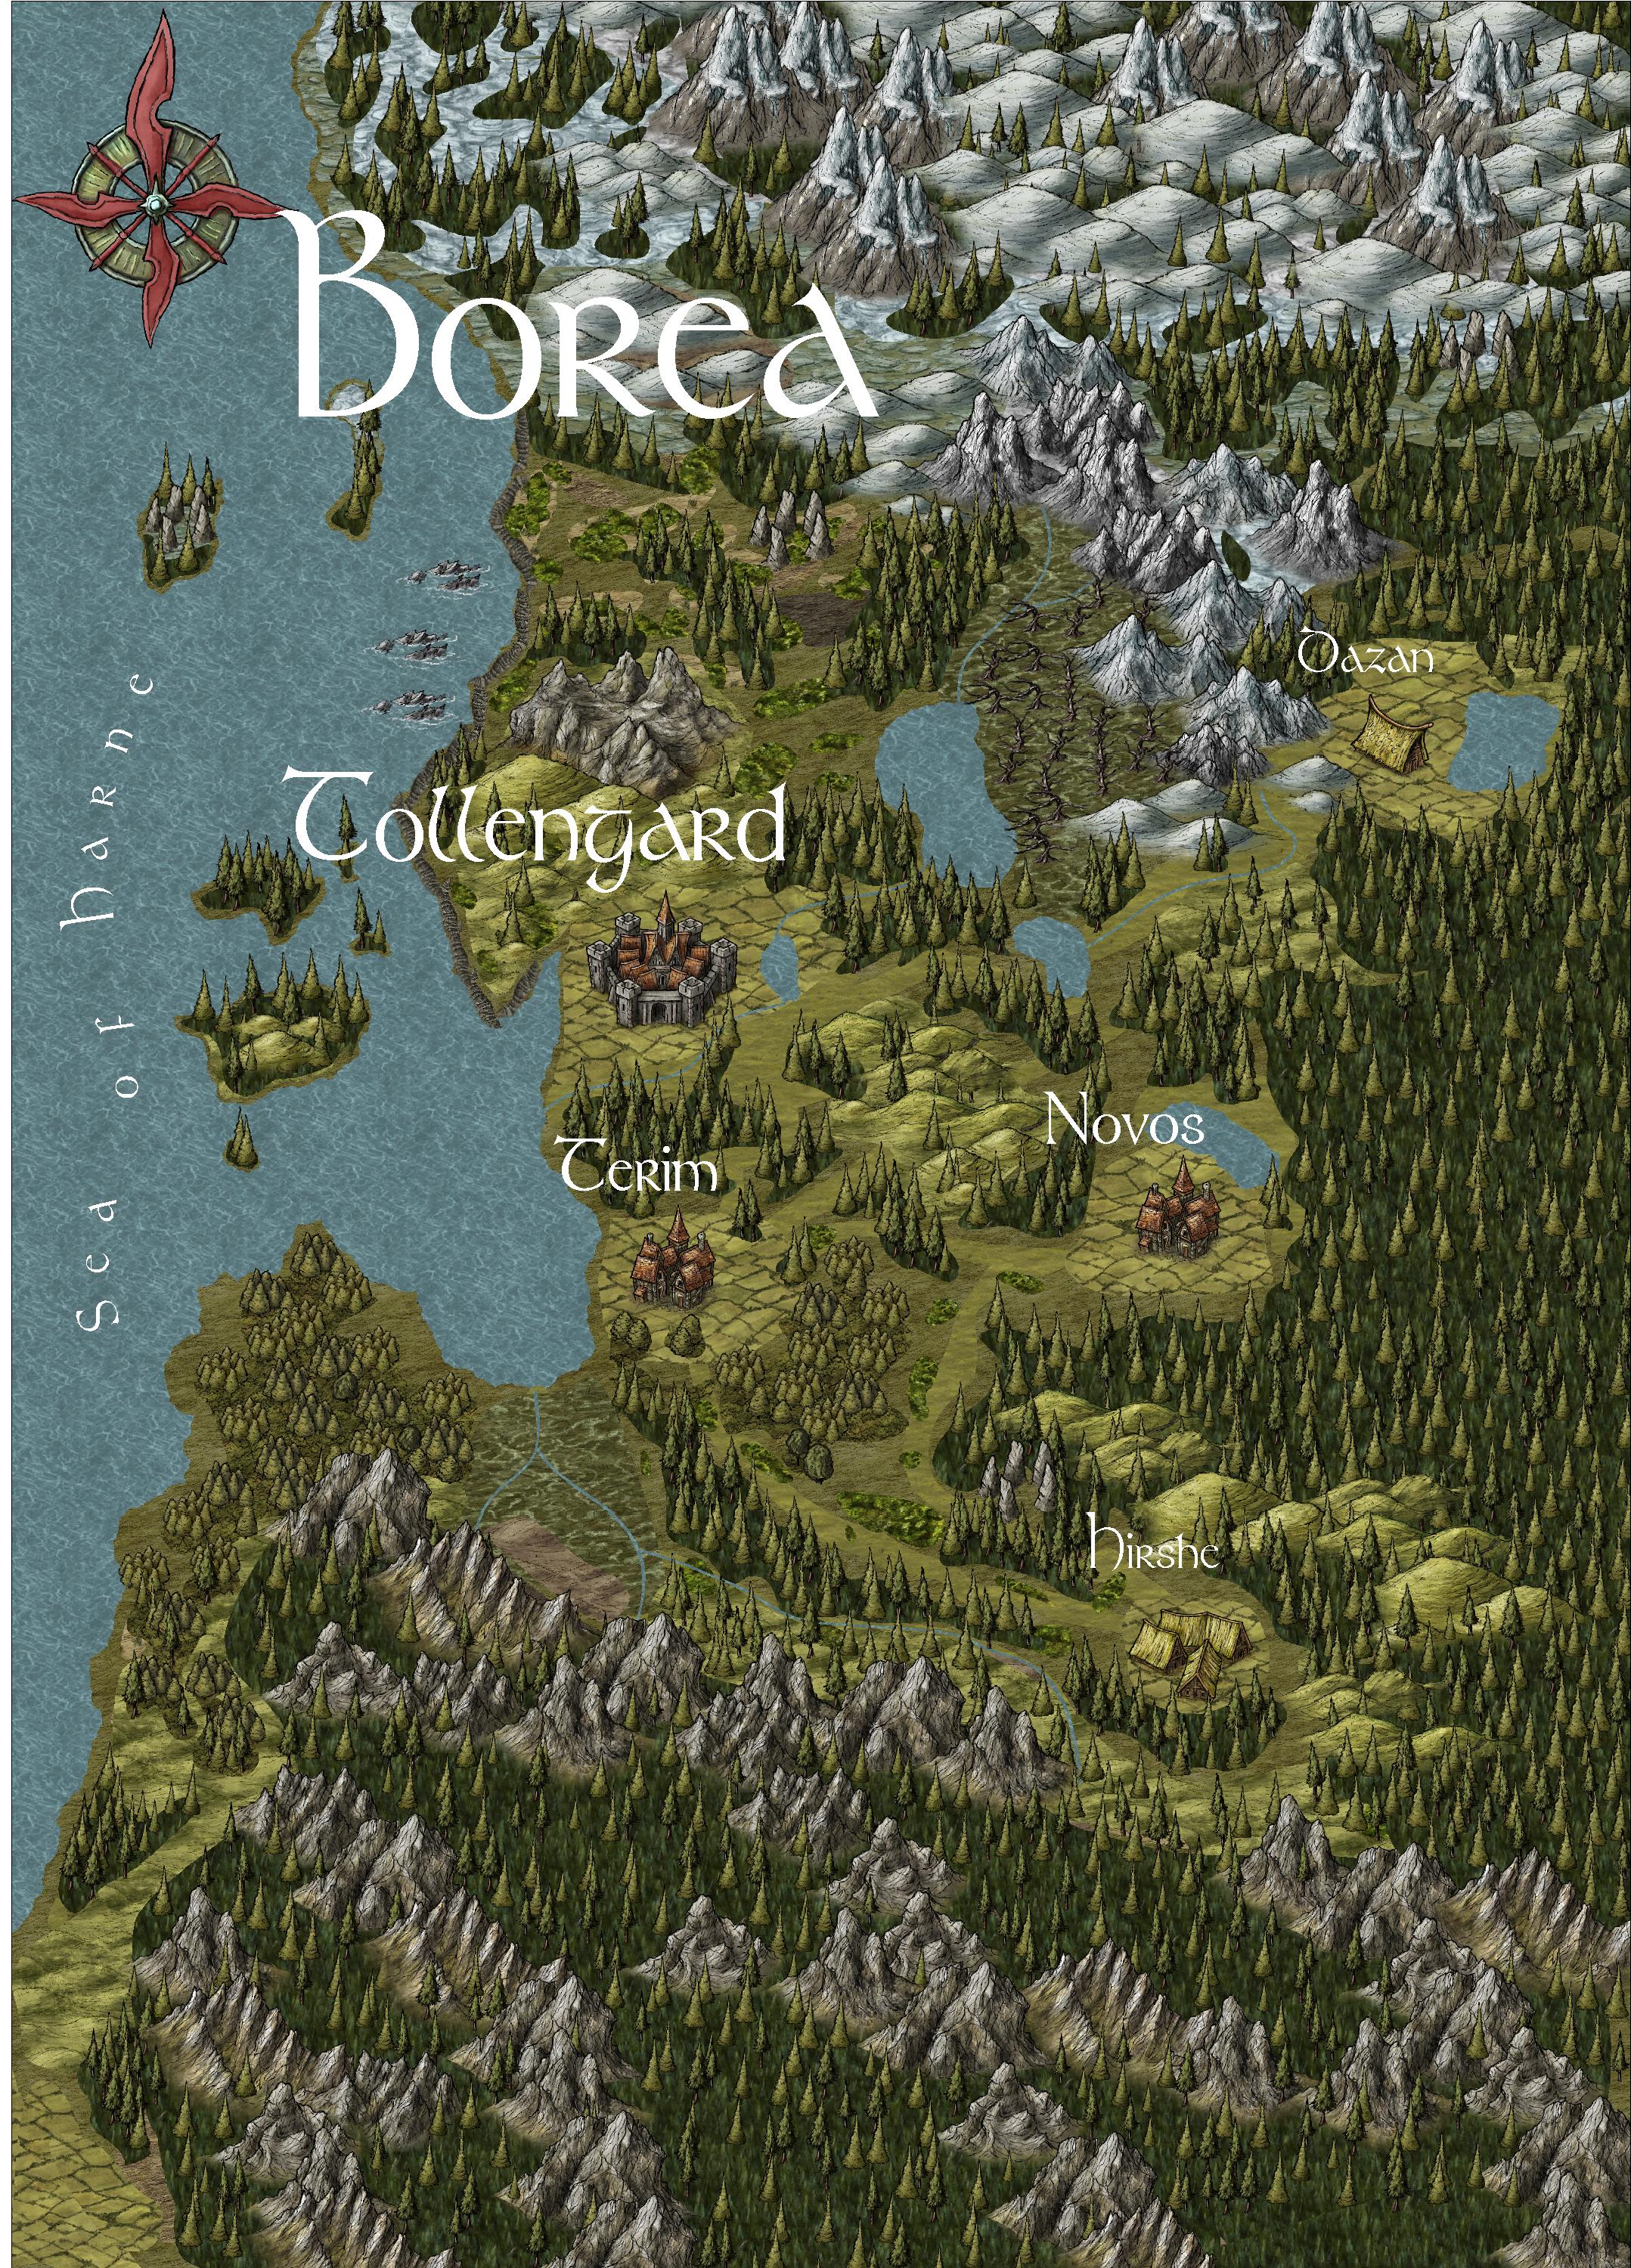
Children had started disappearing from the frigid Borean city of Tollengard since the season’s first snowfall. By the turn of the new year, a total of 6 had gone missing. Each had vanished, seemingly without a trace.
In the beginning, this would simply occur overnight, with cribs being found empty in the light of the morning. However, as the winter wore on, the final pair were apparently snatched when their distraught mothers had simply turned their backs.
No direct ties could be found between the victims’ families and no apparent clues were left behind at the scenes of any of the abductions. There were no tracks nor signs of forced entry. The stricken families seemed to come from all walks of life.
The effect on the morale of the city was notable. Citizens of Tollengard were typically a stoic lot, who suffered through the long winters without complaint. However, the passions rose in even these long-suffering folk as they demanded answers as to what had happened to their children.
The lord mayor, Pavel Ivanov, was feeling the heat. People demanded answers; demanded that he act. Even with doubling the city watch, it was feared that citizens would riot or break down into mobs seeking vigilante justice.
Many speculated that a wood witch had taken up residence on the outskirts of the town and was luring the children away. Others claimed that some ghostly wolf would come and snap the children up in its terrible maw. The theories were numerous, and some made little sense. People simply wanted their children back; they wanted justice.
Borea in the northern reaches.
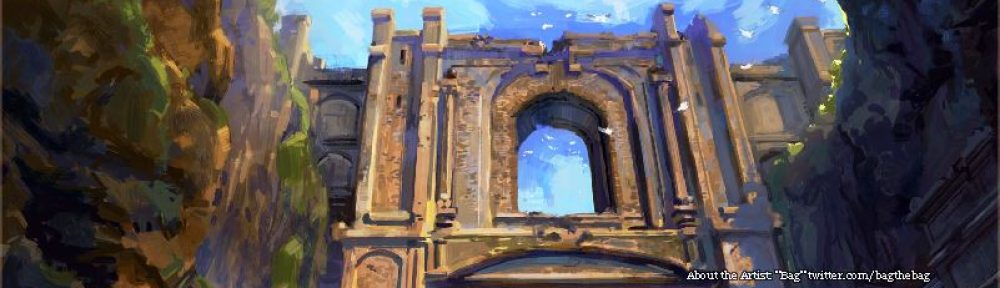
This was the state of things in Tollengard on one sunny winter morning, when things changed forever. Parishioners arrived at the Abbey of Ladina as they did daily. They came to beseech the goddess, patron of the city, for help in returning their children. On this day though, something was not right.
Normally the three monks who tended the church were up an around, welcoming citizens as they came to pray. However, no torches were lit, and no incense burned in the braziers. It was not like the pious brothers to shirk their duties. Clearly something was wrong.
Concerned citizens made their way downstairs to the rectory, to see if perhaps a member of the order had fallen ill. Accessing the monks’ living quarters via the northern staircase, they were greeted by a queer sight.
The foyer at the foot of the stairs was in a state of disarray. In numbers of spots the stone floor was cracked and broken, exposing the earth underneath. It looked as if some great plow had churned through the masonry itself, yet what could have caused this?
The floor of the mess hall to the east was flooded with murky water. This was found later to also be the case with the storeroom further to the south.
There was no sign of the brothers in the sleeping quarters. In fact, all three of their beds were still made. It appeared to the crowd investigating the rectory that all of their modest belongings were also in place.
Coming at last to the sanctuary in the westernmost room of the rectory, the citizens beheld a sight that will vex Tollengard for the rest of its days. The statue there of Ladina appeared to have been desecrated. Some type of viscous green liquid had been splattered about it.
Resting at the foot of the stature, a large stone sarcophagus lay partially open. All assembled knew that this was out of place here. The vessel was empty and obviously ancient, though none of the stone crafters in the city were able recognize its point of origin. On its lid was carved a macabre likeness of a human skeleton, lying under a thin shift.
As bizarre as all of these sights were, they paled in comparison to the final discovery of that chilly morning. For there, snuggled together on the floor of the abandoned rectory of Tollengard, were found the six missing children. All were in good health and appeared unmolested. Being of various ages, all too young to speak, there was no hope of receiving any answers from the babes.
Grateful parents recovered their sons and daughters. In the following days, townsfolk turned both the abbey and the rectory upside down, looking for something to explain the mysterious occurrences. Nothing else of note was ever found, and the missing monks of the Abbey of Ladina were never seen or heard from again.
Final Notes
Thank you so much for taking the time to stop and read this. I hope you find some spark here that you might find useful for a future game. Please drop me a note below if you have any thoughts or suggestions. If you’d like to browse through all of my other maps with plot hooks, you can find them all collected here. Have a great week!
My basic D&D group has been continuing their adventures in my re-imagining of The Isle of Dread. Having spent their initial couple of sessions striking out from the village of Taranoa, the party opted to leave the relative safety of the peninsula and explore the island.
Following a successful hunt with the tribe’s Hawk Clan, party members heard legends of a great treasure hidden in one of the volcanic mountains to the west. The story claimed that an ancient race had lived on the mountain and worshipped a one-eyed god in a cavern temple. Aramjapur, as the deity was called, was said to be all-knowing. His followers prayed to a giant statue of the cyclops featuring an eye cut from an emerald that was the size of a human head.
Traveling cautiously, it took the party 4 days to make their way to the twin volcanos to the west. While they managed to avoid combat, the trip was not without incident.
Just before dusk on the first day, the party spied an allosaurus in the swampland to the north. This caused them to veer to the west and hug the coast.
In the afternoon of the 2nd day, the party stumbled across their first “pylon”. In my previous post I mentioned that I planned to borrow liberally from the old Land of the Lost television series for this adventure. Both this metallic obelisk-shaped booth and the strange tracks (Sleestak) that were found in the area were directly inspired by the show.
On the 3rd day, the party entered the broken lands surrounding the volcanos. A small river meandered between the twin mountains and the party took advantage to replenish their water supply. It took the better part of a day but the party found signs along the northern slope that matched descriptions provided to the by members of the Taranoa Hawk Clan.
Crossing the shallow waterway, the party confirmed that they were on the right track when they identified the crude handholds carved into the rock, leading up the side of the mountain. While hair-raising at times, this allowed even the party’s magic-user to ascend with relative ease.
Natural shelves in the rock were present along the way up, allowing for convenient resting areas during the climb. On the first of these the party discovered the desiccated corpse of what appeared to be a previous adventurer. This was of no great surprise, as the Taranoa had mentioned meeting other outsiders before. However, this did worry the party that perhaps the Eye of Aramjapur had already been claimed by others.
Outfitted in old chainmail, the corpse consisted of not much more than a skeleton. Nothing of value was found on the poor soul, though the party did uncover a sealed scroll case and a discarded short sword. Within the scroll case was a piece of parchment bearing instructions to “beware the children of Aramjapur.”
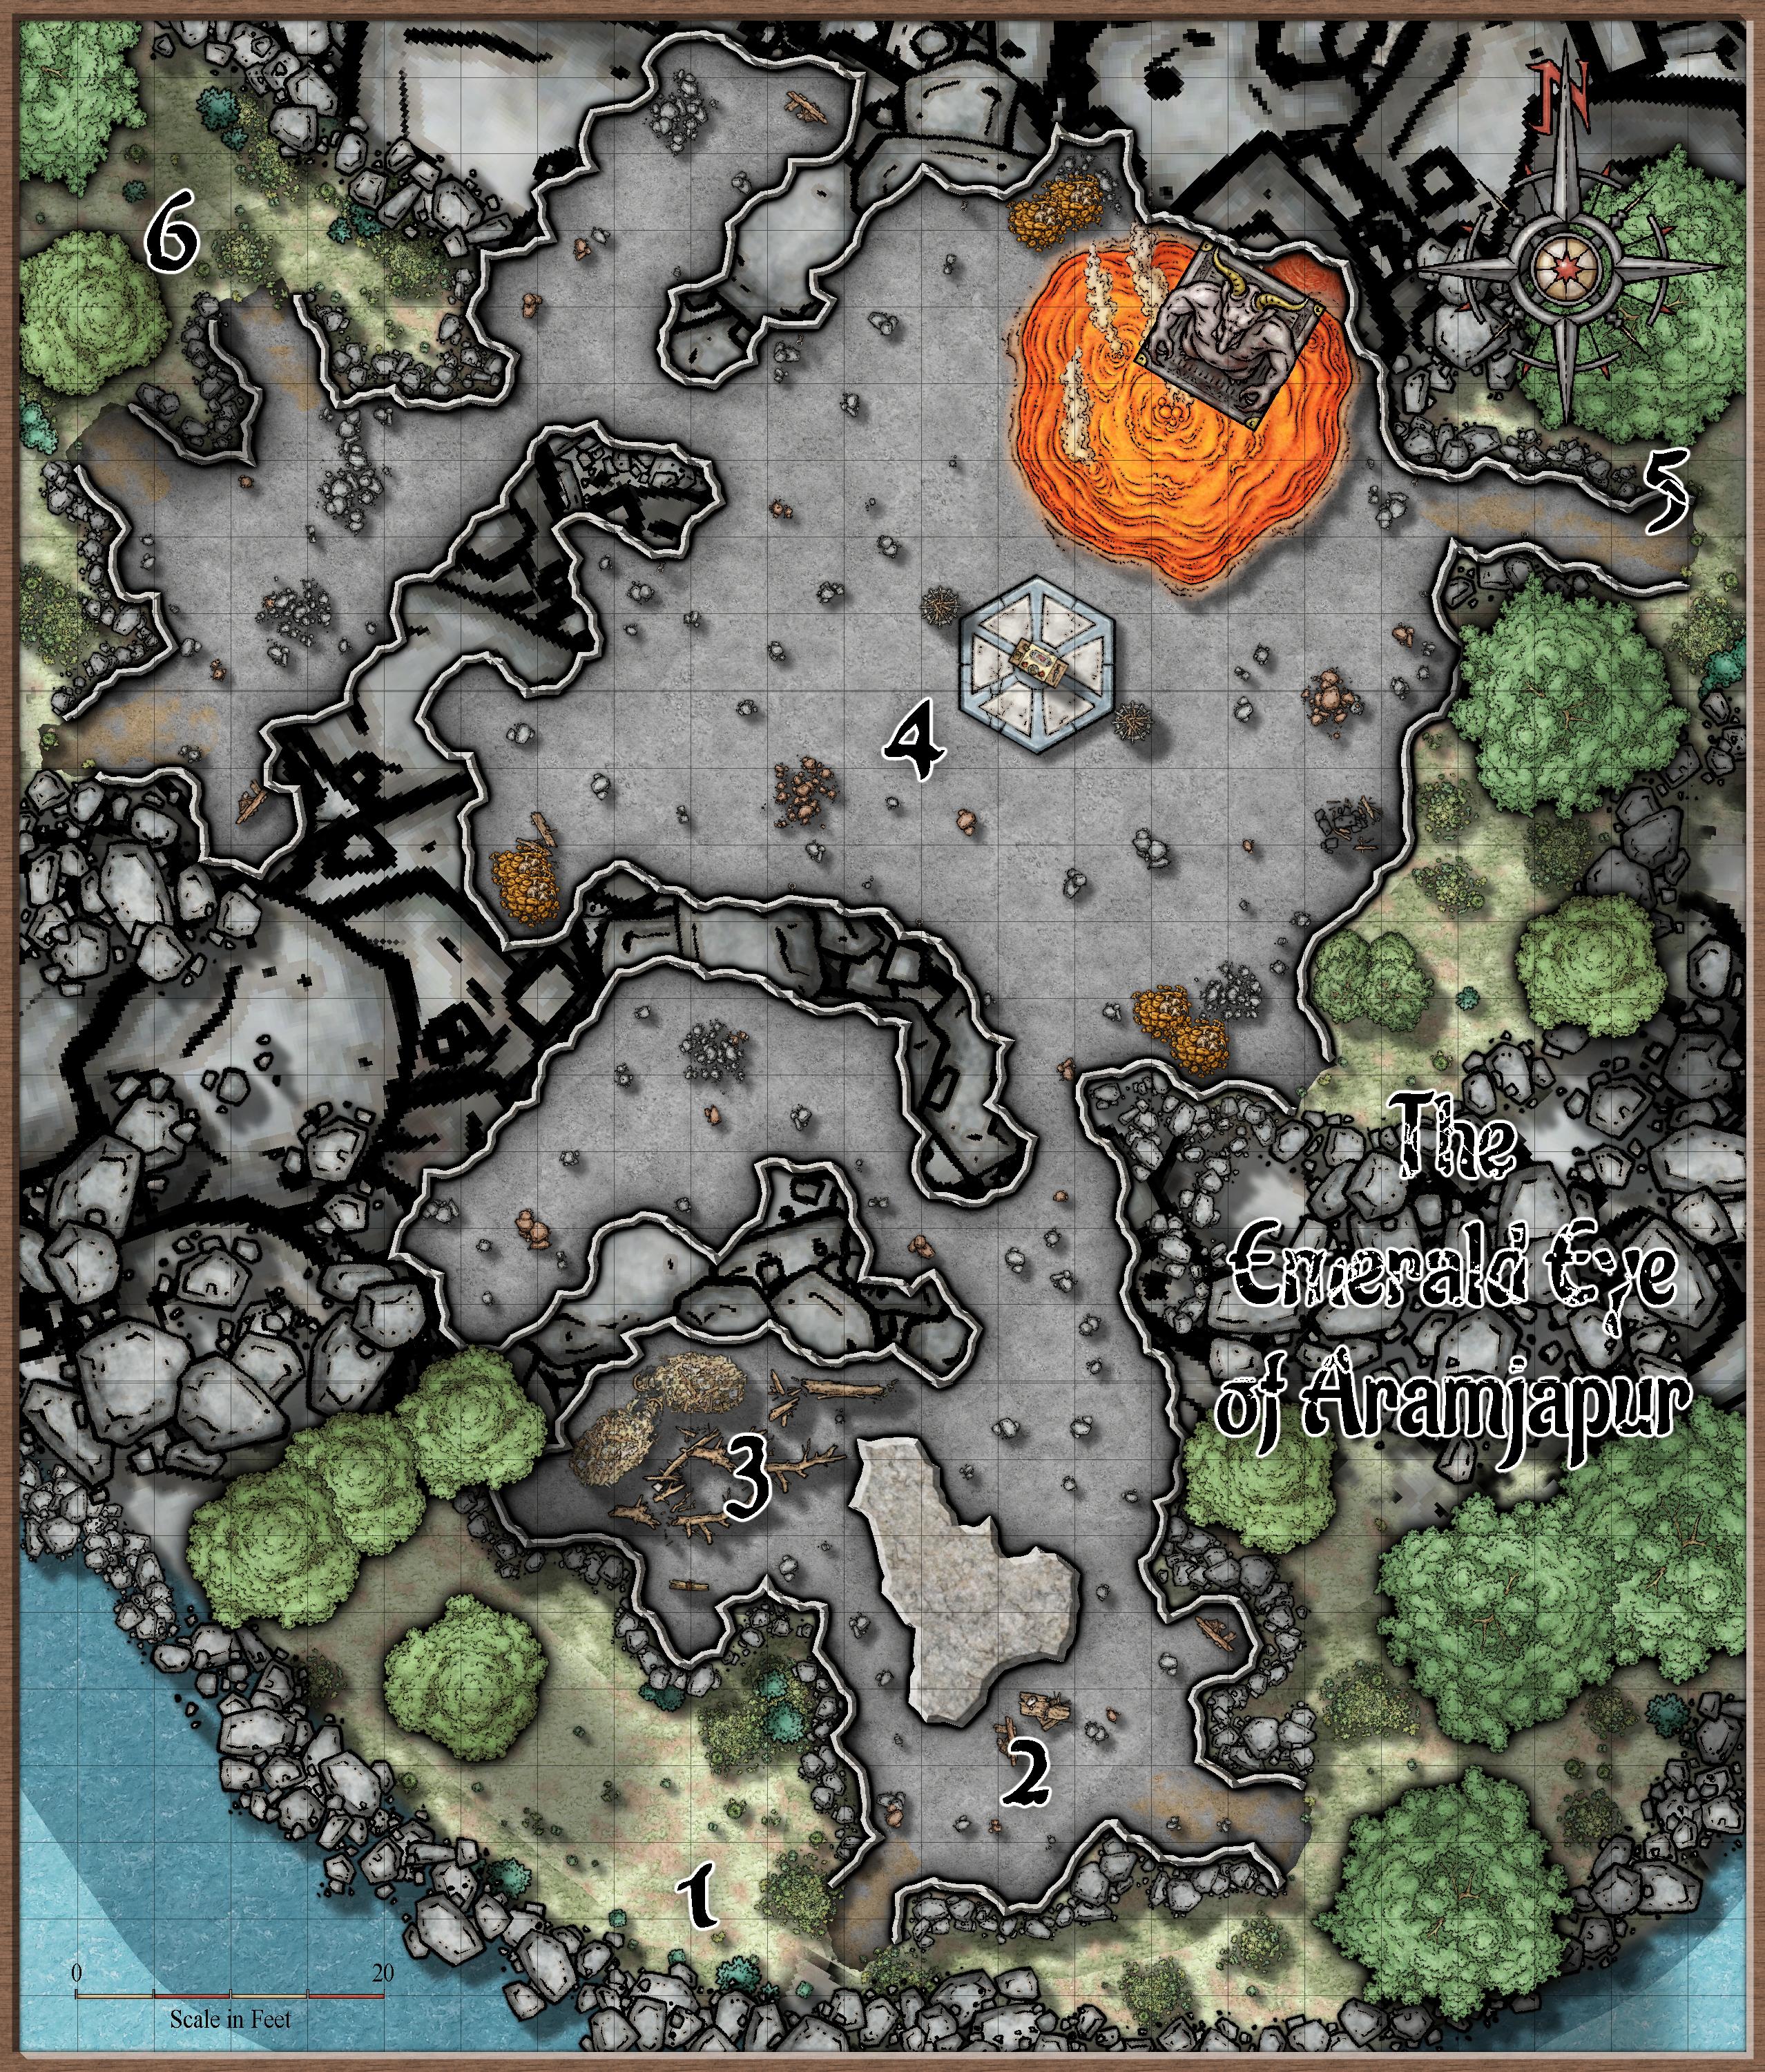
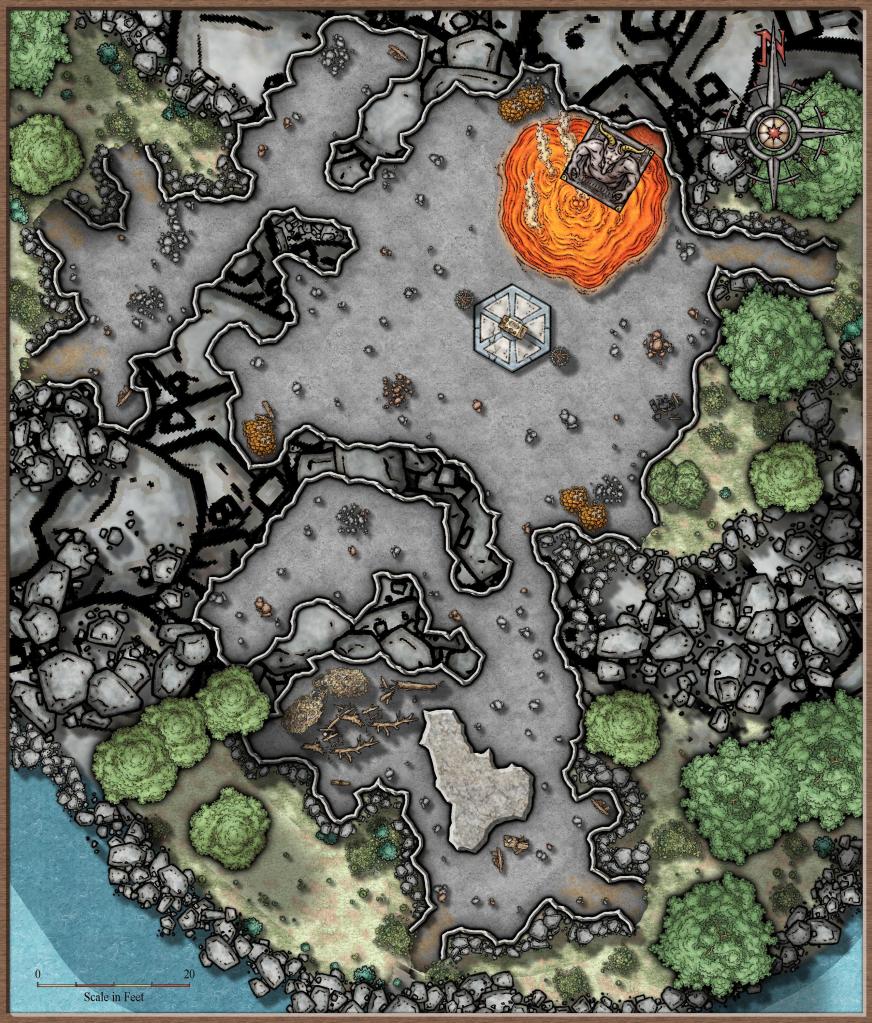
After encountering 3 resting shelves and covering about a 1000’ climb, the party arrived at a much larger shelf with some vegetation and a fairly obvious cave entrance (map location #1).
Map Locations
#1 Shelf
Occurring roughly three quarters of the way up the side of the mountain, this is a fairly large outcropping. A few trees seem to thrive up here and a pair of billitri bushes grow alongside a cave opening. Large cobwebs adorn the trees.
#2 Cave Entrance
Characters entering the caves here will notice that the air is quite warm from volcanic activity. One passage leads to the northwest, while another leads more due north. To the east, another passage leads back outdoors to a smaller mountain shelf, also covered with large cobwebs.
A good deal of debris is piled up in this room. It also serves as the lair for 3 giant spiders who have taken up residence along the side of the mountain. The spiders will attack as soon as the party enters the cave. Digging through the debris will yield a silver dagger and an old coin purse containing 50 gp.
#4 Temple
The large cavern is the old temple to Aramjapur. The room is dimly lit from the lava pool, as well as a bit of sunlight coming in from both of the entrances to the east. Along the northern wall a 30’ tall bust of Aramjapur is ringed by the lava pool. True to the legend, the statue of the cyclops is adorned with a giant emerald eye. In the center of the room, a crude altar sits upon a raised pedestal. The room is otherwise empty, aside from rocks of various sizes and a number of patches of fungus growing about the room.
The lava pool radiates 5’ – 10’ out from the statue, depending on the location. Unless the party has the ability to fly, it appears that they will need to devise some way to safely cross the lava, if they wish to gain the emerald as a prize.
The party could gather sufficient debris from location #3 to build a makeshift ramp across the lava. However, this option would only be sturdy enough to support a character weighting 100 lbs. or less. The only other readily available option would be to cut down a tree outside of area #1 or #5. Assuming the party has a proper axe and goes this route, it will take them approximately 10 minutes to cut down a sufficient tree.
Whichever course of action the party chooses, it will be important to keep track of time. Any party members with applicable skills (or even any who specifically mention that they are looking) will notice numbers of dusty footprints coming and going from this central cavern. Roughly 15 minutes after the party first enters the cave (or earlier if they make a great deal of noise) the “Children of Aramjapur” will start coming to investigate (see location #6).
If a party member is able to access the statue, the Eye of Aramjapur may be pried loose in one round.
#5 Shelf
This tunnel leads out to another mountain shelf similar to the one to the south that the party entered from. The only thing of note out here are 3 stikricki bushes along the side of the cliff.
#6 Exit
3 of the “Children of Aramjapur” lounge in the shade outside of these 3 cavern entrances. These protohumans descended from those who lived on the twin volcanoes for centuries. Standing at roughly 7′ tall, these brutes have a heavy brow and somewhat resemble a cross between a man and an ape. Lacking any verbal language, they will defend their home and the cave system to their death. For my game, I used a reskinned troglodyte stat block (minus the special abilities) but you do what works for you.
Once they detect the party, they will attack immediately and make a great deal of noise. Their grunts and shrieks will soon draw others, so the party will have to act quickly. The “children” will focus their attacks on any party member visibly attempting to acquire the Eye of Aramjapur or approach the statue.
Wrap-Up
How things play out from here is largely up to you. This encounter takes the place of the “Caves of the Rock Baboons” from the original adventure, which seemed rather bland. I created the Emerald Eye of Aramjapur to give things a bit more depth.
There were 15 rock baboons listed in the original adventure and they have similar stats to the troglodytes that I modeled my children of Aramjapur after. Therefore, I surmised that there could be a settlement of roughly 15 of them inhabiting this part of the mountain.
For my game I turned it into a bit of a moral conundrum for my players. The Children of Aramjapur are not evil beings but they will keep coming and defending their home. 4 rounds after the initial 3 attacked and were dispatched, I sent in another 3. The waves of attackers made it increasingly difficult for the party to cross the lava and secure the emerald. At that point one of my players started to question whether this was a noble cause, while another worried that a whole village of the brutes might appear in the next wave. Ultimately my party ended up beating a hasty retreat back down the side of the mountain, leaving the Eye of Aramjapur safely behind.
That is all for now. Thank you for stopping by. If you’d like to browse through all of my other maps with plot hooks, you can find them all collected here. Please take a minute to say hello in the comments below. Have a great week!
Gather round the fire, you children of the jungle. Let it be known by you that the wilds of our homeland can be harsh indeed. Even our mighty heroes and wise elders are, at times, at the mercy of the land. You must learn that, in times of need, the jungle itself can provide for its people. Beware, however, for just as an incautious man may find himself in the belly of the tiger, so too can malady befall one who is careless with the bounty of the wilds.
-Bhagiro Hatti, Gowandian Scholar
Intro
I mentioned in a previous post that one of my groups will be revisiting The Isle of Dread.I spent some time over the holidays prepping for our January sessions and stumbled across some old articles that I had written for the Polyhedron Newsine. I wrote Weeds of Wonder for issue #108 in 1995, as part of the RPGA’s Living Jungle campaign. Since I am going to be dealing with a jungle setting, I decided to reprint it here.
Weeds of Wonder
Below is a partial list of some of the more useful plants to be found within the jungles of Malatra. There are, of course, many others awaiting discovery; some of these will have benign properties, while others will be harmful or even toxic.
Most intelligent inhabitants of Malatra should be aware that plants like these exist. Heroes with herbalism, survival, or other appropriate skills should be allowed a proficiency check to identify or locate these plants.
Stikricki Bush
Part used: Whole Bush
Description: Found only in dry areas of the Rayanna Savannah, this gnarled, woody Bush appears dead even when flourishing. Actually, it is nothing more than a tangled ball of razor-sharp thorns. The Bush seems to serve no other purpose than to shelter small animals which often seek its cover on the otherwise open savannah.
Uses: After carefully harvesting the Bush and allowing it to dry in the sun (this normally takes two to five days, assuming that it is not the rainy season), the bush may be broken into many pieces. These pieces may then be efficiently used as caltrops. Any person with bare feet moving through an area containing stikricki bushes suffers one hit point of damage. In addition, he will have to make a successful save against paralyzation in order to keep moving through the caltrops. Two mature stikricki bushes will bear enough thorns to cover effectively a 10-foot square area.
Description: This distinctive plant has stems that vary in length from two to four feet. Broad leaves surround the plant, and its flowers are large and white with Violet centers. The root is sandy brown and very bitter to the taste. The tiki is found only in humid regions which receive a fair amount of sunlight.
Uses: For as far back as they can remember, the inhabitants of Malatra have been using the root of the tiki plant. Anyone versed in the knowledge of this plant can boil the roots in water to create a thick, pungent brew which will slow poison as does the second level priest spell slow poison. These benefits, however, are granted only if the person drinking the brew also gets complete bed rest.
Gualla
Part Used: Juice from stem
Description: This is a fairly large plant, growing to nearly six feet in height. The leaves range in color from light green to yellow and are long and thin. The flowers are delicate and yellow, and the gualla produces clusters of golden berries. There is a common legend among various tribes that the Ancients brought gualla with them when they came to Malatra.
Uses: Within the stem of the gualla is a thick chartreuse liquid, the juice has a luminescent property which causes it to glow in the dark period objects or persons covered in gualla juice will glow with a faint green light which will be visible from up to 60 yards away in the dark period the juice will lose its luminescence approximately 12 hours after being exposed to the air, although it can be stored in an airtight container for months.
Description: Magasorium is a short, stocky plant with thick, flat leaves. It is entirely green, except for black ribbing along its leaves. Magasorium grows abundantly throughout the Malatran jungle. However, since it grows close to the ground, often it can be hard to find.
Uses: Magasorium is an excellent repellent against the many insects of the jungle. For personal use, the leaves are crushed, and the juice is rubbed on the skin. This application will remain effective for approximately 4 hours (less if the recipient is engaged in strenuous activity). Some tribes also burn the plants in order to keep insects away from their villages.
Description: Billitri is a fragrant, delicate looking plant with numerous slender leaves. It is commonly found on hills and on the sides of mountains. The stem is about 6 inches long and usually produces 3 flowers, which are lavender with golden centers in color.
Uses: The juice from the leaves of the billitri is so fragrant that its scent will remain for days with a person who has applied it to his skin. Many hunters of Malatra use crushed billitri leaves to mask their scent while stalking their prey. The fragrance is strong enough to mask their natural scent, rendering them difficult to detect by creatures that rely on their senses of smell. Some crafty heroes, when being chased by keen nosed predators have been known to lead the creatures through a patch of billitri. Even in its natural state, billitri’s fragrance is strong enough to deaden temporarily the sense of smell of a creature that gets too close to the plants. Although this is not a guaranteed method of throwing off prey, it has worked often enough to make it worth an attempt.
Description: This is a short Bush with slender branches. It grows in dry soil, near the edges of the Rayanna Savannah. Its stems are covered with tiny, cactus-like thorns. The flowers are delicate and white with four petals. Those harvesting the berries of the biseechee bush must do so cautiously, for cobras often make their homes in the areas where these bushes are found.
Uses: The berries of the biseechee bush have incredible healing properties. Many of the Nubari believe these bushes to be gifts from the Ancients. Eating the berries will heal 1hp per berry, to a maximum of four hp over a 24-hour period. Unfortunately, these berries lose their special healing properties within a day, so heroes must seek them out whenever they need them.
Manriki Bush
Part Used: Berries
Description: This short bush looks very similar to the biseechee bush and the one is often mistaken for the other. A close inspection will show that manriki berries are a deeper shade of red and its flowers have only three petals. As with the biseechee, the manriki can be found on the outskirts of the savannah.
Uses: The berries of the manriki bush are extremely toxic to most humanoids. Though they taste sweet and pleasant at first, they quickly cause intense headaches, nausea, and dizziness. Anyone eating them will need to save against poison at +2. If the save fails, the victim will start to see spots shortly after ingestion. Within an hour, the victim will become blind. Any method of slowing or neutralizing poison will affect the onset of this blindness. The blindness will wear off on its own in 3-10 rounds. Blinded characters suffer a – 4 penalty to their attack rolls, and their opponents gain a + 4 to their attack rolls against them, for the duration of the blindness.
Manshooki Tree
Part Used: Vines
Description: The manshooki is a towering tree found in the deepest recesses of the jungle. It closely resembles a massive willow tree, with hundreds of vines dangling down to the jungle floor. The limbs of the manshooki tree are more than strong enough to support humans. Many of the Malatran tribes build storage platforms on these trees high enough off the jungle floor to protect their provisions from prowling jungle animals.
Uses: The vines of full grown manshooki trees are extremely strong and vary in length from 20 to 130 feet. As they are even stronger than hemp, more limber, and narrower in diameter, many inhabitants of Malatra prefer them to ropes woven from hemp. Ultimately, the vines are not as durable, becoming dried out within 3-4 days after being removed from the tree, after which time they could break at any time.
Final Notes
The RPGA’s Living Jungle campaign was written for Advanced Dungeons & Dragons 2nd Edition and was located within the Forgotten Realms campaign setting. Because of this, some of the proper names are specific to Toril. If you are using another campaign setting, such as Mystara or a homebrew, it should be easy enough to make the necessary changes.
While these were originally written for AD&D 2e, I think everything is tame enough that it should work with pretty much any old school or current system with minor tweaks. For instance, I do not believe slow poison existed in B/X or BECMI but I that would be easy to work around.
I have been running a group using the Rules Cyclopedia (with various tweaks) for about 6 months now. While it started as an experiment, it has become a fun endeavor. Up to this point, I’ve put them through their paces in “The Tower of Zenopus”, “Caves of Chaos”, and various homegrown one-shots.
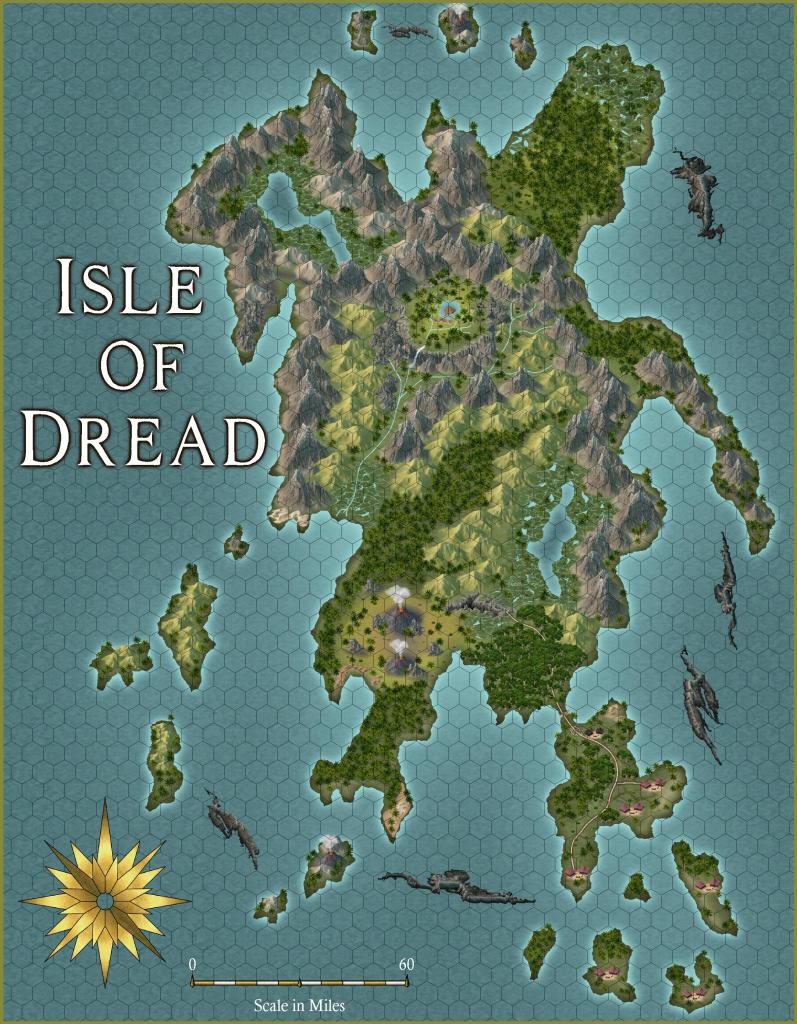
Going into our holiday hiatus, the group consensus is that they would like to continue. I’ve spent the past week deciding where to take them next. Having enjoyed our previous romps through classic adventures I’ve decided to continue retracing the steps of my youth and chart a course for TheIsle of Dread.
My stab at the classic Isle of Dread map. Made using the Campaign Cartographer annual Spectrum overland style.
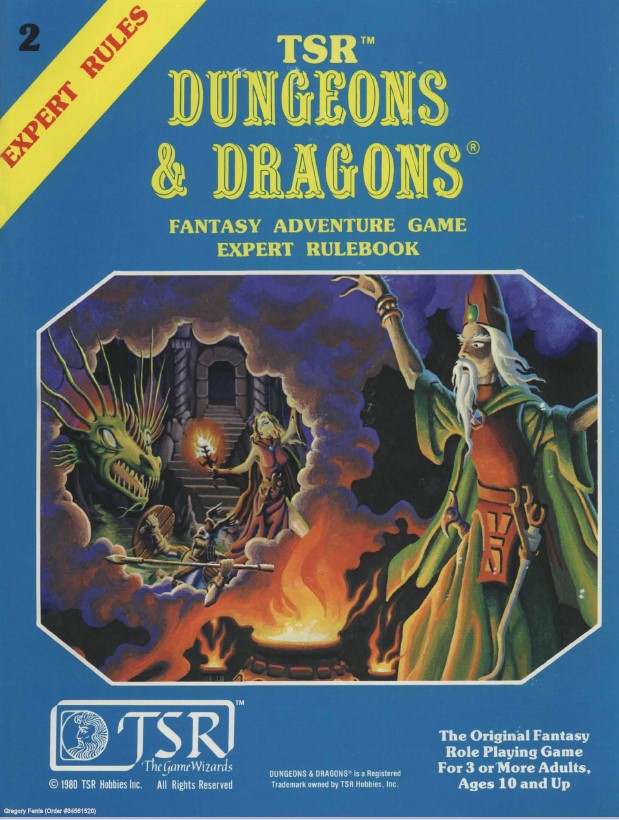
If you are reading this, it’s quite likely that you are well-versed with the module already. Released in 1981, I received my first copy of the David “Zeb” Cook & Tom Moldvay adventure inside the Dungeons & Dragons Expert Set.
D&D Expert Set rule book from 1981.
As the adventure is largely a wilderness exploration, this will be a perfect opportunity to shift my game a bit. Some of our other friends have been eager to join, while a couple of my current players are going through a hectic period at work. Exploring The Isle of Dread will allow me to take more of an episodic approach to my game, with somewhat of a West Marches style.
After making contact with a group of islanders on the southeastern peninsula, the party will establish a base camp. My sessions will then start as one-shots, with different groups of PCs striking out each week to explore the mysteries of the island. This will hopefully keep us nimble and allow us to get through the winter without any canceled sessions due to the lack of players. As we progress a bit, it’s likely that the group will find another location suitable for a forward base deeper within the island.
Hex version of my map. Click for full image.
These days I derive as much fun from making maps as I do from running the games themselves. This practice seems to fill the void created when I stopped painting minis years ago. While the original hex style map for The Isle of Dread will always be dear to my heart, I wanted to make my own version. I settled on the Annual Spectrum style for Campaign Cartographer and took a stab at it.
While I have a lot of fond memories of The Isle of Dread, the adventure as written does not really lend itself to the story I am looking to tell. I will still introduce the island as a location by allowing the party to discover a secret page from a ship’s log and partial map (I created a new version of this as well). However, aside from these details I’ll be changing quite a bit.
Ideally, I would like to hit my players with a number of stand-alone adventures, while also sprinkling some bread crumbs of an overarching story. To do this, I plan to steal liberally from a couple old guilty pleasures of mine.
Inspiration
The Lost World promo shot.
Sir Arthur Conan Doyle’s The Lost World was a syndicated television series, very loosely based on the 1912 novel. The book itself was likely an inspiration for The Isle of Dread in the first place. It premiered in 1999 and ran for three seasons. The show follows a diverse group of early 20th century adventurers after their hot air balloon crashes on an uncharted plateau where prehistoric creatures still exist.
It was a cheesy production; I suspect owing much to the previous successes of shows like Hercules: The Legendary Journeys & Xena: Warrior Princess. Like these predecessors, each episode loosely followed a “problem of the week” format, while also occasionally touching on the larger story of who the characters were and how they might get off the plateau.
I am not here to claim that this was great television. However, it crossed my path at a time in my life when I was about as far removed from the hobby as I had ever been. I suspect this is why it stuck with me. Something about turning on the TV and seeing these silly stories play out really stoked my imagination. It brought back memories of my youth and playing D&D with my friends. I started to daydream about a time in my life when I might have the time to start gaming again.
The entire 66-episode run is currently available for Amazon Prime subscribers. I have been binging it while I doodle on my maps and making notes. Despite the fluff and gratuitous cleavage shots, I am mining a number of good ideas for one-shot adventures.
The other source that I will be looting for ideas is The Land of the Lost. To be clear, I am not referring to the Will Ferrell movie but rather the 1974 children’s adventure television series by Sid and Marty Krofft.
Land of the Lost title card.
The show’s 3 seasons tell the tale of the Marshall family, who while on a river rafting trip, end up in an alternate universe. Rick Marshall and his children Will and Holly become trapped in a land that time forgot, a place inhabited by dinosaurs and other strange creatures.
The Land of the Lost was every bit as cheesy as the Lost World and was clearly aimed at young children. However, despite all of this there are some elements that I think would make compelling additions to my revised Isle of Dread.
The Sleestak were a race of reptilian bipedal humanoids native to the Land of the Lost. Covered mostly in green scales, they have claws on their feet and hands which can function as pincers. Typically armed with crossbows and nets these unique creatures captured my imagination as a child and will make for great reoccurring villains.
Scheming Sleestak
The remnants of a dying race, the Sleestak reside in a Lost City with subterranean tunnels built by their ancestors. All of this sounds like a great fit for the caldera location in the center of the Isle of Dread.
Finally, scattered about throughout the Land of the Lost are numerous pylons. These futuristic constructs contain matrix tables filled with crystals, each serving as the power source to control different aspects such as the weather or passage of time. The World of Warcraft paid homage to the pylons & crystals in the Un’Goro crater zone, and I think they will be a fun addition to my game as well.
Final Thoughts
That is my plan. Do you ever go in and add your own touches to classic adventures? If so, please share in the comments. I would love to hear what has inspired you and what sources you use for inspiration. I would also like to hear from anyone else who may have been inspired by either of these properties in the past.
Thank you for stopping by. Please take a minute to say hello and if you’d like to read some more, here are some convenient links
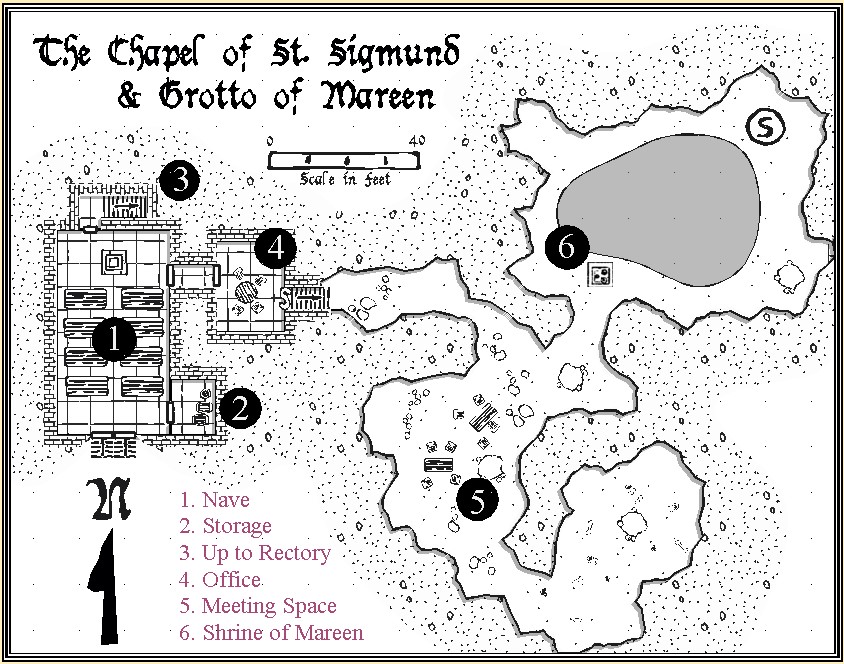
For hundreds of years, the residents of the northern shores of the Sea of Harne have been followers of the cult of Mareen. These simple seafaring people regularly sacrificed a portion of their catch to the brooding queen of the seas, in hopes of fair weather and bountiful waters.
As the Graun Empire’s influence spread over the land, the church of Aunul grew in power. Sailors spread word to the seaside communities that the emperor and his ever-present religious advisors did not view worship of the elder gods as acceptable.
Fearful that inquisitors would arrive one day and brand them as heretics, the residents of Hammondsport acted. A new chapel for the church of Aunul was constructed over the underground grotto that housed their shrine to Mareen. In a comical twist, the chapel was named after a St. Sigmund, a devout follower of Aunul who drowned while trying to spread the faith.
The community goes through the motions of having shifted to the faith of Aunul. However, it is largely a show for outsiders. On all of the old holy days, townsfolk don their robes and meet, well after dark. Slipping through the secret door located in the office, they make their way down into the grotto. There they gather at the altar and make their sacrifices to Mareen as they have for generations.
If you’d like to browse through all of my other maps with plot hooks, you can find them all collected here.
Whether you run a heroic fantasy campaign or prefer something gritty and dark, it’s likely that your players will look forward to the moment when their foes finally drop. Early in the career of any adventuring party, PCs start rummaging through the belongs of fallen opponents in search of loot.
As a GM, it’s fun to watch your players get excited to discover what treasures they have found. However, it can be a bit of a slippery slope. Gold and gems can feel too mundane to be satisfying, while too many magical goodies can throw your game into an unpredictable state.
I like to keep my players on their toes with unusual items that they are not expecting. By sprinkling in occasional pieces of unique loot I’m often able to spark the imaginations of my players, while also creating a reason for them to buy into the story at large.
This week I have compiled a list of 25 different items that your party might discover while looking for loot. Hopefully you can drop some of these into your game. You may roll a d100 and let fate take its course or peruse through and see if something strikes your fancy.
01-04 Treasure Map: This is straightforward. The map can be for something you already have planned or you can wait to see if they ever pursue it. Either way, their foe was carrying a map that marked the way to some great treasure. Will they become treasure hunters?
05-08 Mag of Marbles: A simple bag of marbles. The question here becomes “what will the party do with them?” Enterprising adventurers might use them as simple baubles to trade with creatures they meat, or perhaps they throw them to the ground while making a desperate escape. It’s fun to see what they will come up with.
9-12 Love Letter: Somehow the villain your party just dispatched came into possession of a rather steamy love letter. Who was it from? Has the author or the intended recipient met their final fate or are they simply locked away somewhere? Will the party try to find out or will they simply move on?
13-16 Wanted Poster: Rifling through the belongings of the fallen foe, the party discovers a wanted poster. The posted might feature a notorious villain, a “harmless” NPC that the party encountered a couple sessions ago, or even one of the PCs themselves.
17-20 Spyglass: If the system you’re using doesn’t happen to have specific rules for such an item, it’s easy enough to come up with something. Make it a worthwhile little trinket for your party.
21-24 Invitation: The party discovers an invitation for x number of people to a masquerade ball. There’s a lot you can do with this one. Perhaps the fallen opponent had been the invitee or perhaps they had simply come into possession of the invitation. Who is throwing the party? It could be the BBEG, an influential NPC, or perhaps the person who owns some MacGuffin that the party needs to acquire.
25-28 Key: An ornate key is found. There may be documentation included as to what the key unlocks, or not. The key might be useful in an upcoming adventure or perhaps it would give them access to unexplored areas that they had to pass by during a previous engagement. Alternatively, it may be a fragile skeleton key that would give them a percentage change to open any lock but likely break once used.
29-32 Bag of Toys: The party discovers a bag of finely made handmade toys. While they might fetch a decent price on their own, the party might gift them to the child of a landed lord, to gain favor. Perhaps they give them to the local street urchins who will then thankfully be their eyes and ears in the city.
33-36 Diary: A carefully wrapped diary is found. Who did it belong to and what secrets does it hold? Does the party use it for blackmail, sell it to the highest bidder, or return it quietly to the rightful owner?
37-40 Bag of Bones: Is this just a grisly discovery or does it give the party some valuable insight into something? What type of creature are the bones from? Do they carry any value with local alchemists?
41-44 Peculiar Coins: The party has never seen coins like these. Possibly they are oddly shaped or forged from strange new metal. Perhaps they are stamped with the visage of some horrible abomination.
45-48 Mislabeled Potion: This is the only item on the list that is magical. It has magical properties; it just doesn’t do what it says it does.
49-52 Bag of Caltrops: It’s fun to watch what the party comes up with for these. If your system doesn’t happen to have specific rules for these, it’s easy to whip something up. Something like: “Covers a 5’ square area. Creatures not moving carefully through must save or take 1-2 damage and be immobilized for a turn.”
53-56Troop Movements: The party finds documents detailing the upcoming troop movements in a local conflict. What will they do with this information? They might use it to sneak behind enemy lines, win the favor of a local lord, or sell to the highest bidder.
57-60 Exotic Creature: The party discovers a small cage containing an exotic creature. Will it become a pet? Will the party sell it to a local noble? Does it simply become dinner?
61-64: Piece of Chalk: While perfectly mundane, I love seeing what my players will do with chalk. Are they marking subterranean passages with it, sharing with peasant children, or grinding it up into a fine powder?
65-68 Flamboyant Hat: Unbeknownst to the party, this foppish headpiece was recently stolen from a wealthy noble. Describe it as you wish. However, it will instantly be recognized in town if the party tries to sell it or wear it.
69-72 Fireworks: Party finds a bag of fireworks. This is another one where it’s just fun to sit back and see what the party finds to do with them.
73-76 Jar of Ink: This is a 1-quart jar of black ink, capable of making quite a mess. Let’s see what the party does with it.
77-80 Secret Map: This is a map of a local cave complex or building. However, all the secret entrances are labeled.
81-84 Important Missive: This piece of parchment details the most recent orders from someone. Perhaps it’s from your BBEG to one of his lieutenants. Alternately it could be from a guild leader taking action on one of their rivals.
85-88 Body: The party finds the remains of a somewhat famous person who was not known to be deceased. Will they go to the authorities, or would that risk them being blamed?
89-92 Tome: This musty old tome contains lore about something specific within your world. It could pertain to history, geography, or politics. There’s no need to flesh out the whole book. Just allow your players a % chance to find a relevant bit of information if they spend time reading through the pages.
93-96 Mystery Box: This appears to be a simple wooden box with the dimensions being up to the GM. While a mundane item, characters taking time to really investigate it will discover a finely crafted hidden compartment.
97-100 Inheritance: This final one is a bit of an homage to the classic The Enemy Within campaign for WHFRP. The party finds a notarized document claiming that the bearer is entitled to a large inheritance. No need to take the Warhammer route here but it obviously creates some fun moral questions for the party.
That’s all for now. Do you have any bits of mundane loot that you’ve handed out to your players to spur their creativity or help develop your story? If so, please comment below. I would love to hear what has worked for you. Have a great weekend and good gaming!
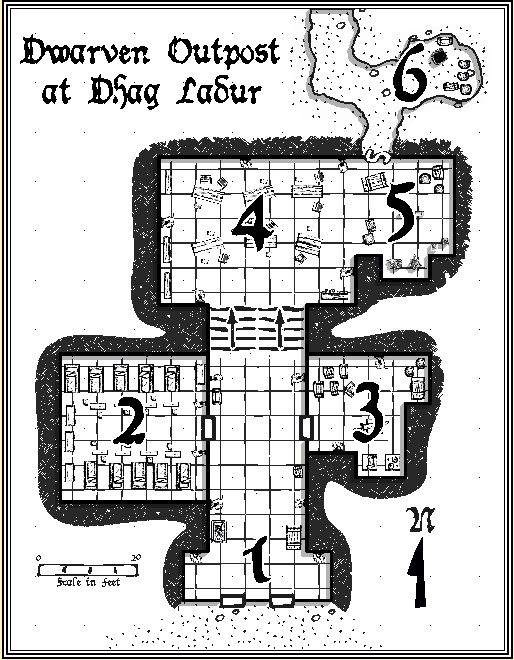
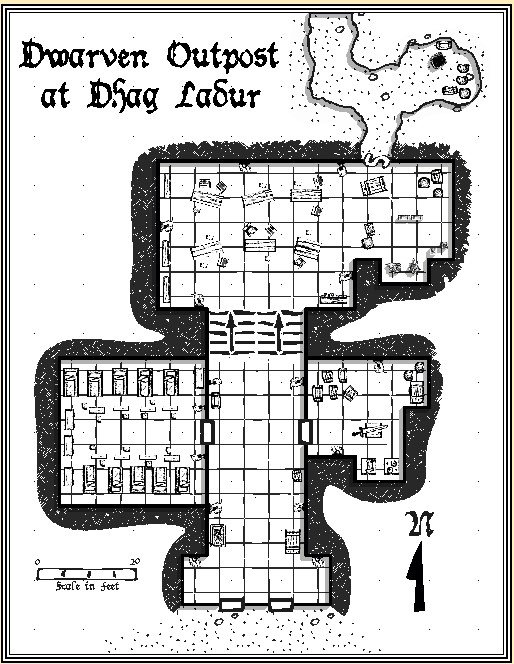
The dwarves of Khared Draz hold the Iron Mountains from Nur Badur in the south, all the way to the frosty Borean border in the north. This simple outpost found at the pass of Dhag Ladur is typical of watch posts found throughout the region.
Entrance: Built into the side of the mountain, double doors reinforced with iron bands mark the entrance to the outpost. 2 sentries are always stationed at the entrance, while 2 others roam further afield.
Dormitory: 10 soldiers are stationed at the outpost during any given time. During each 2-week stint, this room is where they store their belongings and get their sleep. The furnishings are modest but sufficient.
Armory: Weapons are stored and cared for in this small room. A small forge is located on the southern wall and is vented to the outside.
Mess Hall: This spacious room is where you can find most of the dwarves when they are not on duty or asleep. Long benches run the length of the room and a fire is kept burning around the clock.
Kitchen: This isthe command center for the cook. Meals are prepared and ale is provided throughout the day for soldiers who are not on duty.
Tunnels: The tunnels can be accessed through a secret door located in the kitchen. The small cavern to the east house spare supplies and a well. In the event of an attack, the dwarves have the option of barring the entrance and retreating into the tunnels. The tunnel to the north twists around and leads to an alternate exit from the mountain.
Thanks for stopping by. This week’s map was made with Campaign Cartographer, using the “Annual Inked Dungeons” style. Hope you have a great week and manage to fit in some time to roll some dice. Good Gaming!
If you’d like to browse through all of my other maps with plot hooks, you can find them all collected here.
In ancient Xanti, there is a common belief in reincarnation. Among the worshipers of the cult of Kaa, tradition dictates that wealthy nobles be buried along with their belongings, in elaborate tombs.
The tenets of their faith claims they will be reunited with their possessions in their next life. Whether this be truth or folly, only the gods know. However, woe to the dessert thief who tries to claim these riches for herself.
-Bhagiro Hatti, Gowandian Scholar
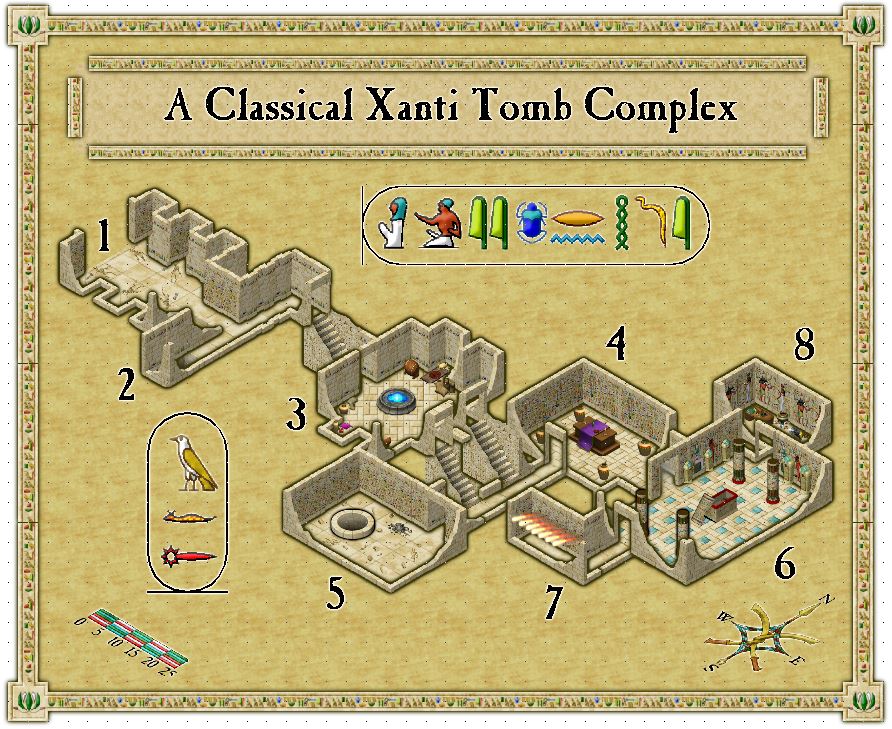
1. Entrance
The entrances to Xanti tombs are often built into the side of canyon walls. Purposely left open, as a welcome to the gods, they are occasionally sealed off with sand from blowing desert winds. It is believed that when a tomb is sealed off in such a manner that the inhabitants will be forsaken by their deities and lose their opportunity for everlasting life.
While not sealed, Xanti tombs are not without their protections. Necromancers place tomb guardians in the form of skeletal warriors at the entrance of the complex. This particular tomb holds 6 such guardians in niches to the left and right of the entrance.
Each armed with a khopesh, these skeletal figures will remain lifeless unless someone intrudes on the tomb. Once disturbed they will animate and seek to eliminate the threat.
2. Dead End / Pit
This corridor halts at a dead end, with a 10’ deep pit. To the inexperienced, this may at first seem to be a very obvious trap. However, this is actually a very purposeful key to the tomb, placed by the architect.
Any who have studied ancient Xanti burial rights will know what this portends. This signals to any future caretakers that the safe pace through the tomb is to take the leftmost choice at any intersection.
3. Offering Room
This room contains 4 ceremonial offering niches, where well-wishers could visit, prior to the tomb being sanctified. They would fill these niches with all manner of offerings for the departed, in a belief that this would curry favor for them in the next life.
In the center of the room a pool of water gives off an eldritch blue glow. The pool with radiate as magical if any with the ability to check for such things happens to do so. Exactly what its properties are is a secret lost to time. However, legends tell that supplicants leaving offerings would drink from the well to receive a boon from the gods.
The pictured tomb is that of a mid-level noblewoman. Of the present offerings, most are fairly mundane sundry items. There are sacks of old grain, olive oil, bottles of wine that have long since turned to vinegar, and bolts of linen. A close search will turn up a gold scarab pendant and a garnet ring that are both finely crafted.
4. Shrine
This room is the shrine where priests of Kaa would give their final prayers for the departed. During these ceremonies, 4 earthen-ware vessels bearing cobras would be placed within the room as part of the invocation ritual. The reptiles are long since dead and likely nothing remains of them.
This floor of this room is littered with a number of old bones. The opposite end of the room is dominated by a well that is 10’ in diameter. After crossing the threshold to this room, PCs will hear a skittering noise coming from the well. Within 2 rounds of this, 4 giant beetles will emerge from the hole and attack until slain.
If explored, the pit will be found to descend 30’, though there are numerous tunnels branching off in other directions. These other tunnels have been created by the beetles. They are not large enough to stand up in, susceptible to collapse, and parties unwise enough to venture into them should meet more beetles promptly.
6. The Burial Chamber
This ornately decorated room is the burial chamber itself. The noblewoman’s sarcophagus dominates the center of this pillared room, while those of her 8 attendants line the northern, western, and southern walls.
These three walls are adorned with detailed paintings depicting scenes from the life of the departed. The eastern wall is reserved for images of what she hopes for in her new life.
7. Fire Trap
Those foolish enough to cross the threshold from the burial chamber into this L-shaped hall will immediately hear an audible click. However, nothing else will happen at this time.
If anyone walks forward to the right-angle and then follows until the dead end, they will be in for a surprise. As soon more than 5 lbs. of weight is placed on the 5’ section of tile at the dead end, 7 gouts of flame with shoot out from holes on the right side of the wall.
The flames will persist until there is less than 5 lbs. of weight being applied to any of the 3 east-west floor tiles marked with flames on the map. However, after 4 rounds the mechanism will run out of fuel.
If specifically searching, perceptive characters may notice the small holes in the wall.
8. Treasure Room
This room would contain the worldly treasures of the departed. While there would certainly be some coins and gemstones, other items dear to the individual would be here as well. Bolts of fine silk, oils, and incense would be common among such items. In addition, books of arcane knowledge might be stored here for safekeeping until the afterlife.
Final Notes
That wraps up another week. Again, this isn’t intended to be a full-on adventure but I thought perhaps that this might get the creative juices flowing for some of you. Please let me know if any of this sets your mind to wandering. Hopefully, instead of dreading the new work week that is quickly approaching, you’ll be able to let your thoughts drift a bit to future sessions around the gaming table. Good gaming and have a great week!