The hills making up the Archian border with Caledos are pocked with dozens of abandoned mines. These leave a lasting reminder of the rush for silver in the years prior to the rise of the Graun Empire.
Without drawing much attention from local officials, a nebulous consortium of investors has been purchasing old dig sights along the coastal region. The mine at Mt. Morris was one such purchase. About 12 months ago, a group of ten men re-opened the dig, in what locals were sure was folly.
After spending a couple weeks repairing the base camp, the team resumed the dig. None but the foreman had any previous mining experience. Most of the “miners” consisted of farm hands or former members of the stevedores’ guild. None were strangers to hard work, but they were a motley group to be certain. However, the strangers who came and offered them the job assured that they would be paid handsomely.
The past year had been difficult. The team had failed to find any substantial amount of ore and they often assumed that their work would soon come to an end. Despite this, the paymaster and his retinue of guards would appear every month and the dig continued.

Recent Events
Seven days ago, a strange thing happened, breaking the monotony for the miners. While digging in the eastern tunnel that morning, the team struck what appeared to be a rock wall. Further investigation confirmed that they had indeed stumbled upon a bit of masonry crafted by human (or demi-human) hands.
Foreman Fugue seemed particularly interested in this development and ordered that there always be three men digging until such a time as the wall was breached. Unfortunately, Fugue himself explained that he was feeling ill and retired to his office in the storehouse.
Later that evening, just before dusk, the wall gave way and opened into a chamber beyond. The crew initially thought to go fetch the foreman. However, they knew he was not feeling well. There was no telling what might lie beyond the wall, and they reasoned that they might find something of value. Gathering up torches, the trio decided to enter the chamber alone. None of the miners were heard from ever again.
Foreman Fugue
Bartholomew Fugue is a wiry little weasel of a fellow. Just shy of 50 years old he appears to be more of a bookworm than a miner. That said, in his younger days he did indeed work during the great silver rush.
Two years ago, Fugue was approached by a group who held certain interests in the region. They were seeking the diary of Elthane Vanator, a necromancer and occultist of some renown. Apparently something about this diary made it incredibly valuable and they wanted it found.
The belief was that the book was hidden away in Vanator’s old lair, which lay buried under the Archian hills, somewhere nearby.
Thus is was that Fugue was assigned a crew of nine and set about digging in the old silver mine. He had been sworn to secrecy and warned that his life would be forfeit if his true purpose were ever discovered.
Fugue was no fool. Prior to being stationed at the mine, he did his research. He took with him a number of books on the occult, as well as what bits of information he could gather regarding Elthane Vanator. From these readings he gathered that the necromancer, having been hanged some 100 years earlier, was known to employ the living dead as guardians over his dwellings.
What Happened?
Foreman Fugue had almost forgotten his original job of finding the diary. His employers had been paying him well and he had been skimming off the meager bits of silver that his miners had been finding.

When word came out of the mine that the diggers had found a wall, his blood ran cold. Knowing that Vanator’s lair may hold undead guardians, the foreman feigned illness and excused himself from the proceedings. He briefly considered warning the others but thought better of it. He had been warned not to disclose the true purpose of the mine, and this was not the time to start taking chances. Stopping briefly at the stables, he left extra water for his horse and placed a padlock on the stall. Then he proceeded to his office and locked himself away.
Sure enough, later that evening the sound of blood curdling screams could be heard throughout the camp. From he vantage point in the office, he spied a pack of cadaverous looking creatures burst forth from the mine entrance. With bestial swiftness the animated corpses fanned out and swarmed the camp. A terrible stench of carrion filled the air, as Fugue steadied the barricade in front of his door.
More screams were heard in the hours to follow. The foreman sat watching in terror, too scared to make so much as a sound. At one point there had been pawing and scratching at his door, but his defenses held. Not long after that he viewed the shapes of the undead retreating back into the cave.
Too craven to risk leaving his sanctuary, he has been holed up in the storehouse for the past week. The days have been quiet, though at night he has heard sniffing and panting outside his walls. The paymaster is due today, along with his armed guards. Once they arrive he plans to let the guards deal with the guardians and then hopes to take some credit for finding the diary that surely must be within the discovered vault.
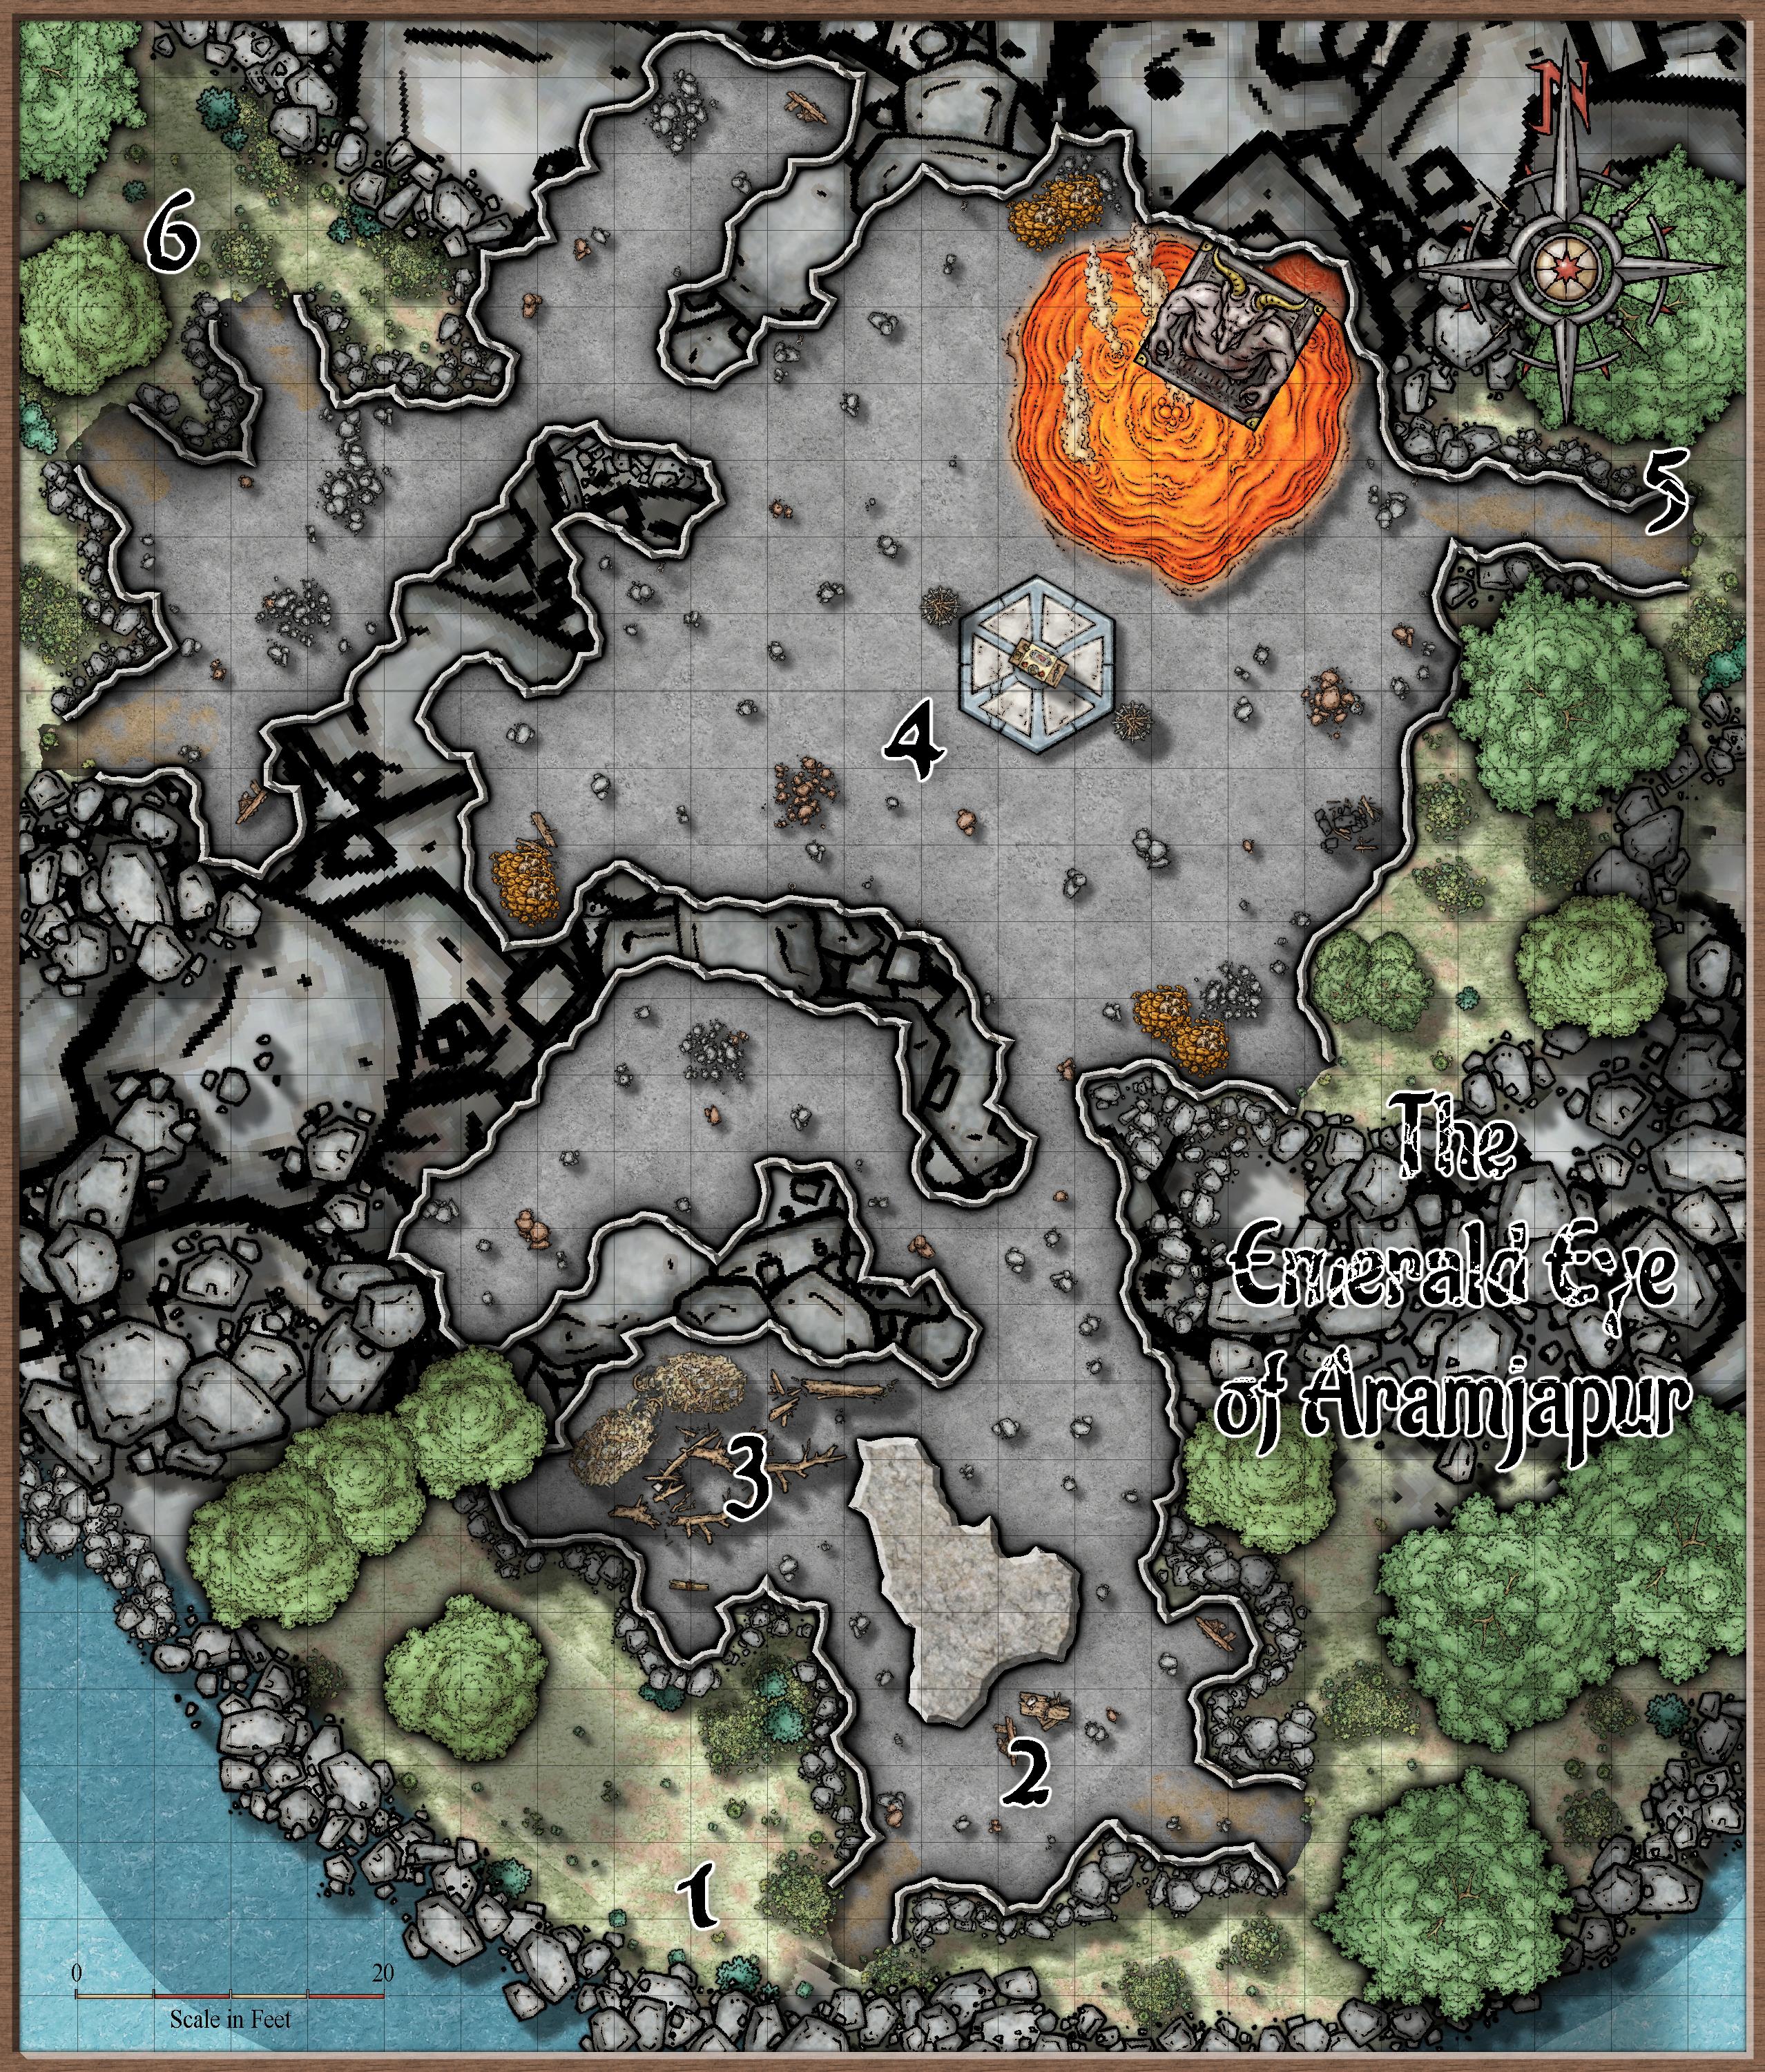
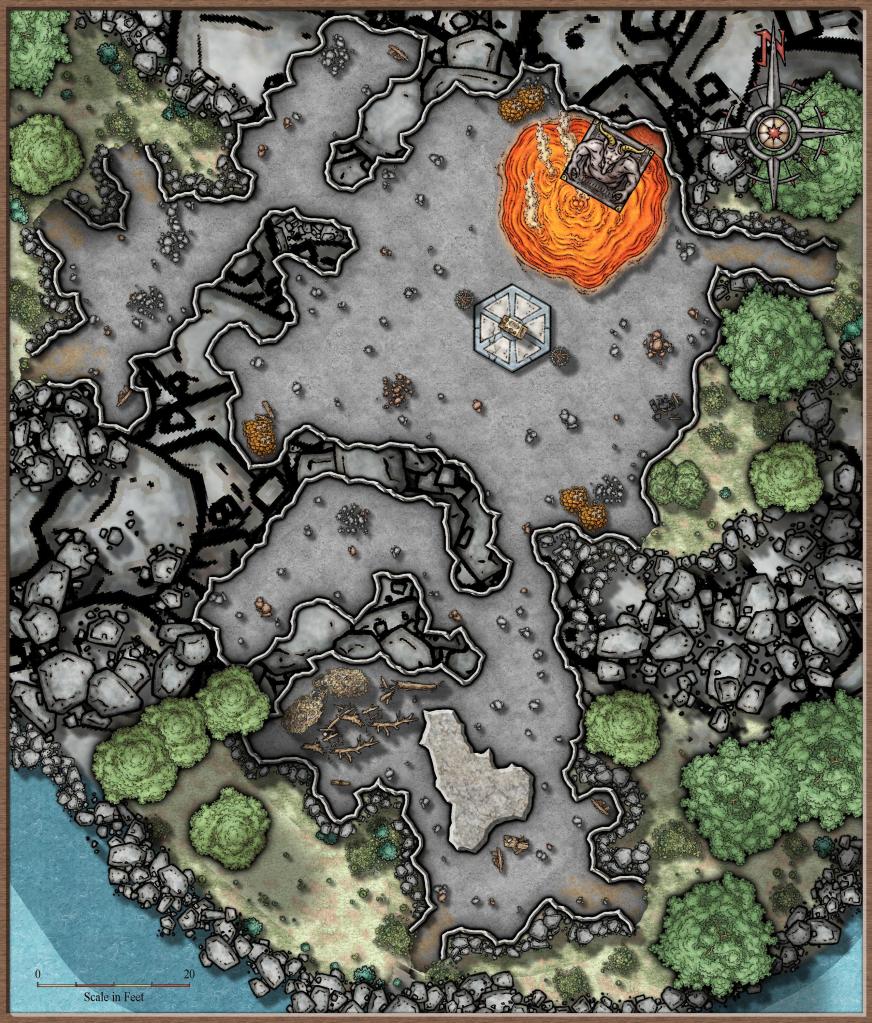
The Mine at Mt. Morris
How you get your party to the camp is entirely up to you. One easy method would be to have a relative or friend from a nearby town hire them to deliver something to one of the miners. I happened to know that my group was filled with inquisitive types, so I allowed them to stumble onto the camp randomly, as they were traveling across the countryside.
1 Bunkhouse
This L-shaped building is the bunkhouse that served as the living quarters for the miners. Characters will recognize the stench of rotting flesh as they get near. The back doors are slightly ajar, and the front doors are unlocked.
The remains of two of the miners may be found here. It is a grisly sight and will be clear that something has been eating the corpses and that they have been dead for the better part of a week.
There is nothing of great value in the room, though the party might turn up a decent bag of copper and silver coins if the absolutely turn the place upside down and go through all of the miners’ belongings.
The most curious thing in the whole room is to be found in a footlocker under the northernmost bed (Foreman Fugue’s). Tucked away under some handkerchiefs and small clothes will be found a book and some hastily scribbled notes. The book is titled A Treatise on Reanimated Beings and seems to be a bit of a bestiary imparting knowledge on minor undead creatures. Reading through the notes will indicate that someone was expecting to encounter undead guardians.
2 Mess Hall
This is where the miners prepared their meals and relaxed when they were not working. As with the other structures, this was built back when the mine was first created and it’s clear that it has been serving considerably fewer people.
As with the bunkhouse there are two sets of remains here as well. Both seem to have met the same fate as their fellows.
There is not much of value to be found here, though the party could stock up on the equivalent of iron rations, wine, and ale as they wish.
3 Stables
The stables area makes for another unsettling scene. The remains of one miner can be found in the stable yard. Two horses appear to have met a similar fate in their stalls.
Oddly, one living horse remains. Scratches and claw marks mar the door to the stall. A locked padlock seems to have saved the poor creature, but it is quite dehydrated and appears to be starving. Close inspection will show that someone left extra water in the stall for the beast, but the containers are bone dry.
To the west of this building is a great deal of debris, earth, and rocks that have been removed from the mine.
4 Storehouse
The front and rear doors to this building are closed and locked. There are windows on each facing of the building, though all appear to be barricaded with an assortment of boxes and crates.
On a roll of a 1 or 2 on a d6, characters will hear movement from within the building as they approach.
Entering via any of the doors may be obtained through a regular open doors check. Entering via any of the windows will simply be a matter of breaking the glass and pushing the haphazard barricade aside.
Characters will be able to tell that this building is used to store all of the equipment for the mine. All manner of digging equipment and supplies may be found here.

The smaller room in the northeastern corner of the building is where Foreman Fugue has locked himself away, cowering in fear. He will not call out to the party if he hears them enter the building. Upon entering the office area, characters will find Fugue in the fetal position and he will immediately “surrender” to the party and beg them not to hurt him.
While he is terrified, this is partly an act. The foreman does not want to reveal what is going on and has no explanation for why he has stayed locked up in the office for days. If questioned, he will lie and claim that some creatures came out of the woods two days ago and he barely managed to escape with his life. If asked about the horse in the stables or the book and notes in the footlocker, he will lie poorly and show signs of great discomfort.
If threatened with physical harm, Fugue will break down crying and attempt to save himself. Bit by bit he will start to reveal what actually happened. However, he will only reveal what he judges to be enough to save his wretched hide. If the party does press him to the point of revealing anything about his employer, he will strive to make it seem that he was an unwilling participant, at the risk of death. He will not mention that the paymaster is due to arrive today unless his life is absolutely on the line.
5 Mine Entrance
The corpse of one of the unfortunate miners lays here.
6 Cave Intersection
Here the tunnel branches off in 4 directions. The northern path only goes a short distance and yet another dead miner can be found here.
7 Western Tunnel
3 nights ago, a green slime made its way into the mine complex and has taken up residence along the roof of this tunnel. If party members are not paying attention and come to the end of this tunnel it will drop on them.
8 Altar Room

This is the room where the mine intersected with the previous underground complex. As the party moves in this direction the will be assailed by the smell of carrion. Four pillars support the ceiling. A pool of 2’ deep murky water dominates the center of the room. On the northern wall is a stone altar bearing various ritualistic items as well as a book written in spidery script (close inspection will show this to be the diary of Elthane Vanator). A similar altar on the southern wall is adorned by a bronze statue of a great horned beast.
If the players enter this room, give them a description and then within 1 round, they will hear a blood curdling shriek, followed by the flapping of leathery feet as they are attacked by 3 ghouls and a ghast from the hallway to the east.
Following their initial foray killing the miners, this pack of undead returned to the tunnels out of familiarity. While they have been venturing out at night, something gets dragging them back to the tunnels by the light of day. Hearing the party, they come forward to feed.
9 Ceremonial Room
This room is empty, save for a 5-pointed star painted on the floor and an extinguished candle placed in each corner.
10 Crypt

There are 8 sarcophagi in this room. Four of these are open and empty. The remaining four are closed and hold inanimate skeletons.
There is a small stone altar along the western wall. Besides it rests an open chest filled with gold and any treasures that would be appropriate for your game.
11 Cave-In
The northern wall of the passage has collapsed here. It appears that the passageway originally continued, however, clearing the cave-in would take multiple days.
Remaining Questions
If the party have explored the mine and located the diary, there are still a number of questions that will remain.
- What is the purpose of the shadowy consortium that has been trying to find the diary?
- What dark knowledge does the diary contain to make it worth going to all of this effort?
- What will happen once the paymaster arrives? He always comes with guards, and they will surely want the diary if the party is still around. They also won’t want any witnesses!
- Finally, what lies beyond the collapse at area #11? Is there a whole complex to explore with amazing treasures to be found?
Final Notes
That is all for now. I hope you have enjoyed yourself and thank you for reading this far. If you have any thoughts as to something to add or where we might take things from here, please leave a comment below. If you’d like to read something else, check out the links below.
For the Village of Cross Tree, go here.
For maps & plot hooks, go here.
For my Idea Chest posts, go here.
For some random tables, go here.
Finally, for a bit about me and some general stuff, this is the spot.