I spent most of my free time over the past few months working on the Horror of Talaraska. In hindsight, I probably shouldn’t have tackled something like this during my busiest time at work. However, with the adventure behind me I wanted to wrap up a few things and provide some plot hooks for anyone who would like to build on to the adventure. For anyone catching up, the pertinent posts can be found here:
My intention was to create a one-shot adventure that would actually be a one-shot and not run over into multiple sessions. At 54, my current reality is often that I have one crack at new players. On some occasions there will be no chance at a follow-up game, while at others a fun single evening might land me a new gaming group.
I opted to base things on the Rules Cyclopedia because I’ve been dipping my toes in those waters lately. I should note that aside from nostalgia, I don’t typically lean toward those old school systems. Left to my own, I’d prefer something more mechanically complex or even classless. However, Basic D&D fit the bill for my target audience of prospective new players (who I often rope in with little or no experience to TTRPGs).
My group for this adventure consisted of a party of 5 1st level characters. All but one of the players were entirely new to hobby, with the 5th having only dabbled with 3e in college. Shout-out to Elyndra, Ardor, Cedric, Remere, and Ivee. We ran the adventure as written in just over 3.5 hours (I used a stack of pre-generated characters like I would for a convention) and it seemed to be well received. My plan worked, as we’re currently trying to line up schedules for a regular game over the winter months.
I started the party just West of the Village of Cross Tree, as suggested at the beginning of the adventure. We had previously established that all the party members already knew each other and we’re heading off in search of adventure.
The party’s interactions with the villagers played out largely as I expected. However, I did encounter one thing that I found interesting. My players ranged anywhere from 4 to 20 years younger than me and it was clear that while they were new to tabletop role-playing games, they had an almost video game mentality to interacting with the villagers.
On the Road
The trip from the village to the bandit camp was one area I was concerned about. I was afraid that it might either take too much time or seem too easy to the party. As things played out at my table, my list of mundane encounters worked as intended. The party from the discarded supplies and thoroughly investigated that area. Next up was the giant bees though they wisely gave them a wide berth. Their third rule ended up being the faint campfire smoke and I made the decision based on elapsed time to have that lead them right on to the bandit camp.
Road to the bandit camp.
Bandit Camp
The bandit camp encounter worked as intended. I set this up in such a way as to make it highly likely that the party would get the drop on the bandits. First level characters in Basic Dungeons and Dragons are pretty fragile, so it was important to me to give the players a chance to feel heroic here.
As things worked out, the party broke their morale after the 3rd bandit fell. Their fellows were plopped down, bound and gagged, and had to wait outside the cave until the party completed their explorations.
In hindsight, I got lucky here and this could have been deadlier than I’d intended. If I were to do it again I might not worry about bandit HP and instead simply say that they would drop with a single hit.
There was originally more to this secret room. When I was first putting together the adventure there were some levers built into the wall here that would move objects in the map room (location #5). This was all intended to give the party clues about other things they might find if they were to explore the lower city. As it turned out, it just felt cumbersome and I thought it would slow things down so I left it out.
#5 Map Room
The frescoes here were intended to give the party a clue about the final encounter. I wanted to telegraph the fact that lighting the braziers in room #7 might help them defeat the horror.
I also toyed with including a sort of “you are here” Marker to give the party a point of reference if they explored the lower city in the future. Again, I skipped this for the sake of brevity but if I were to build on this adventure I would probably put it back in.
#6 Collapsed Stairway
I included the Magic Mouth on the pillar here because I’ve always been taken by David A. Trampier’s illustration in the AD&D Player’s Handbook (if you’re not familiar with the image you should check it out). Magic Mouth doesn’t exist in Basic D&D to my knowledge but Talaraska being an ancient center of arcane knowledge, it felt appropriate to lift something from AD&D.
# 7 The Study
My goal with this final room was to create an encounter that would feel exciting to the players. I had the benefit of hosting players who were quite green. However, knowing I’d be sharing this adventure I went into the project as if veteran players were at the table. Meta gaming aside, players are often every bit as familiar with all of the standard monsters as the GM. This led me to want to use a unique creature.
I was also a bit challenged by the system itself. Basic D&D may hold a dear place in my heart but low-level combat isn’t exactly exciting. Because of this I gave the Horror some abilities to keep the party on their toes. I’m sure this may be seen as heresy by some OSR purists and that’s fine. I was simply doing what I thought would work for my table.
In the end I was very happy with the results. The combat was resolved at the top of the 4th round and I believe my players were engaged for the duration. Multiple PCs were injured but all stayed up and the added abilities really seemed to leave the players scared of what would happen next.
Where to Go From Here?
Wakou M’baque. A precursor to Talaraska.
While I think this would work well as an intro or convention adventure, I’ve tried to create it in such a way that it would be easy to build onto. The city of Talaraska has been kicking around in my head for some 40 years and I’ve always loved the idea of a subterranean city lost to time (see my previous post on Wakou M’baque). I’ll revisit the space as time allows but for now there are some questions and threads that you may want to fill in for yourself.
If the party decides to return and explore the lower parts of the city, there should be invaluable information to be gained by studying the map room.
Knowledge of Talaraska should be hard to come by. However, there may be more clues to be found in the woods outside of the village of Cross Tree. Karia Merric, the barmaid at the Cross Tree Inn, recently found an antique suit of armor in the woods. This will be discovered to have originated from Talaraska.
Nicodemus from the Ruined Tower may have knowledge of the lost city, as it’s been hinted that he had been an adventurer in his younger days.
Taryn Keen’s father Benjamin has been missing for two years and townsfolk claim that he had an unhealthy fixation on legends of a lost city somewhere in the vicinity of Cross Tree.
The frescoes in the map room depicted numerous shadowy creatures like the one the party encounters in the study. Are they still lurking about? What’s their origin?
What’s the purpose of the runestone found in the study?
Closing
That’s all for this week. As we head into November I’m hoping that I’ll have fewer real life demands and more hobby time. Thank you for taking the time to stop by and visit. Have a great week!
The Horror of Talaraska is intended to be a starting adventure, originally written with the Dungeons & Dragons Rules Cyclopedia in mind. For further information on the adventure itself, here are the important links:
In Part 1 of The Horror of Talaraska, the adventurers arrived at the village of Cross Tree, a quiet settlement nestled within a dense forest. They soon learned that the village had been terrorized by a group of bandits led a brute named Kargan Pike. After a recent attack on the village, the adventurers were asked by the settlement’s cleric to track down the bandits and recover stolen items crucial to the village’s survival.
The party tracked the bandits to their camp just off the road, where they found the remaining brigands in a state of fear and disarray, their leader and another bandit having disappeared into a mysterious cave. The party is now faced with the choice of entering the cave to seek out the missing bandits or returning to the village with any captives.
It’s certainly possible that the PCs will decide that they’ve had enough and want no part of exploring the cave. Should things play out that way, you’ll want to be prepared for role-playing their triumphant return to Cross Tree. However, I expect that most budding adventurers worth their salt will simply not be able to pass up the chance to explore the cave and bring Kargan Pike to justice. That is the outcome we will explore here.
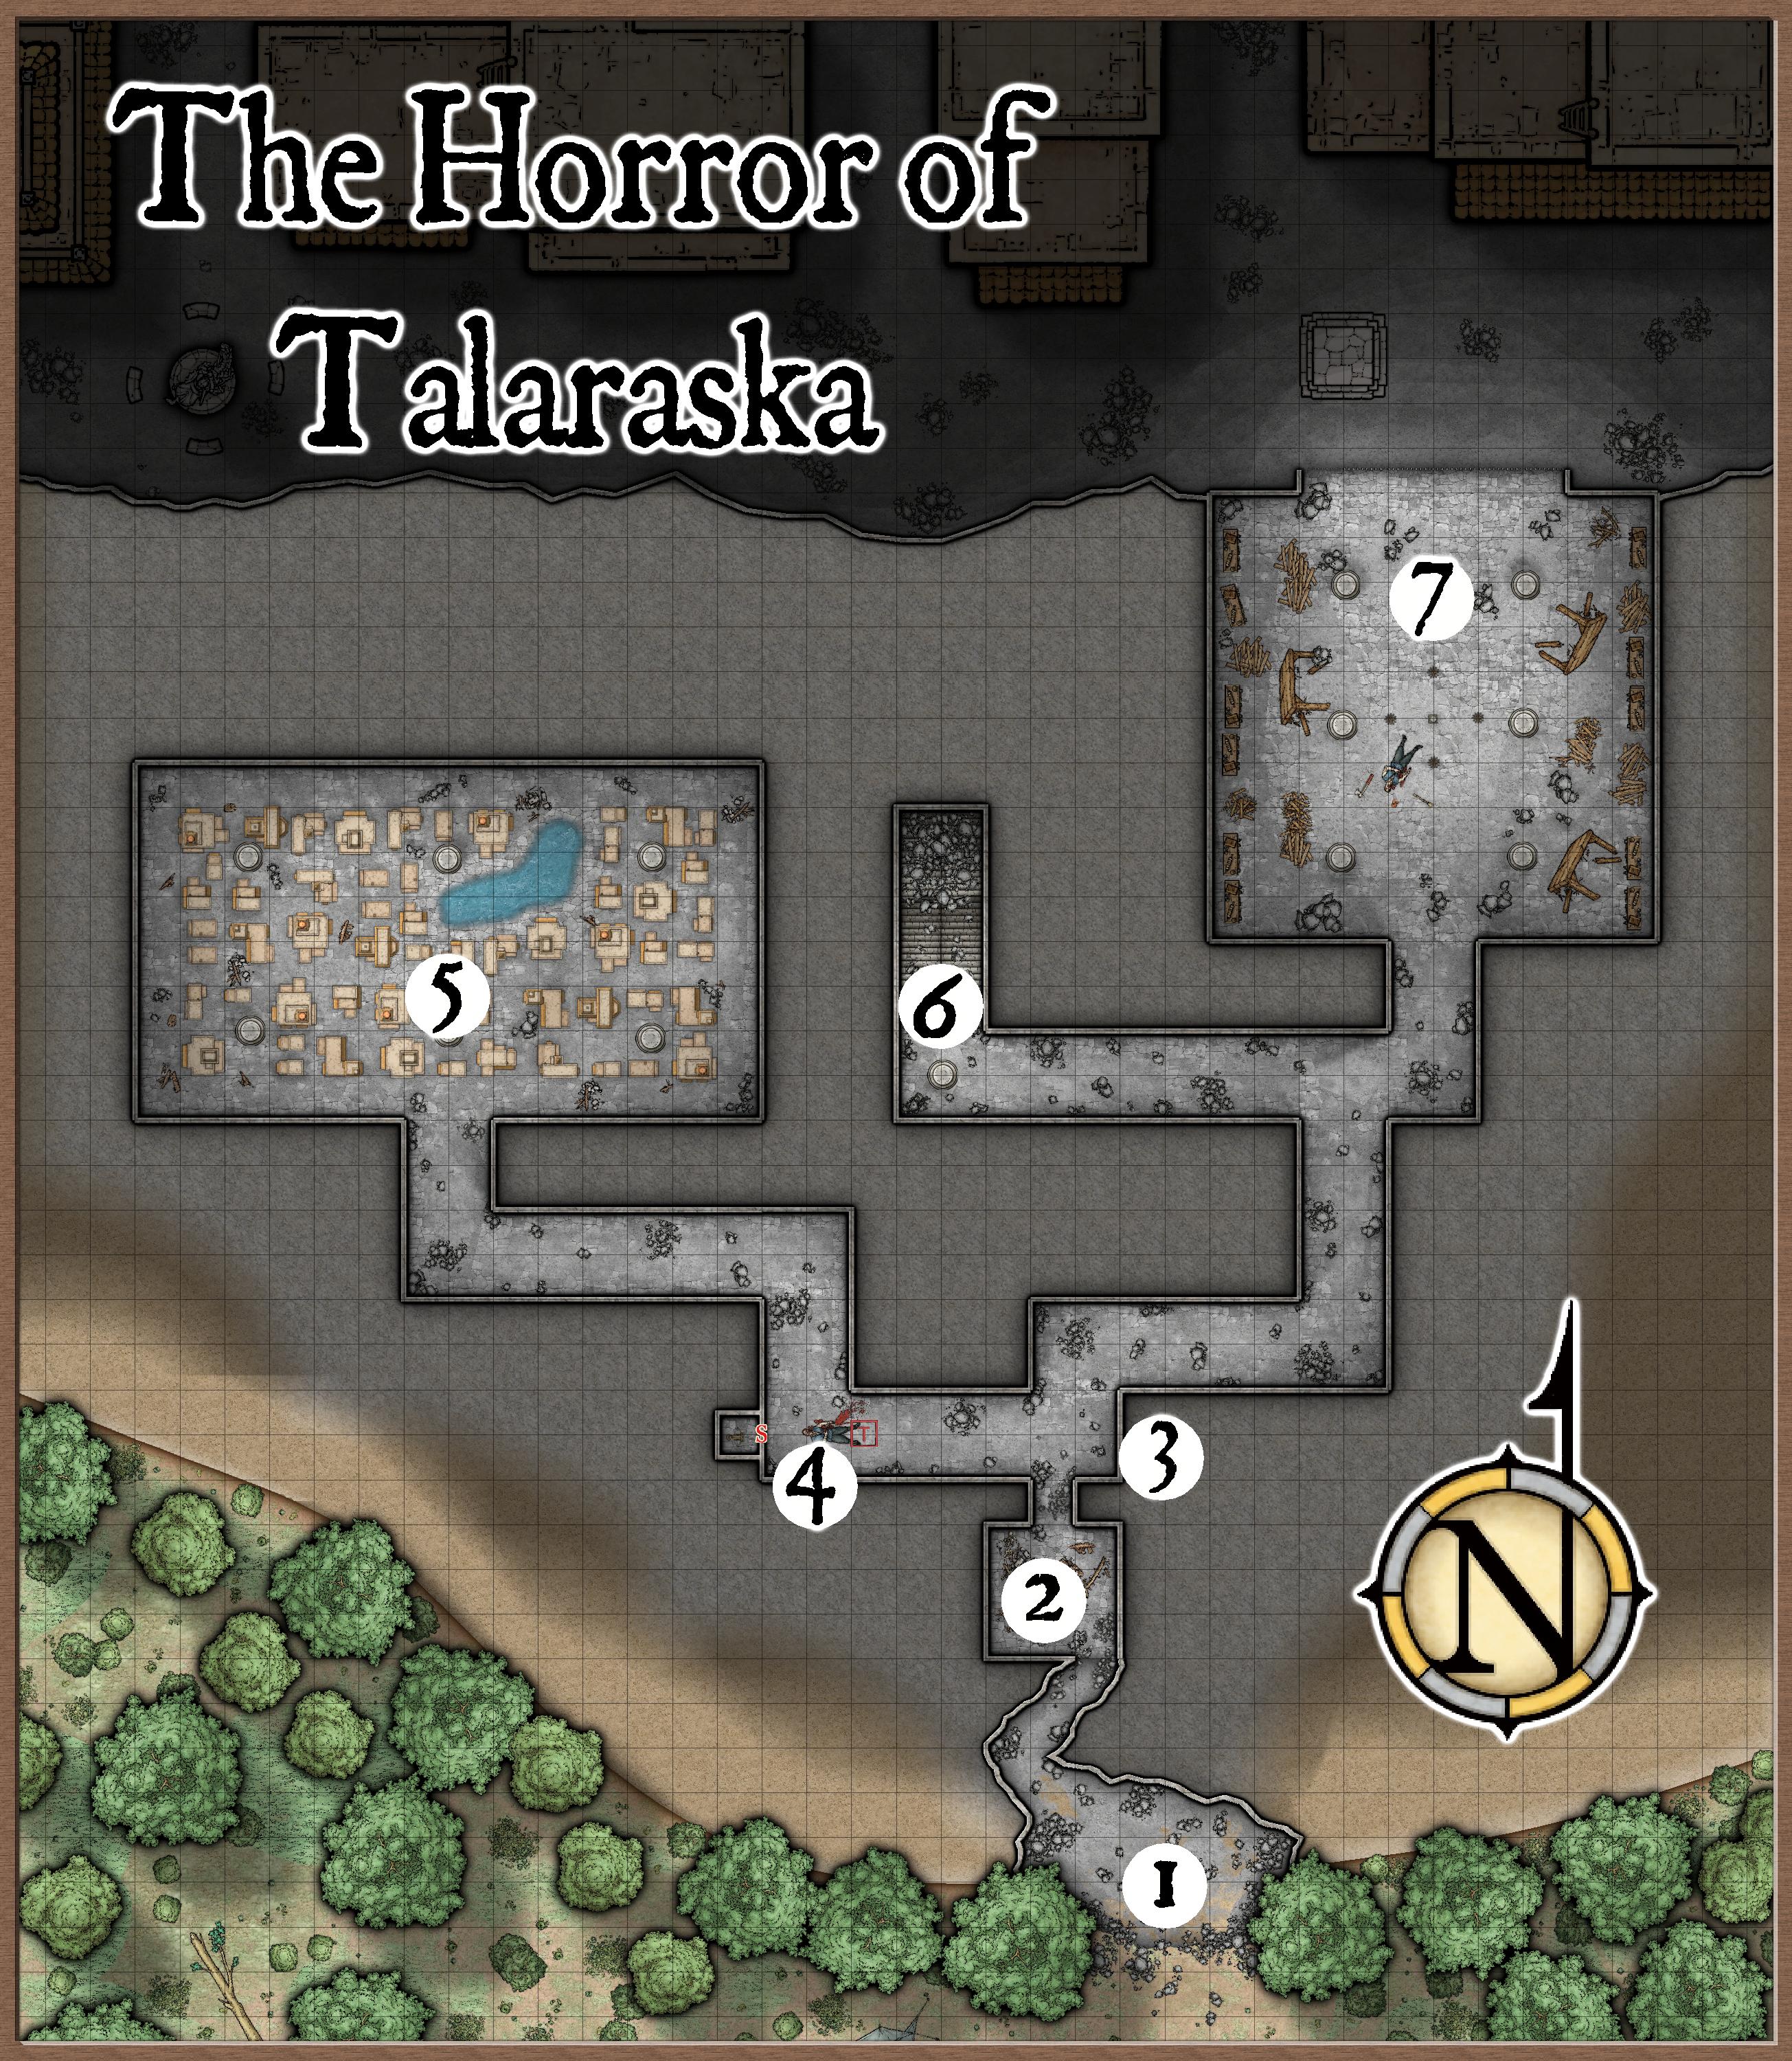
Created with Campaign Cartographer 3+ using the Dungeons of Schley symbol set.
The Lost City of Talaraska
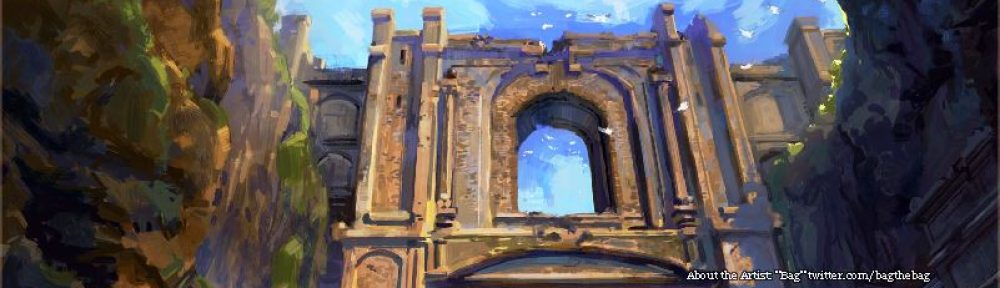
What the players don’t know is that what lies before them is no ordinary cave. The recent earthquake that struck the region caused a collapse revealing this entrance. Beyond this unassuming passage is not merely a darkened cavern, but the gateway to a city long forgotten by time. This is Talaraska, once a thriving center of arcane secrets. The city’s haunted remains lie in wait, holding both ancient treasures and terrifying dangers.
#1 Cave Entrance
The jagged edges and loose rubble make it clear that this cave entrance is newly formed. The chamber inside measures roughly 15 feet by 30 feet, with a low ceiling that barely rises more than 5 feet in height. Moving through the cave requires the adventurers to crouch slightly, adding to the claustrophobic atmosphere. Dust and debris litter the ground, and several stones look freshly fallen, hinting that the cave’s stability may be in question.
A narrow passage leads off to the northwest before taking a sharp turn to the northeast, plunging into darkness. Torches will be necessary to proceed forward. The air is thick with the scent of damp earth and mildew, but those who search the ground will quickly note two sets of tracks leading into the passage.
#2 Breached Room
Map without labels.
At the end of the narrow tunnel, the party emerges into a small 15′ x 15′ chamber. Unlike the natural cavern behind them, this room is clearly man-made. The floor and walls are smooth, worked stone, marked by the passage of time but still intact. The southern wall of the chamber has collapsed inward, littering the floor with debris, chunks of masonry, shattered wood, and dust. Among the wreckage, the skeletal remains of two unfortunate souls can be found, partially buried beneath the rubble. Cool, stale air flows in from the north.
Careful examination of the scene will reveal more. Characters with relevant skills (such as Dwarves with their inherent knowledge of stonework) have a 1-in-3 chance of discerning that the breach in the southern wall is the result of the recent earthquake. Meanwhile, the rubble to the north, piled high against the exit, indicates something else entirely. This was once a hidden chamber, concealed by a now-destroyed secret door.
#3 Intersection
As the party leaves the secret room, they enter an intersection where two 10-foot-wide passages branch off—one to the west, and the other to the north, which quickly bends to the east. The ceiling here rises to roughly 10 feet. Rocks and debris are scattered across the floor.
Lying on the ground near the eastern wall are eight crossbow bolts. These appear to have struck the wall before dropping to the floor. A repetitive clicking sound, heard every few seconds, draws the party’s attention to the west. As their torchlight flickers down the hall, they make out the figure of a body lying prone about 25 feet away.
#4 Body & Trap
A man’s lifeless body lies in a fresh pool of blood, and the rhythmic clicking sound continues to echo from the western wall. Upon closer inspection, this man appears to be one of the bandits, though he is not the leader, Kargan Pike. His face is twisted in pain, and he has two crossbow bolts embedded in his chest, similar to those found at the intersection in Area #3. His extinguished torch lies beside him, as does a short sword. If searched, the bandit has a pouch on his belt containing 5 gp and 4 sp.
As the party inspects the area, they’ll notice that the man’s body is resting on a pressure-sensitive plate set into the floor. The clicking noise they’ve been hearing originates from the trap mechanism located behind an arrow slit in the western wall. This arrow slit leads to a small 5-foot nook where the trap apparatus is housed.
When the bandit stepped on the pressure plate, it triggered the mechanism, causing a bolt to fire from the arrow slit. The unfortunate bandit fell onto the plate and, as the apparatus continued to attempt firing, it shot its remaining bolts, which missed their mark and struck the far eastern wall, leaving the spent bolts in Area #3. The repetitive clicking sound is simply the apparatus attempting to fire again, though it has no remaining ammunition. If the body is moved from the plate, the clicking will cease immediately.
#5 Map Room
This is a large chamber and the flickering light from the party’s torches only barely reaches the far walls. Six stone pillars rise from the floor to the 20’ high ceiling, supporting the structure. The most striking feature of the room is on the floor itself. Apart from a 5-foot-wide walkway circling the room, the rest of the floor is covered with carved replicas of buildings. These miniature structures are hewn from a dark, smooth stone and range in size from 1 to over 5 feet in length and up to 3 feet in height. While the adventurers won’t immediately realize this, the buildings represent a detailed map of the central square of the lost city of Talaraska.
Frescoes adorn the walls of the chamber, though time has not been kind to them, and the images are cracked and faded. Closer inspection of the paintings reveals disturbing scenes of a fabulous city, filled with towering buildings, now in a state of chaos. Shadowy figures, vaguely humanoid in shape, emerge from the edges of the city, chasing terrified citizens. The figures seem to be made of darkness itself, wrapping around buildings and enveloping those who flee. In one of the central scenes, the sky is depicted with a blazing sun high above. The shadowy figures are seen retreating from the light, their forms dissipating and shrinking as the sun’s rays touch them.
In the center of the room, a pool of water represents a lake within the city. Its dark waters glisten faintly in the torchlight, and a subtle ripple occasionally disturbs its surface. Unbeknownst to the party, a carrion crawler has recently surfaced through a crevice at the bottom of the pool and picked up the scent of the dead bandit at location #4. Sensing the vibrations of the approaching adventurers, it is holding its position but will slither from the pool and attack when they draw near.
Carrion crawler. Art by: Yuri Perkowski Domingos yuri.perkowski@gmail.com
Carrion Crawler: AC 7; HD 3+1; hp 13; MV 40′; #AT 8; D paralysis; Save F2; ML 9; AL N. A hit by a carrion crawler paralyzes the victim unless a save vs. Paralysis is made. The paralysis can be removed by a cure light wounds spell, but any spell so used will have no other effect. Without a spell, the paralysis will wear off in 2-8 turns.
If the party takes the time to inspect the pool closely, they will notice something glinting at the bottom. A thorough search of the pool will reveal a sapphire brooch, its intricate design still gleaming despite the years underwater, worth 275 gp.
#6 Collapsed Stairway
A solitary stone pillar supports the ceiling as the corridor turns to the north. As the party approaches within 5 feet, a disembodied mouth suddenly appears on the pillar’s surface. Its stone lips move as they issue a haunting warning:
“Turn back interlopers. Death and despair await those who disturb the dark heart of Talaraska. Trespass no further into the shadows!”
Beyond the pillar, the adventurers are greeted by a sight of complete devastation. A 10-foot-wide set of stone stairs descends into darkness, but any hope of progress is dashed by a massive rock collapse. Hundreds of pounds of rubble now block the stairway, making it impossible to pass through.
# 7 The Study
As the party moves forward, the hallway opens into a large chamber, roughly 50 feet by 50 feet. The room is dark, save for the faint light cast by the adventurers’ torches. Directly ahead, they can make out a pedestal surrounded by 4 braziers, as well as the body of a man lying face down in the center of the room. Clearly once a study of some sort, crumbling bookshelves and the remains of tables line the sides of the room. The walls are covered with decayed tapestries and arcane symbols are etched into the stone floor.
Entering the room, the PCs will see that to the north the chamber opens into vast blackness, a 30-foot-wide opening in the wall where the ground suddenly drops off. A cool breeze enters the room from this opening, bringing with it the scent of stale air. Should the party go so far as to hold torches out this opening, it will become clear that a great cavern looms below. Some 40’-50’ down, they can just make out the shapes of buildings in the darkness.
The pedestal is carved from black marble, its surface smooth and polished. Designs cover the sides of the pedestal and they appear to shift slightly in the torch light. At the top of the pedestal is a shallow indentation. In the very center of this indentation is a hole, barely wider than a finger.
The body is that of the bandit leader, Kargan Pike. He is quite dead, though he bears no apparent wounds. If the adventurers roll him over, they should be able to recognize him from the villagers’ descriptions. They will also note that his body is cold to the touch and he died with a look of abject terror on his face.
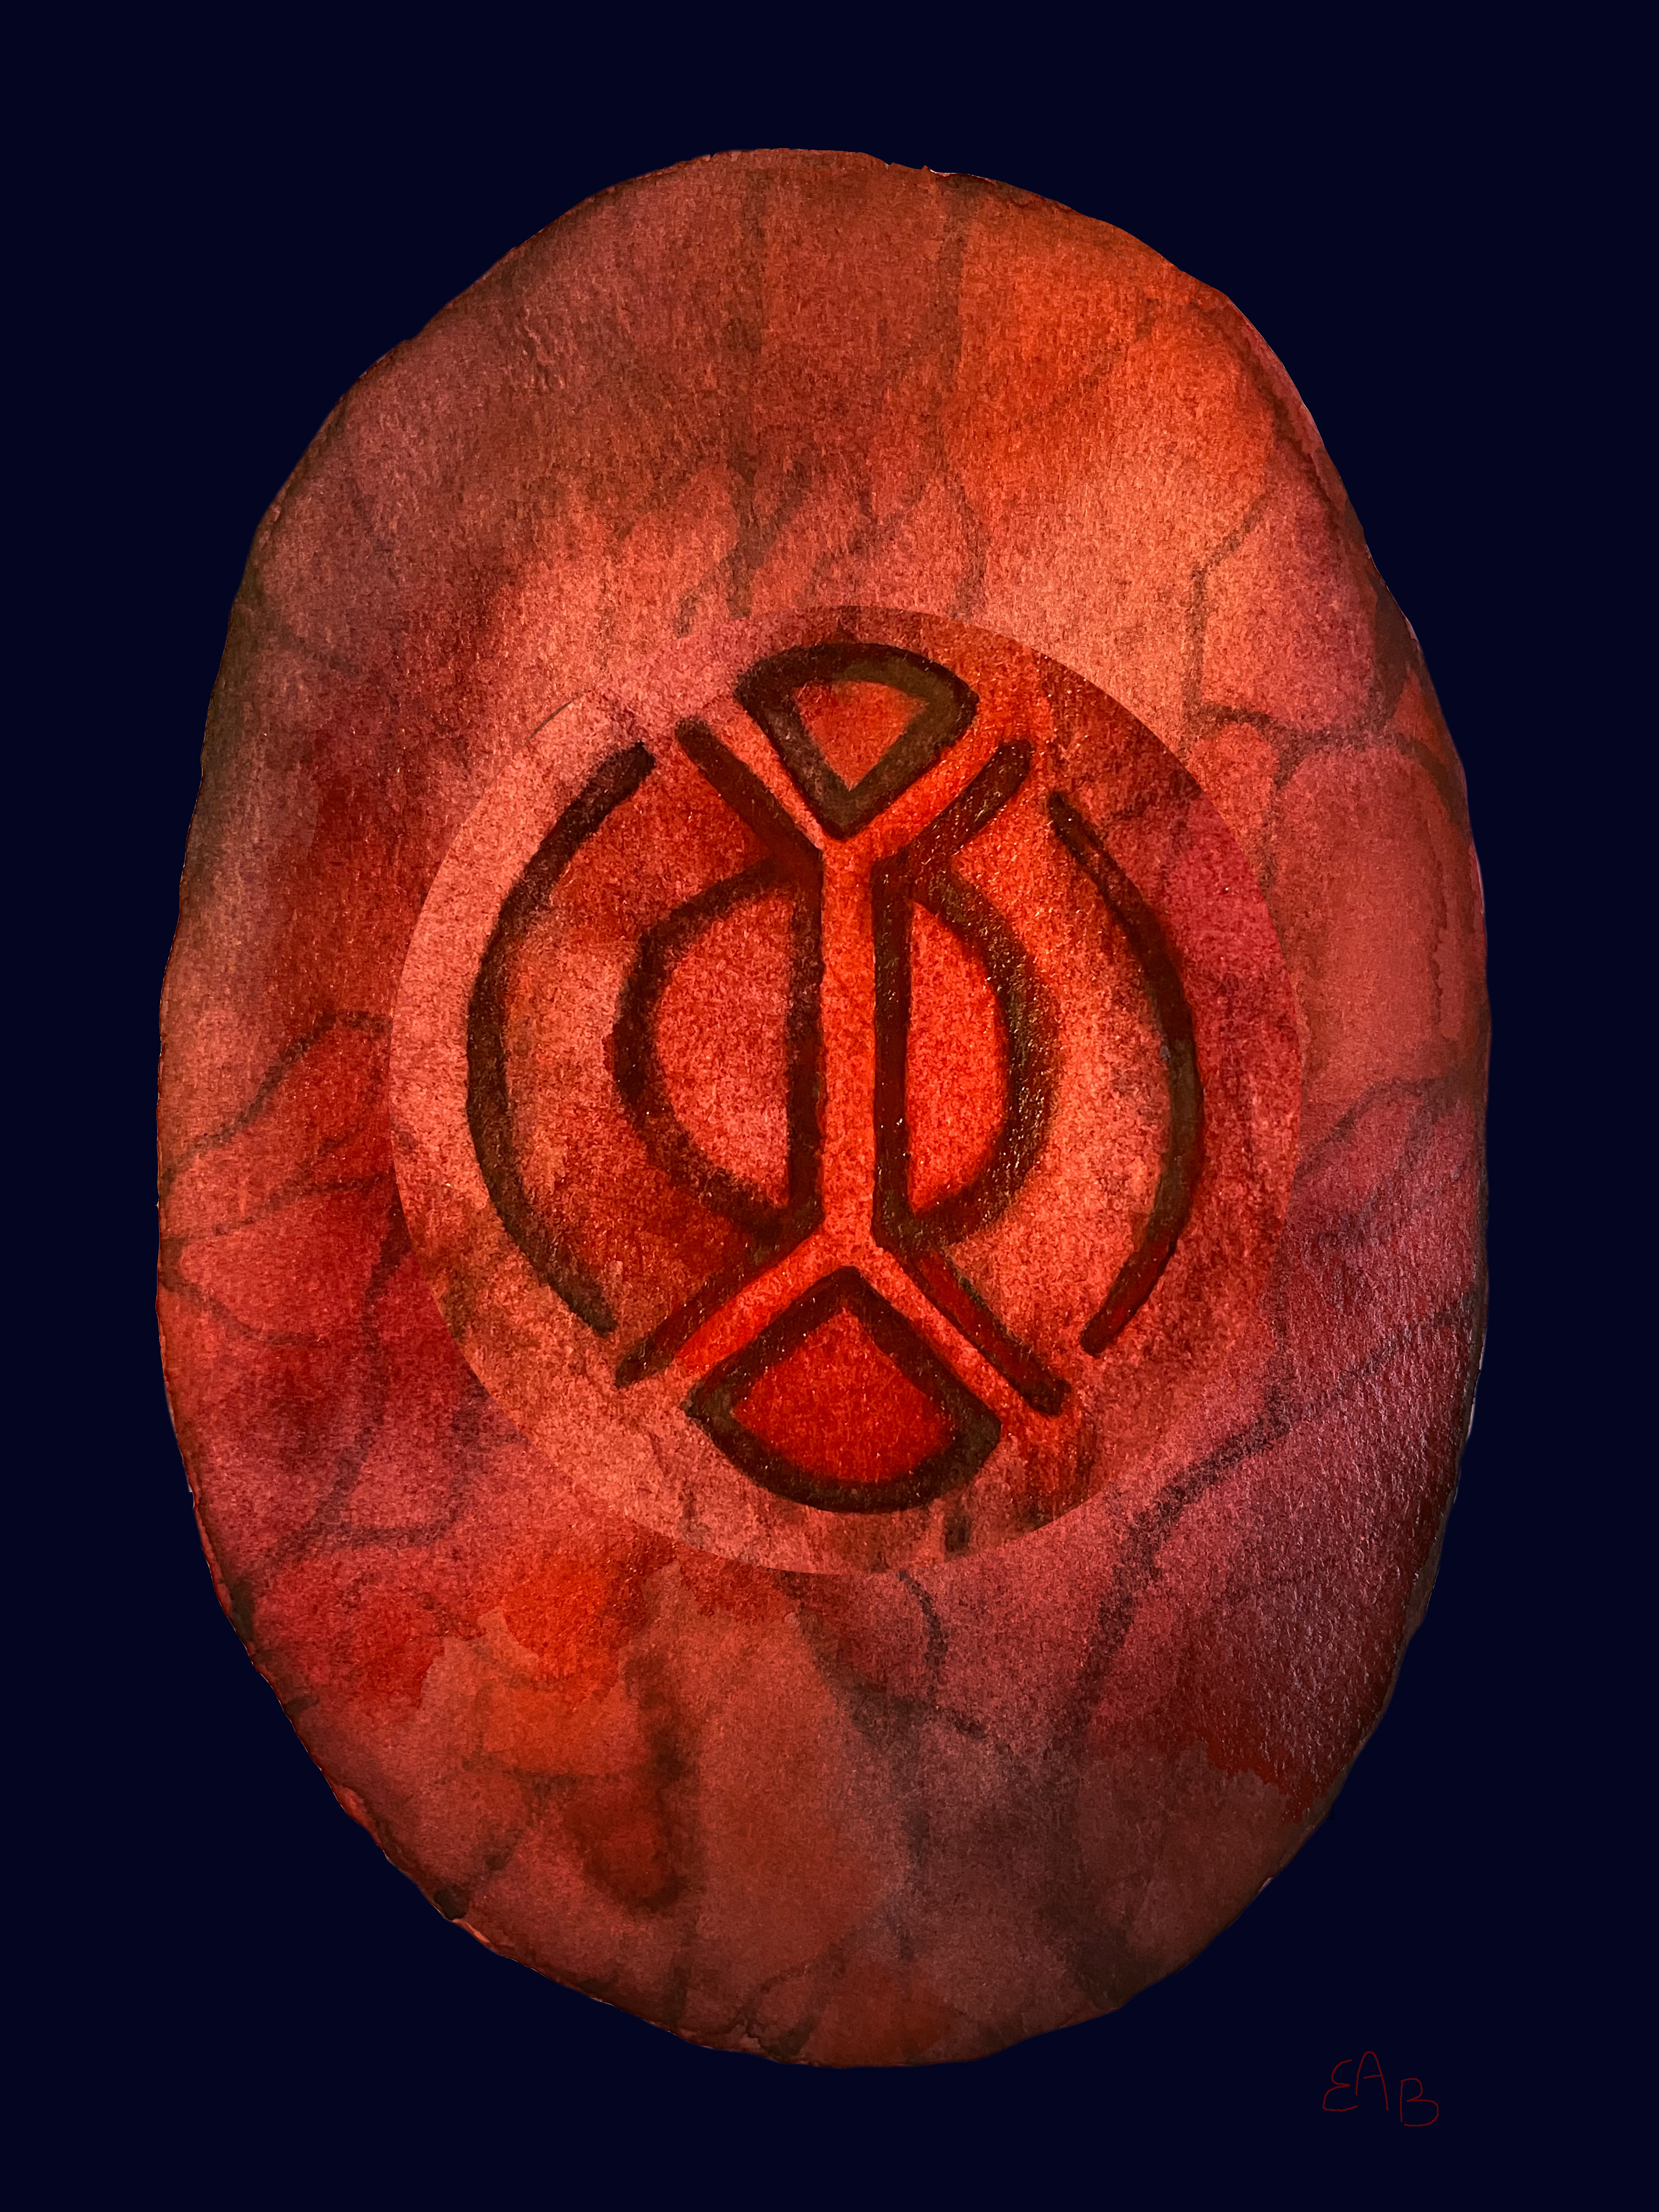
The missing satchel of medicinal herbs and business ledger may be found in his backpack. An extinguished torch and hand axe lay not far from his body. Also of note, a polished stone with an intricately carved rune lies not far from his outstretched right hand. Roughly 3” in diameter, the runestone is reddish in color and seems to pulse with an inner fire. Unbeknownst to the party, this relic originally rested on the pedestal. When Pike entered the room, the bandit snatched it up, triggering an event that led to his demise.
If any of the party members pick up the stone, an iron portcullis will immediately slam down from the ceiling. With a deafening clang, the entrance will be sealed off and the adventurers are trapped inside. At that very moment, thick black smoke begins to pour ominously from the hole at the top of the pedestal. The smoke coalesces, swirling into a vaguely humanoid form, as a chorus of indecipherable whispers fill the air. In one breathless moment, a creature fully forms out of the smoke and turns its gaze toward the adventurers. It attacks.
Fear Aura: Characters starting their round adjacent to the Horror must save vs. spells or suffer a fright. Frightened characters must flee from the creature for one round as their action. After fleeing, they may act normally on their next turn.
Chill Touch: In addition to 1d4 damage, each successful hit forces the target to roll a d10 on the Horror’s Touch table below for potential additional effects.
1-4 Chilled to the Bone: The character feels a deep, unnatural cold, but suffers no further effects beyond the initial damage.
5-7Nightmares: The character is haunted by vivid, terrifying nightmares. Each night, they relive the moment they were touched by the Horror, waking in a cold sweat. They find sleep restless and unsettling for d10 days.
7-9Shivering Limbs: The character’s limbs shudder involuntarily. They suffer a -1 penalty to attack rolls for 1 round as the cold spreads through their body.
10 Mark of Horror: The Horror’s chill permanently brands the character’s skin with black veins where they were touched. For the next 3 days, the character exudes an unnatural cold, causing discomfort to those nearby.
Non-Corporeal: The Horror is a magical entity (not undead), impervious to normal weapons and is immune to sleep and charm effects. It takes full damage from magical attacks and fire.
Averse to Light: The Horror avoids attacking any character holding a torch or other light source. If all four braziers in the room are lit, the Horror will retreat back into the pedestal.
If the party manages to reduce the Horror to 0 HP or light all four braziers, a sudden whooshing sound will fill the chamber as the black smoke is forcefully drawn back into the pedestal. The iron portcullis will rise with a clatter, signaling that the threat has passed.
At this point, the party has achieved what they came here to do. They have recovered the villagers’ stolen goods and with Kargan Pike dead, the threat to Cross Tree has been neutralized. The logical course would be to return to the village, report on their findings, and share the story of what truly lies beneath the forest.
The mysteries of Talaraska are far from fully revealed. For some adventurers, the allure of ancient Talaraska will beckon. Should they wish to return and lower themselves into the blackness below, a new chapter of discovery and peril awaits..
Conclusion
Well, that took entirely longer than I had expected. I’ll have one more upcoming post covering The Horror of Talaraska, to answer some questions and provide a few plot hooks for anyone interested in building on from the adventure. Following that, I’ll hopefully get back to my regular posting schedule. Thank you for taking the time to stop by and visit.
The one conceit to the adventure is that the PCs should enter the village via the road from the west and preferably in the latter part of the day. If that doesn’t fit with the story you are looking to tell, it should be easy enough to make a change here or there and piece things together.
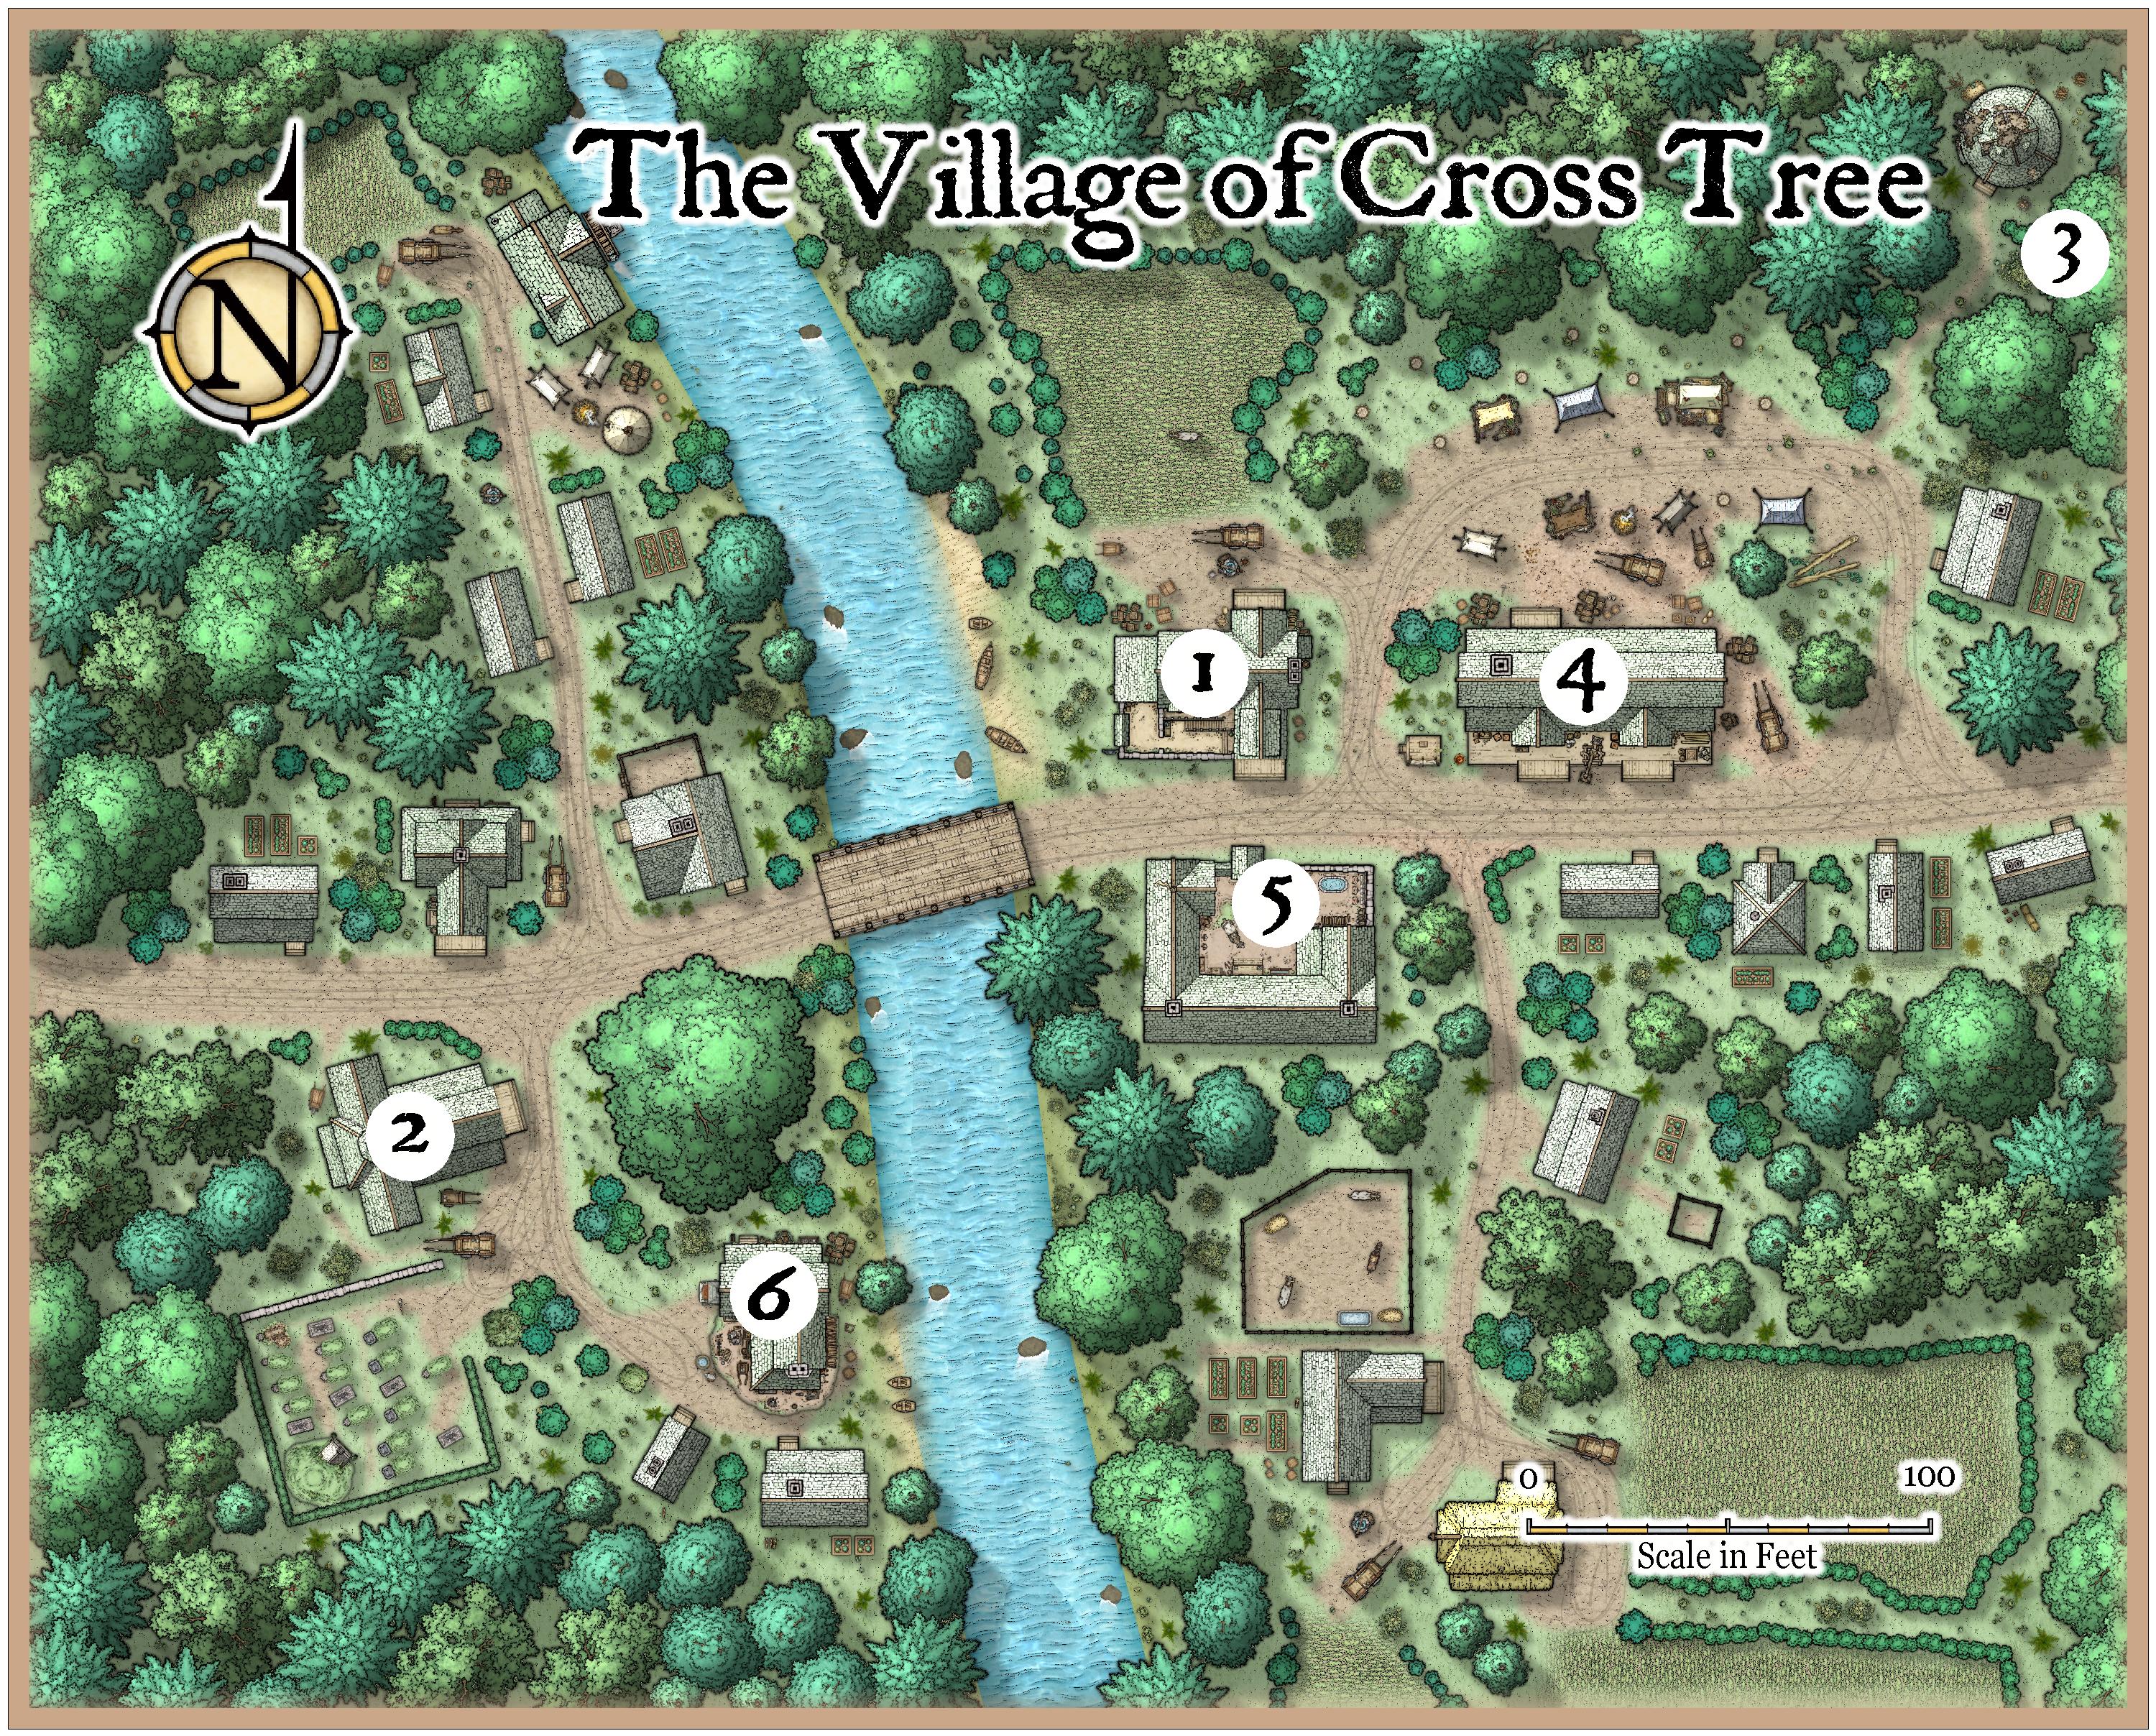
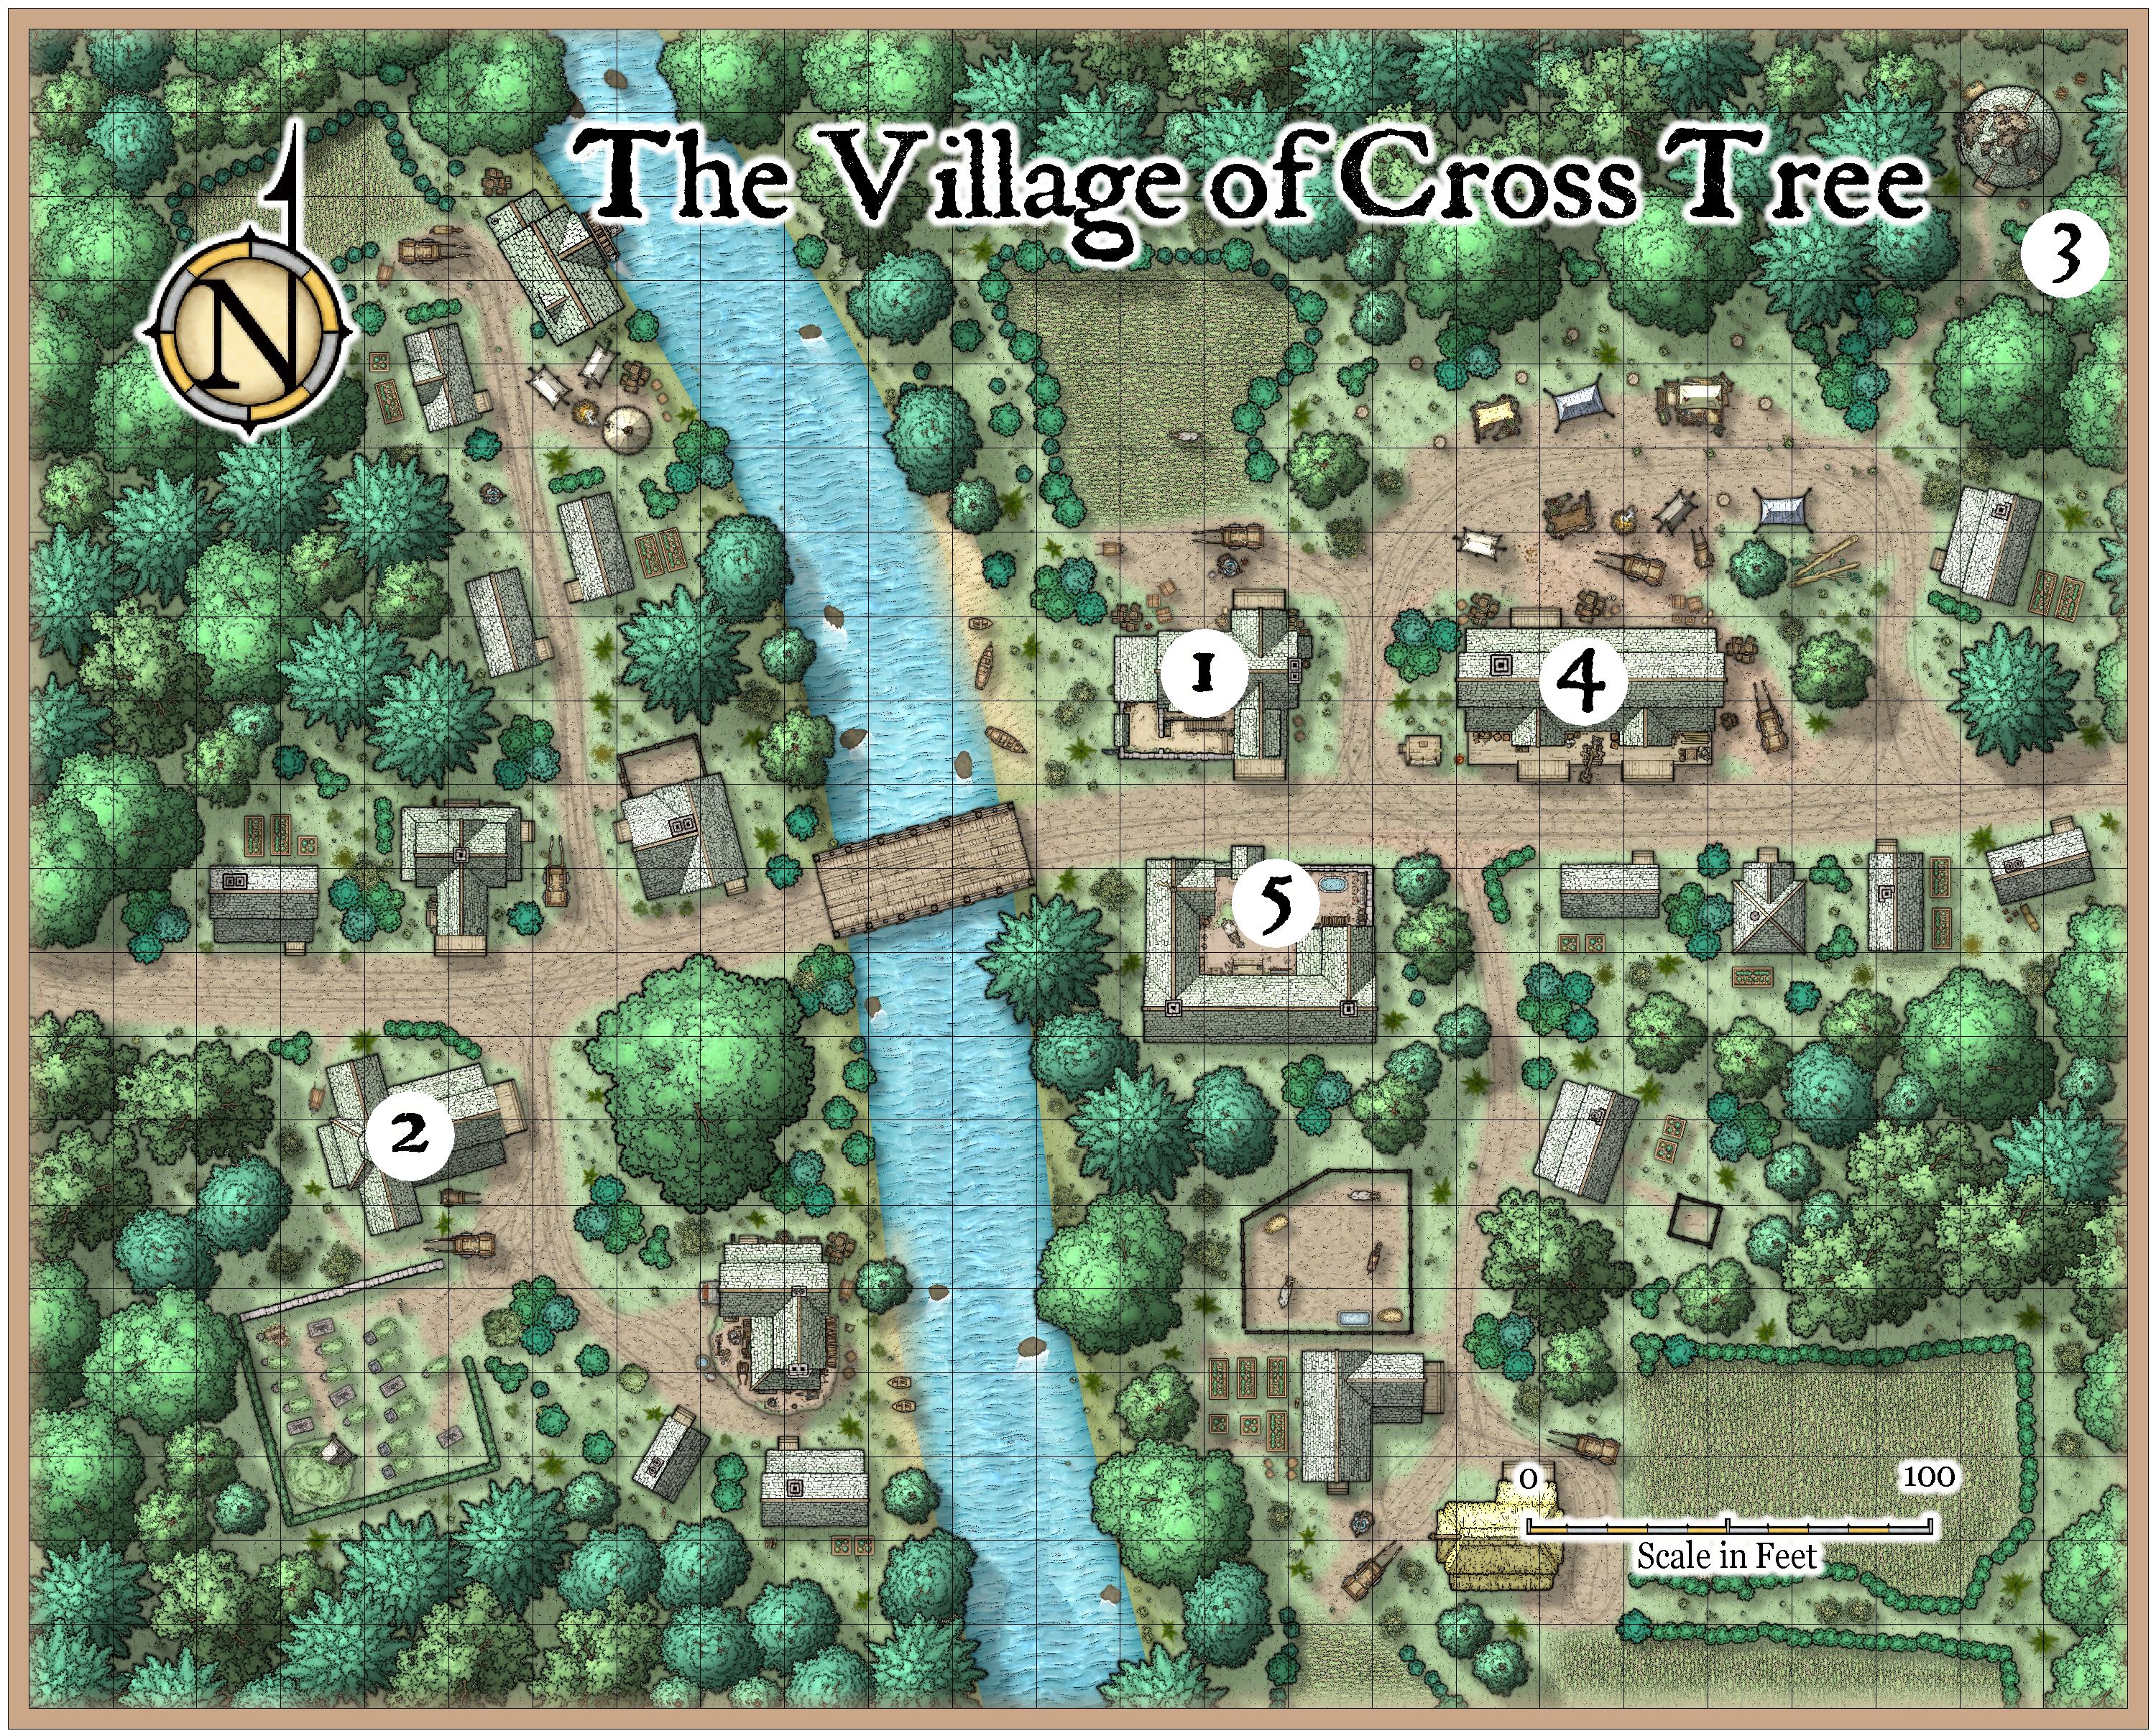
Cross Tree
The party should arrive in Cross Tree in the latter part of the day, after an uneventful day of travel. The road has been wooded for most of the day, but the party would have noticed the terrain becoming hillier since about midday. Even through the thick cover of the forest, the PCs can tell that the day is coming to an end. The band has traveled for most of the day and thoughts are likely turning to finding shelter for the evening. The distinct smell of roasting meat fills their nostrils as the road widens a bit.
Ambush at the bandit camp w/labels. Created using Campaign Cartographer 3+ Dungeons of Schley symbol set.
Before them, the forest parts to reveal a quaint little settlement. Smoke rises from a few chimneys, but they also notice the charred and still smoldering remains of a couple buildings that were recently razed. Just ahead, along the southern side of the road (location #2 on the map of Cross Tree), some figures stand huddled together. An olive-skinned woman with long silver hair seems to be presiding over the tail end of a church service of some sort. Closer inspection would suggest that this may be a funeral.
The PC’s approach seems to interrupt the gathering and they turn to stare at the party. The woman waves a hand in greeting and approaches. “Welcome! Are you the ones who they sent to help? Thank the gods! We did not expect to see you so soon.”
The woman is Leagis Longfeather, a cleric of Mielikki (or any deity appropriate for the campaign setting you are using). For more on Leagis, see The Church of Cross Tree (location #2). Her greeting will likely leave the party somewhat puzzled, but she will not keep them in suspense for long. Stepping away from the mourners, Leagis will explain what Cross Tree has been going through in recent weeks.
Barely large enough to be considered a village, Cross Tree has always been a quiet little settlement, consisting of simple folk who largely live off the land. Residents occasionally trade furs with passing travelers. For items that are harder to come by, there are larger settlements within a few days of travel in either direction.
Being a follower of Mielikki, Leagis found the tranquil woodland setting quite agreeable and set up residence here nearly 10 winters ago. Since that time she explains that there has been little to no trouble from the outside world.
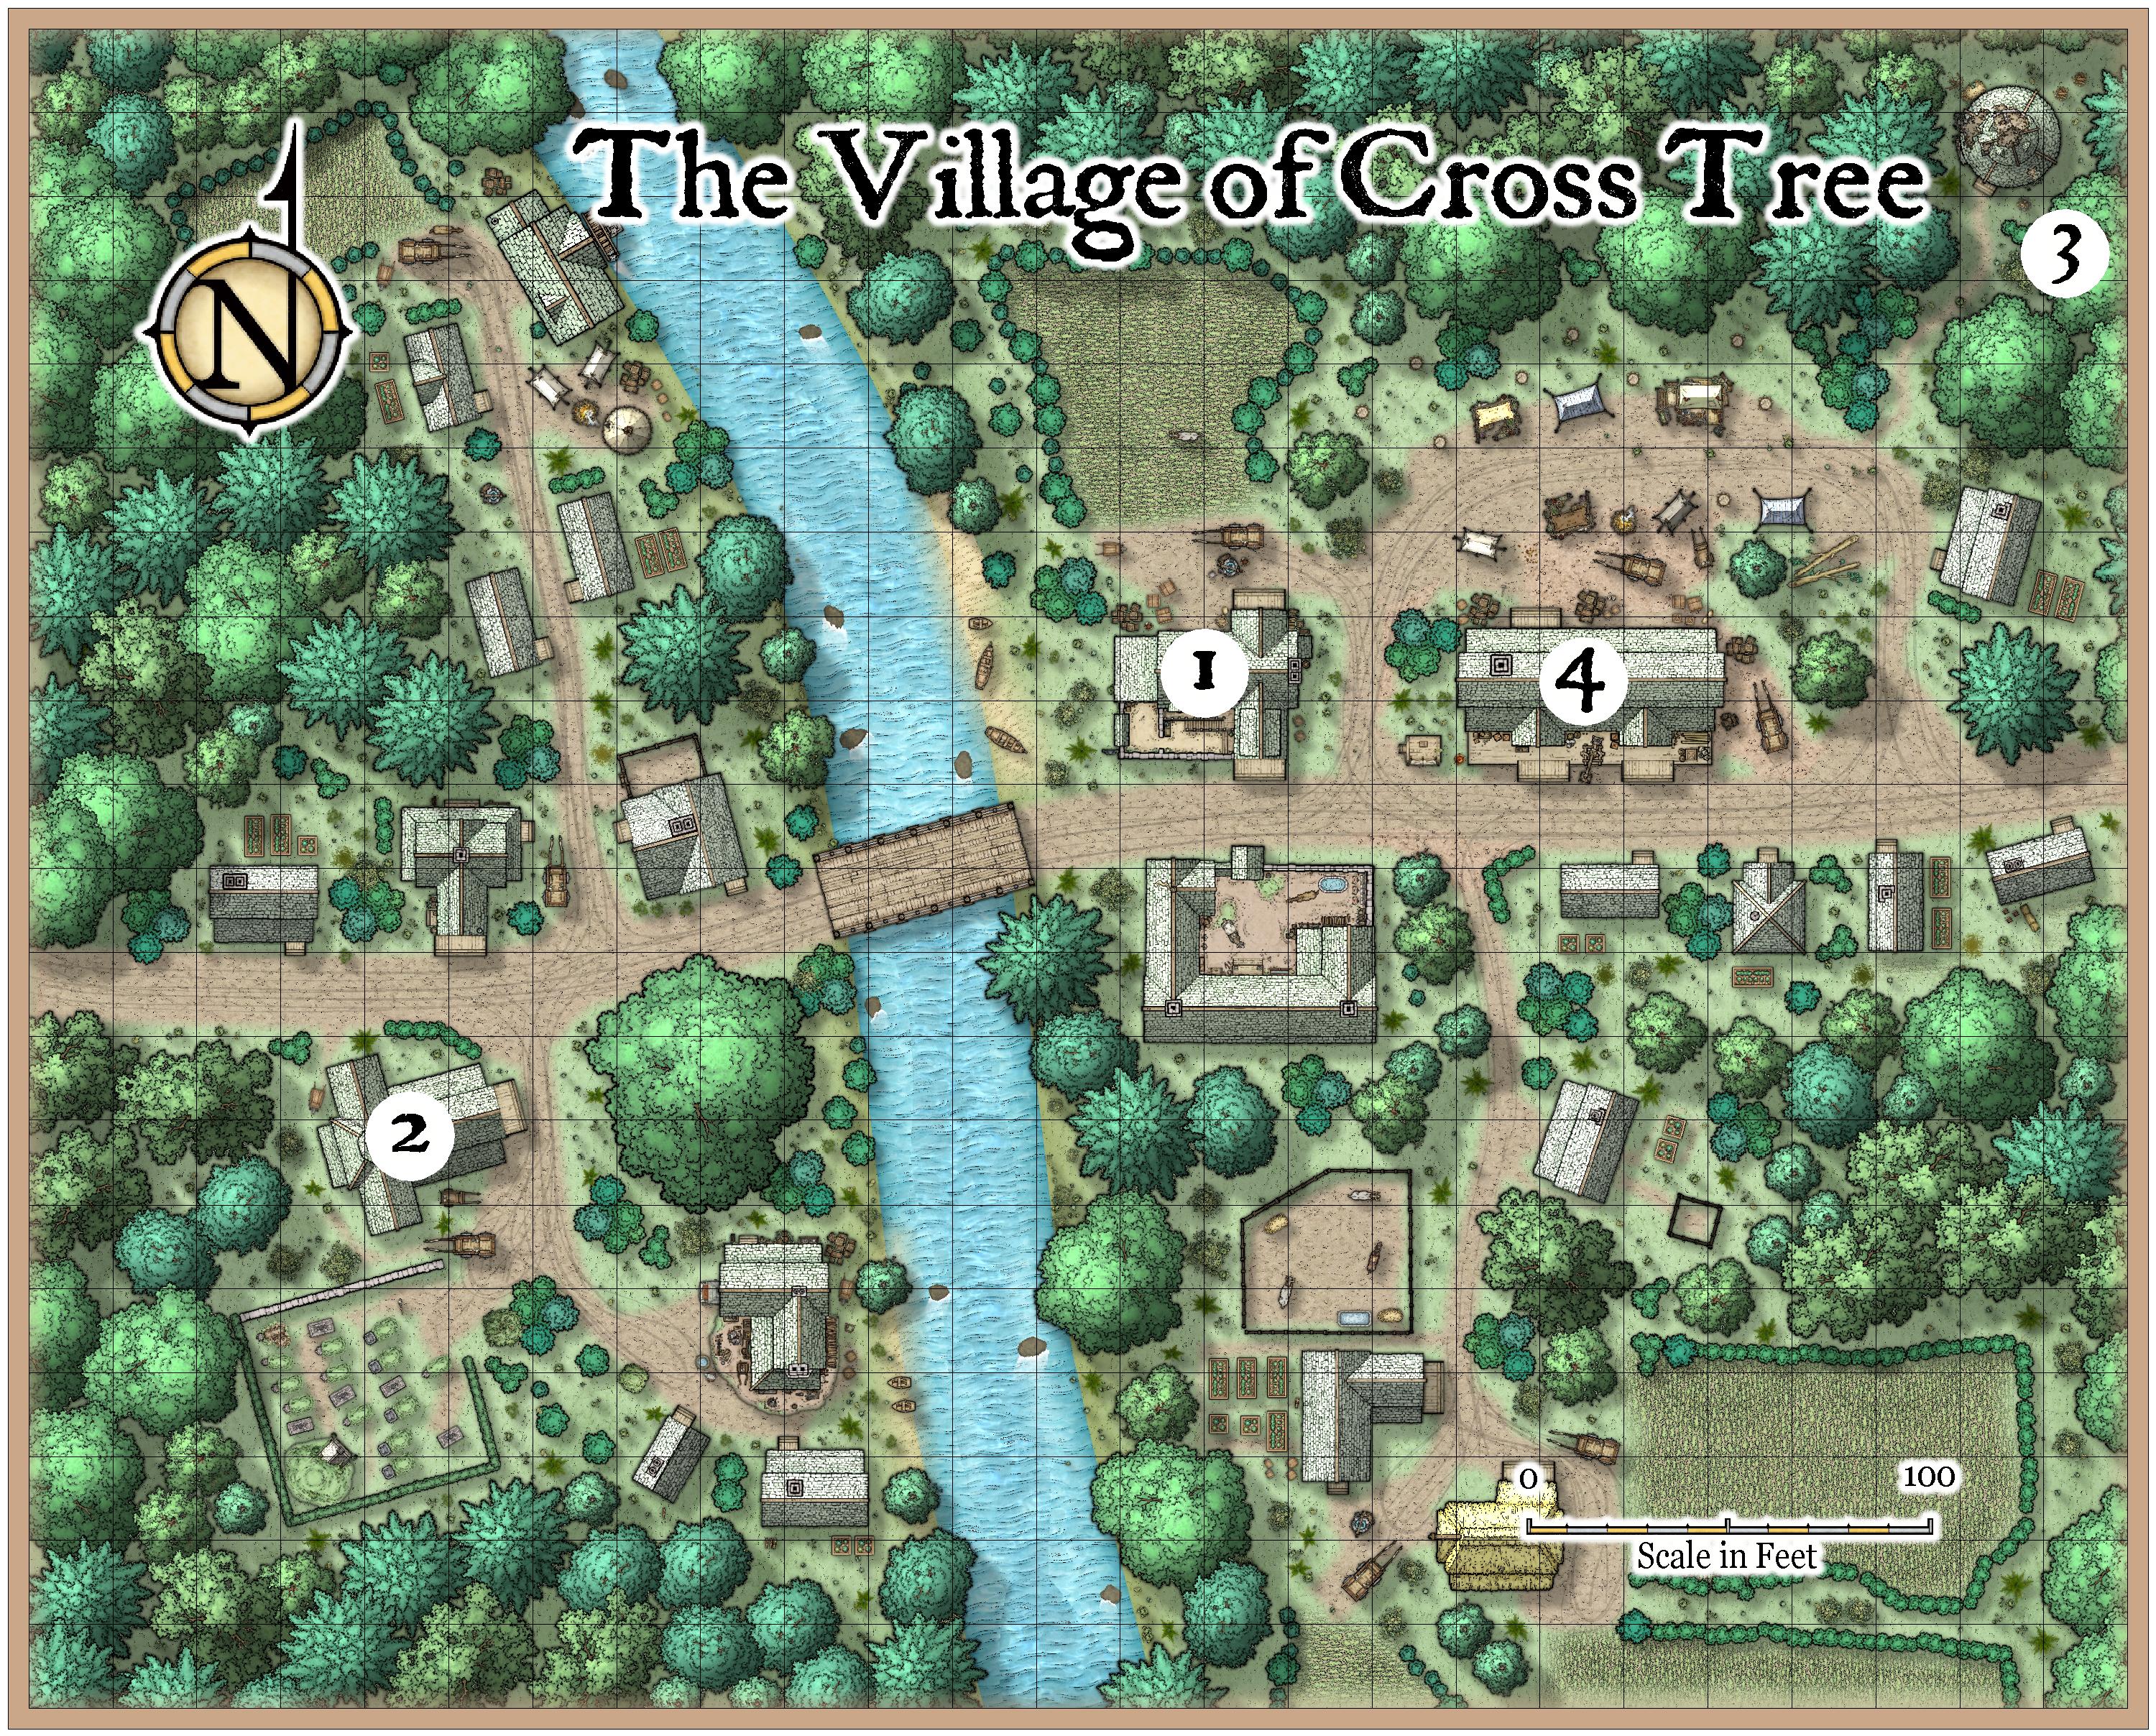
The village of Cross Tree. Created with Campaign Cartographer 3+ using the Cities of Schley symbol set.
That all changed two weeks ago. It was about an hour past dusk when two traders arrived from the east. Both disheveled and wounded, they told of being ambushed by a group of bandits. Having lost their wagon and horses in the skirmish, they fled on foot. The attack had occurred within a mile of the settlement. Nothing like this had ever happened before.
Most hoped the incident was an isolated one. A party ventured forth from the village on the following day but failed to find any sign of the bandits. However, when a trapper failed to return after checking his traps last week, people became concerned. It was decided that two young men from the settlement would take the road to the west (the direction the party is coming from) and try to secure help from the nearest town.
Then, last night, the settlement was attacked. The bandits struck while all were asleep. They lit fire to thatched roofs and a number of buildings were soon ablaze. In the chaos that ensued, the blacksmith (Derek McQuarrie) was grievously wounded and the only other two citizens with any combat experience were lost.
Leagis is under the false assumption that the party has come to answer their call for aid. As it becomes apparent that they knew nothing about Cross Tree’s plight, she will be crestfallen. However, by the time her tale has been told, Leagis will have had enough time to size up the party and will be convinced that they can be of help.
She will start with the direct approach, asking for the party’s help with the bandits. If they resist outright or are hesitant, she will shift her gaze to the still smoldering buildings and fresh graves. None of the residents seem like they would be able to put up much of a fight and the cleric is not opposed to pointing that out. Without their help, Cross Tree may face another direct assault and cease to exist altogether.
Leagis Longfeather. Art by Daniel Comerci – danielcomerci.com
Leagis is not averse to pointing out the fact that the party already seems to be heading in the direction that the bandits have been coming from. Even if they do not wish to offer their assistance, it would seem likely that the party may encounter the band once they travel forth from Cross Tree.
Some of the more enterprising adventurers are likely to test the waters and inquire as to what may be gained if they agree to help. Neither Leagis, nor any of the other residents will agree to join an expedition (they are shaken and feel that they have lost too much already). However, they would be very appreciative and are willing to do what they can to secure the help of the adventurers.
Leagis will not press the issue of the bandits too much from here. Rather she will allow the party to let everything sink in and be willing to answer any questions that they may have. She is able to offer the party a sum of 75 gold coins if they would be willing to deal with the bandit threat and return certain items that have been stolen. In addition, she will see to it that the party will not need to spend their coin on room and board for the night. Whether the party agrees to help or not, Leagis will invite them to join her for dinner at the inn.
The Cross Tree Inn
Cross Tree’s modest inn is named The Cross Tree Inn and it appears to have made it through last night’s raid unscathed. If the PCs travel with horses or pack animals of any sort, a stable hand will appear to lead them away to the stables across the street and will politely refuse any payment.
The silver-haired cleric leads the party over to the settlement’s largest building. A weathered sign above the doorway designates it as “The Cross Tree Inn”. Opening the door, the party will immediately know this to be the source of the roasting meat they had smelled earlier.
There is a step down to the earthen floor of the common room and a modest fire lazily crackles on the other side of the room. Leagis motions to an empty table in the corner and they notice that the inn is filling up for the dinner meal. Despite the common room being densely filled, there is a somber air about the place. Looking about, the party can tell that others are taking interest in their table. While none are gawking, it is clear that they are curious about the PCs.
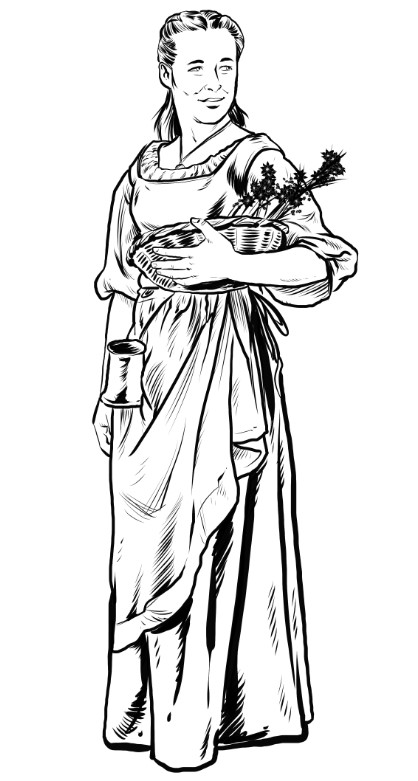
As they are all seated, the cleric speaks to the group. “You are guests here, so I do not wish to make you uncomfortable. However, we are in need so I must at least try to help my people. Whether you decide to help us or not, please simply enjoy our hospitality.” The table will be attended by the proprietor himself, a burly fellow in a stained apron named Killian Merric. The innkeeper arrives at the table and humbly takes the orders for each party member.
Killian Merric. Publisher’s Choice Quality Stock Art @ Rick Hershey / Fat Goblin Games. http://www.fatgoblingames.com
Role-Playing in the Cross Tree Inn
It is possible that the party is already clambering to help with the bandits. However, it is also possible that they need more convincing. If this is a first adventure for yourself or some of your players, this is a good opportunity for you to fit in a bit of role-playing. It is likely that your players can feel the story setting itself up before their eyes but ideally you want this to be a cooperative experience, rather than simply a situation where you do all of the talking.
Leagis will stick to her word and not badger the PCs about lending their aid. However, she is curious about them, where they are from, and where they are headed. She will not be impolite and will respect and boundaries that the characters put up, but she will probe a bit. If your players have not introduced and described their characters yet, this would be a perfect opportunity.
The party will likely want to question the villagers about the bandits. If asked about their numbers? The villagers will claim that there had been anywhere from 6 to 8 bandits. They all appeared to be human and were led by a great brute of a man with two hand axes.
In addition to the monetary reward that Leagis offered, the two traders who had been ambushed will also offer an appropriate reward if their wagon and supplies can be returned. In particular, a satchel of medicinal herbs and business ledger were lost. The herbs in particular are of great importance to the village.
If party members happen to mingle with the villagers at the inn, they may hear one or more of the following rumors. Of course not all rumors are true. Rumors followed by an “F” are false.
A dragon has been seen flying over the hills to the northeast. F
There was an earthquake three weeks ago. While the village was spared, there were a number of tree falls and rockslides to the east of the village.
One of the villagers may mention a legend that there are the ruins of a lost city located deep within the forest.
One of the villagers may mention that the bandits used magical fire to light some of the village buildings on fire. F
Local wildlife has been unusually restless and aggressive. F
The barmaid (Karia Merric) found and antique suit of armor out in the woods and brought it back for the blacksmith to inspect.
Lodging will be provided for the players at the inn. If the party is willing to take up the challenge, the owners of the mercantile would be willing to help modestly equip them for their undertaking. The night will pass uneventfully and assuming the party heads out in search of the bandits the following morning The villagers will send them off with well wishes.
On the Road
The road leading east out of the village is heavily wooded. Assuming the party inquired with the villagers ahead of time, they would know that the initial ambush of the traders took place roughly a mile outside of Cross Tree. What the PCs won’t be aware of is that the bandits are currently camped about 5 miles from this location.
Depending on your game, hunting down the brigands could largely be hand waived away by allowing any PCs with the Tracking general skill to successfully pick up the trail. However, if you’re looking to prolong things a bit and convey the feeling of searching for their quarry, I’m adding a list of random occurrences below. Some of the results will pertain to the hunt for the bandits and some are merely mundane encounters. Roll a d10 and consult the list. Continue to roll against the list and play out the results (ignoring any repeat results) until the party has achieved 3 results pertaining to locating the bandits. At that point they will have closed in on the bandit camp.
Road to the bandit camp.
Discarded Supplies: The party stumbles upon a small clearing where they find a few items—such as a torn piece of cloth, a broken arrow, or a half-eaten piece of dried meat—hastily discarded by the bandits. These items indicate that the bandits were recently in the area and they are on the right track.
Freshwater Spring: The party crosses a spring-fed stream. This crystal-clear waterway yields tasty trout, to anyone with the skill to fish them out.
Faint Campfire Smoke: As the party travels, they catch a glimpse of faint smoke rising above the treetops in the distance. This smoke is coming from the bandits’ campfire, and heading in that direction will bring the party closer to their quarry.
Boar Attack: The party startles a large wild boar and the beast charges out of the forest to attack. (AC 7; HD 3; hp 15; MV 90′ (30’); #AT 1 tusk; D 2d4; Save F2; ML 9; AL N)
Wagon Tracks in the Mud: The road becomes muddy in a low-lying area, and the party spots deep wagon tracks that veer off the road and into the forest. These tracks were made by the bandits as they moved the stolen wagon off the road.
Berries: A bountiful berry patch lines the side of the road, allowing the party a delicious snack.
Distant Voices: The wind carries the sound of faint, hushed voices coming from the forest. If the party follows the sound, they will find themselves approaching the bandits’ location.
Road to Nowhere: A warn game trail leads off from the road but eventually becomes too narrow to follow.
Broken Branches and Trampled Underbrush: The party notices a section of the forest where branches have been broken and the underbrush is trampled, as if a group of people or animals recently passed through in a hurry. Following this trail leads the party closer to the bandits’ camp.
Giant Bees: A loud buzzing sound leads the party to a beehive the size of a man. The bees will not mess with the party unless their hive is disturbed.
The Bandit Camp
The bandit camp lies just off the north side of the road, approximately 6 miles from the Village of Cross Tree. The road has been winding northeast, gradually ascending as it passes through the dense forest. Occasionally, the party may catch glimpses of the distant mountains to the north through breaks in the trees. Evidence of the recent earthquake is visible here and there in the form of downed trees, cracked rocks, and small landslides.
Unbeknownst to the PCs, the brigands have been experiencing increasing unease since the events of the previous night. The camp, initially set up as a base to raid the village of Cross Tree, has become a place of growing tension and fear. Kargan Pike, the bandits’ leader, had seen the village as easy prey, leading his band of cutthroats to harass the villagers with little resistance. Confident in their success, Pike instructed his men to establish a camp just off the road, close enough to launch further raids but far enough to avoid immediate detection.
While setting up camp, the bandits discovered a cave entrance hidden in the hillside, likely revealed by the recent earthquake. This entrance, flanked by trees and half-covered in debris, piqued Pike’s interest. Curiosity got the better of him, and he ordered one of his men to light a torch and accompany him into the cave. The pair disappeared into the darkness, leaving the rest of the group to continue their tasks.
That was nearly a day ago. As the minutes turned into hours, the remaining bandits grew anxious. They began hearing strange, unsettling noises emanating from the cave—low moans, distant echoes, and, at one point, a bloodcurdling scream that sent shivers down their spines. The night brought no relief, as the eerie silence from within the cave only heightened their fear. None of the remaining six bandits managed more than a few moments of restless sleep, and by dawn, the tension had reached a breaking point.
Now, with the sun up, a heated argument has broken out among the group. Half of the bandits are eager to flee, suggesting they split the remaining loot and leave Pike to whatever fate has befallen him. The others, more cautious or perhaps more loyal, argue that they should wait another night, hoping their leader will return and guide them out of this mess. Fear, uncertainty, and the looming sense of doom have frayed their nerves, and the tension among them is palpable.
Bandit camp. No labels.
As the party approaches the camp, they will likely overhear the bickering. The sounds of raised voices and the crackling of a smoldering campfire carry through the woods. With a bit of caution, the party should be able to spot the two sentries at locations #1 and #2 without being detected, and with further careful observation, they may glimpse the remaining four bandits arguing near the campfire.
The bandits are distracted and on edge, making them less likely to notice the party’s approach. Unless the adventurers make a significant amount of noise, I’d allow the party a surprise round of actions. If you’d prefer a random check, the bandits will be surprised on a roll of 1-4 on a d6 (as opposed to the normal 1-2 per the Rules Cyclopedia). The situation is volatile, and how the party chooses to engage—or exploit—the tension among the bandits will determine the course of the encounter.
Bandit stats are as follows:
AC 7; HD 1; hp 4; MV 90′ (30′); #AT 1 short sword or 1 short bow; D 1d6 (short sword) or 1d6 (short bow); Save T1; ML 8; AL C.
AC 7; HD 1; hp 6; MV 90′ (30′); #AT 1 hand axe or 1 short bow; D 1d6 (hand axe) or 1d6 (short bow); Save T1; ML 8; AL C.
AC 8; HD 1; hp 5; MV 90′ (30′); #AT 1 club; D 1d4; Save T1; ML 8; AL C.
AC 7; HD 1; hp 4; MV 90′ (30′); #AT 1 short sword; D 1d6; Save T1; ML 8; AL C
AC 7; HD 1; hp 3; MV 90′ (30′); #AT 1 hand axe; D 1d6; Save T1; ML 8; AL C
AC 8; HD 1; hp 4; MV 90′ (30′); #AT 1 hand axe; D 1d6; Save T1; ML 8; AL C
If the party calls out to the bandits or they somehow don’t manage to surprise them, the band will attack, albeit haphazardly. The brigands are skittish from the start, if two of their group are incapacitated or the PCs are seen to be using any magical attacks, they may opt to flee or surrender. If you are using the optional morale rules, consider having the bandits make a morale check at -2. Then I’d apply an additional -2 penalty again as each subsequent bandit goes down.
Captured individuals will beg for their lives and clearly be confused at the PC’s arrival on the scene. Having met no real resistance from the villagers, they will clearly be confused at the PC’s arrival on the scene. If questioned, they will gladly provide as much information as they are able, regarding their activities and what happened to their leader (at least as much as they know). If questioned about the missing trapper, even under duress, they claim to have no knowledge. They do not know what is inside the cave or what became of Pike. However, they will point out that their leader had both the missing business ledger and satchel of medicinal herbs on his person.
All of the other missing items from Cross tree may be found around the bandit camp, including the wagon and horses stolen from the traders. In addition, It appears that the band were traveling with some loot that did not come from the village. If the camp is thoroughly searched it will yield a small chest with 126 gp, 66 cp, a ruby brooch (80 gp), silver dagger, and bronze anklet (30 gp). The following mundane items may be found at the camp: 6 torches, a bullseye lantern, 3 pieces of chalk, a mirror, 2 flasks of oil, 100’ rope, and a tinderbox.
At this point, the question now becomes what will the party do next? Pike and one of the other bandits are still somewhere within the cave, along with some of the items that the party was hoping to have returned. Will the party venture into the cave or head back to the village with any prisoners?
Conclusion
I’m going to wrap it there for this installment. This post is admittedly much longer than I had originally intended and took me far longer to finish. However, real life work and responsibilities have been challenging distractions. I figured it best to post what I have so far and hopefully return with the next installment in a timelier fashion.
Thank you so much for taking the time to visit. These little escapes to fantasy really help to get me through rough situations at work. Hope you have a great week!
Having fleshed out the village of Cross Tree for the past couple months I wanted to start exploring some adventures and encounters. The Horror of Talaraska is an introductory scenario designed to be played in a single gaming session of 3-4 hours. If not used as a first adventure it could easily be dropped in by a GM who needs to fill a session on short notice.
This scenario was written with the Dungeons & Dragons Rules Cyclopedia from 1991 in mind. I will note that despite utilizing the Rules Cyclopedia, I’m not an OSR purist by any means. I will deviate from RAW liberally, both in creating new creatures and in mechanics for encounters. While intended as a starter adventure for ~4 players, it should be easy enough to tweak things up or down as needed.
These have been trying times for the village of Cross Tree. Choice Quality Stock Art @ Rick Hershey / Fat Goblin Games.
While Cross Tree is a location in my own campaign world, I’ve tried to create it generically enough that GMs could fit it into just about any published or homegrown setting. For instance, if you happened to be running a game in Mystara, the village should fit nicely within the Grand Duchy of Karameikos (probably somewhere north of Kelvin). Required features for the location would be a wooded region, relatively close to mountains, and more than a single day’s travel from any settlements to the east or west.
All of this is to say that everything here is flexible. I’ve personally never picked up a pre-written adventure and ran it word for word as it was presented. I’m confident that anyone perusing obscure TTRPG blogs will be able to easily convert things to any system of their choice or make any modifications as they see fit. My goal has always been to provide digestible source material to give GMs ideas and inspiration. This is no different. Take what you like, make changes as you wish, and leave the rest.
One final note before I dive in. My games tend to lean a bit lower on the fantasy scale than what seems to be trendy these days. That’s just my personal taste. If you happen to run a game with wildly diverse characters such as anthropomorphic squirrels or fish people, some of my stuff may seem a bit bland to you.
If you find my adventures to be too human-centric, simply spice things up a bit. For instance, you’re about to hear about some human brigands causing trouble in Cross Tree. They could easily be replaced with a band of gnolls. We’re all lucky to share this hobby that supports a diverse assortment of stories. Do what works for you!
Adventure Background
Village of Cross Tree. Created with Campaign Cartographer 3+ using the Dungeons of Schley symbol set.
Three weeks ago, an earthquake shook the region of the Carrowmar forest, near where the sleepy village of Cross Tree is located. While such tremors aren’t rare, this one left the villagers uneasy, fearing it might be an omen of darker times ahead. Their fears soon materialized.
Over the past week, Cross Tree has been terrorized by a group of brigands led by a fearsome brute named Kargan Pike. The trouble began when two merchants, traveling from the northeast, were ambushed on the road, narrowly escaping with their lives. Then, just last night, the bandits brazenly attacked Cross Tree. The village managed to drive them off, but not without cost: the blacksmith suffered severe injuries, and two villagers were killed.
After their raid, the bandits retreated into the forest, returning to the secluded spot where they had stashed the merchants’ wagon. As they settled in for the night, the flicker of their campfire revealed an opening in the hillside. Closer inspection suggested that the earthquake had caused this to become visible in the side of the hill. Curious yet cautious, Kargan Pike and one of his goons ventured into what they assumed was just a natural cave.
Unbeknownst to the bandit leader, the thickly wooded hills to the northeast of Cross Tree were once home to the mysterious city of Talaraska. Lost to time and now only recalled by elder sages, Talaraska was once a center of arcane knowledge, a beacon of enlightenment from another age.
Few now remain who remember the city, let alone how it came to be swallowed up by the hills and trees of the forest itself. For countless years, the relentless march of time has hidden every trace. Were it not for the earthquake, it may have sat undisturbed for years to come.
What initially seemed to be a simple cave proved to be something more, as Pike and his companion ventured deeper. As the dirt floor gave way to paving stones they discovered the true nature of their findings. The air grew thick with the dust of ages and the faint, eerie echoes of a lost civilization. The pair stumbled upon remnants of arcane symbols and ancient tomes, their pages brittle and yellowed with age.
Their intrusion, however, did not go unnoticed. As they delved further, their presence disturbed the slumber of a remnant of Talaraska’s past not meant to be disturbed. This ancient guardian, a construct powered by forgotten magics, rose from its centuries-long dormancy with a malevolent fury. Pike and his lackey were quickly overwhelmed and met a grisly end.
Now, without their leader and haunted by the unsettling sounds emanating from the cave, the remaining brigands are huddled in the forest, paralyzed by fear. They nervously debate their next move, their hands never straying far from their weapons.
The PCs will arrive in Cross Tree, unaware of the events of the past week. Appearing capable, the party will be approached by the townsfolk, asked to help with the bandits, and to retrieve some important objects.
Assuming that the adventurers agree, they will head off in search of Pike and his band of brigands. Roughly a half day’s trek outside of the village, the party will discover where the merchant’s wagon has been dragged off the road and ultimately where the bandits have made their camp. The party will presumably attack or otherwise deal with the bandit camp. At this point they will be at a crossroads where they could head back to Cross Tree to report their success or opt to venture into the cave, to discover what happened to the bandit leader.
Until Next Time
In the spirit of keeping these posts digestible, I’m going to wrap it there for this week. We’ll delve into the adventure itself next time. Thank you for taking the time to stop by and visit. Hope you have a great week!
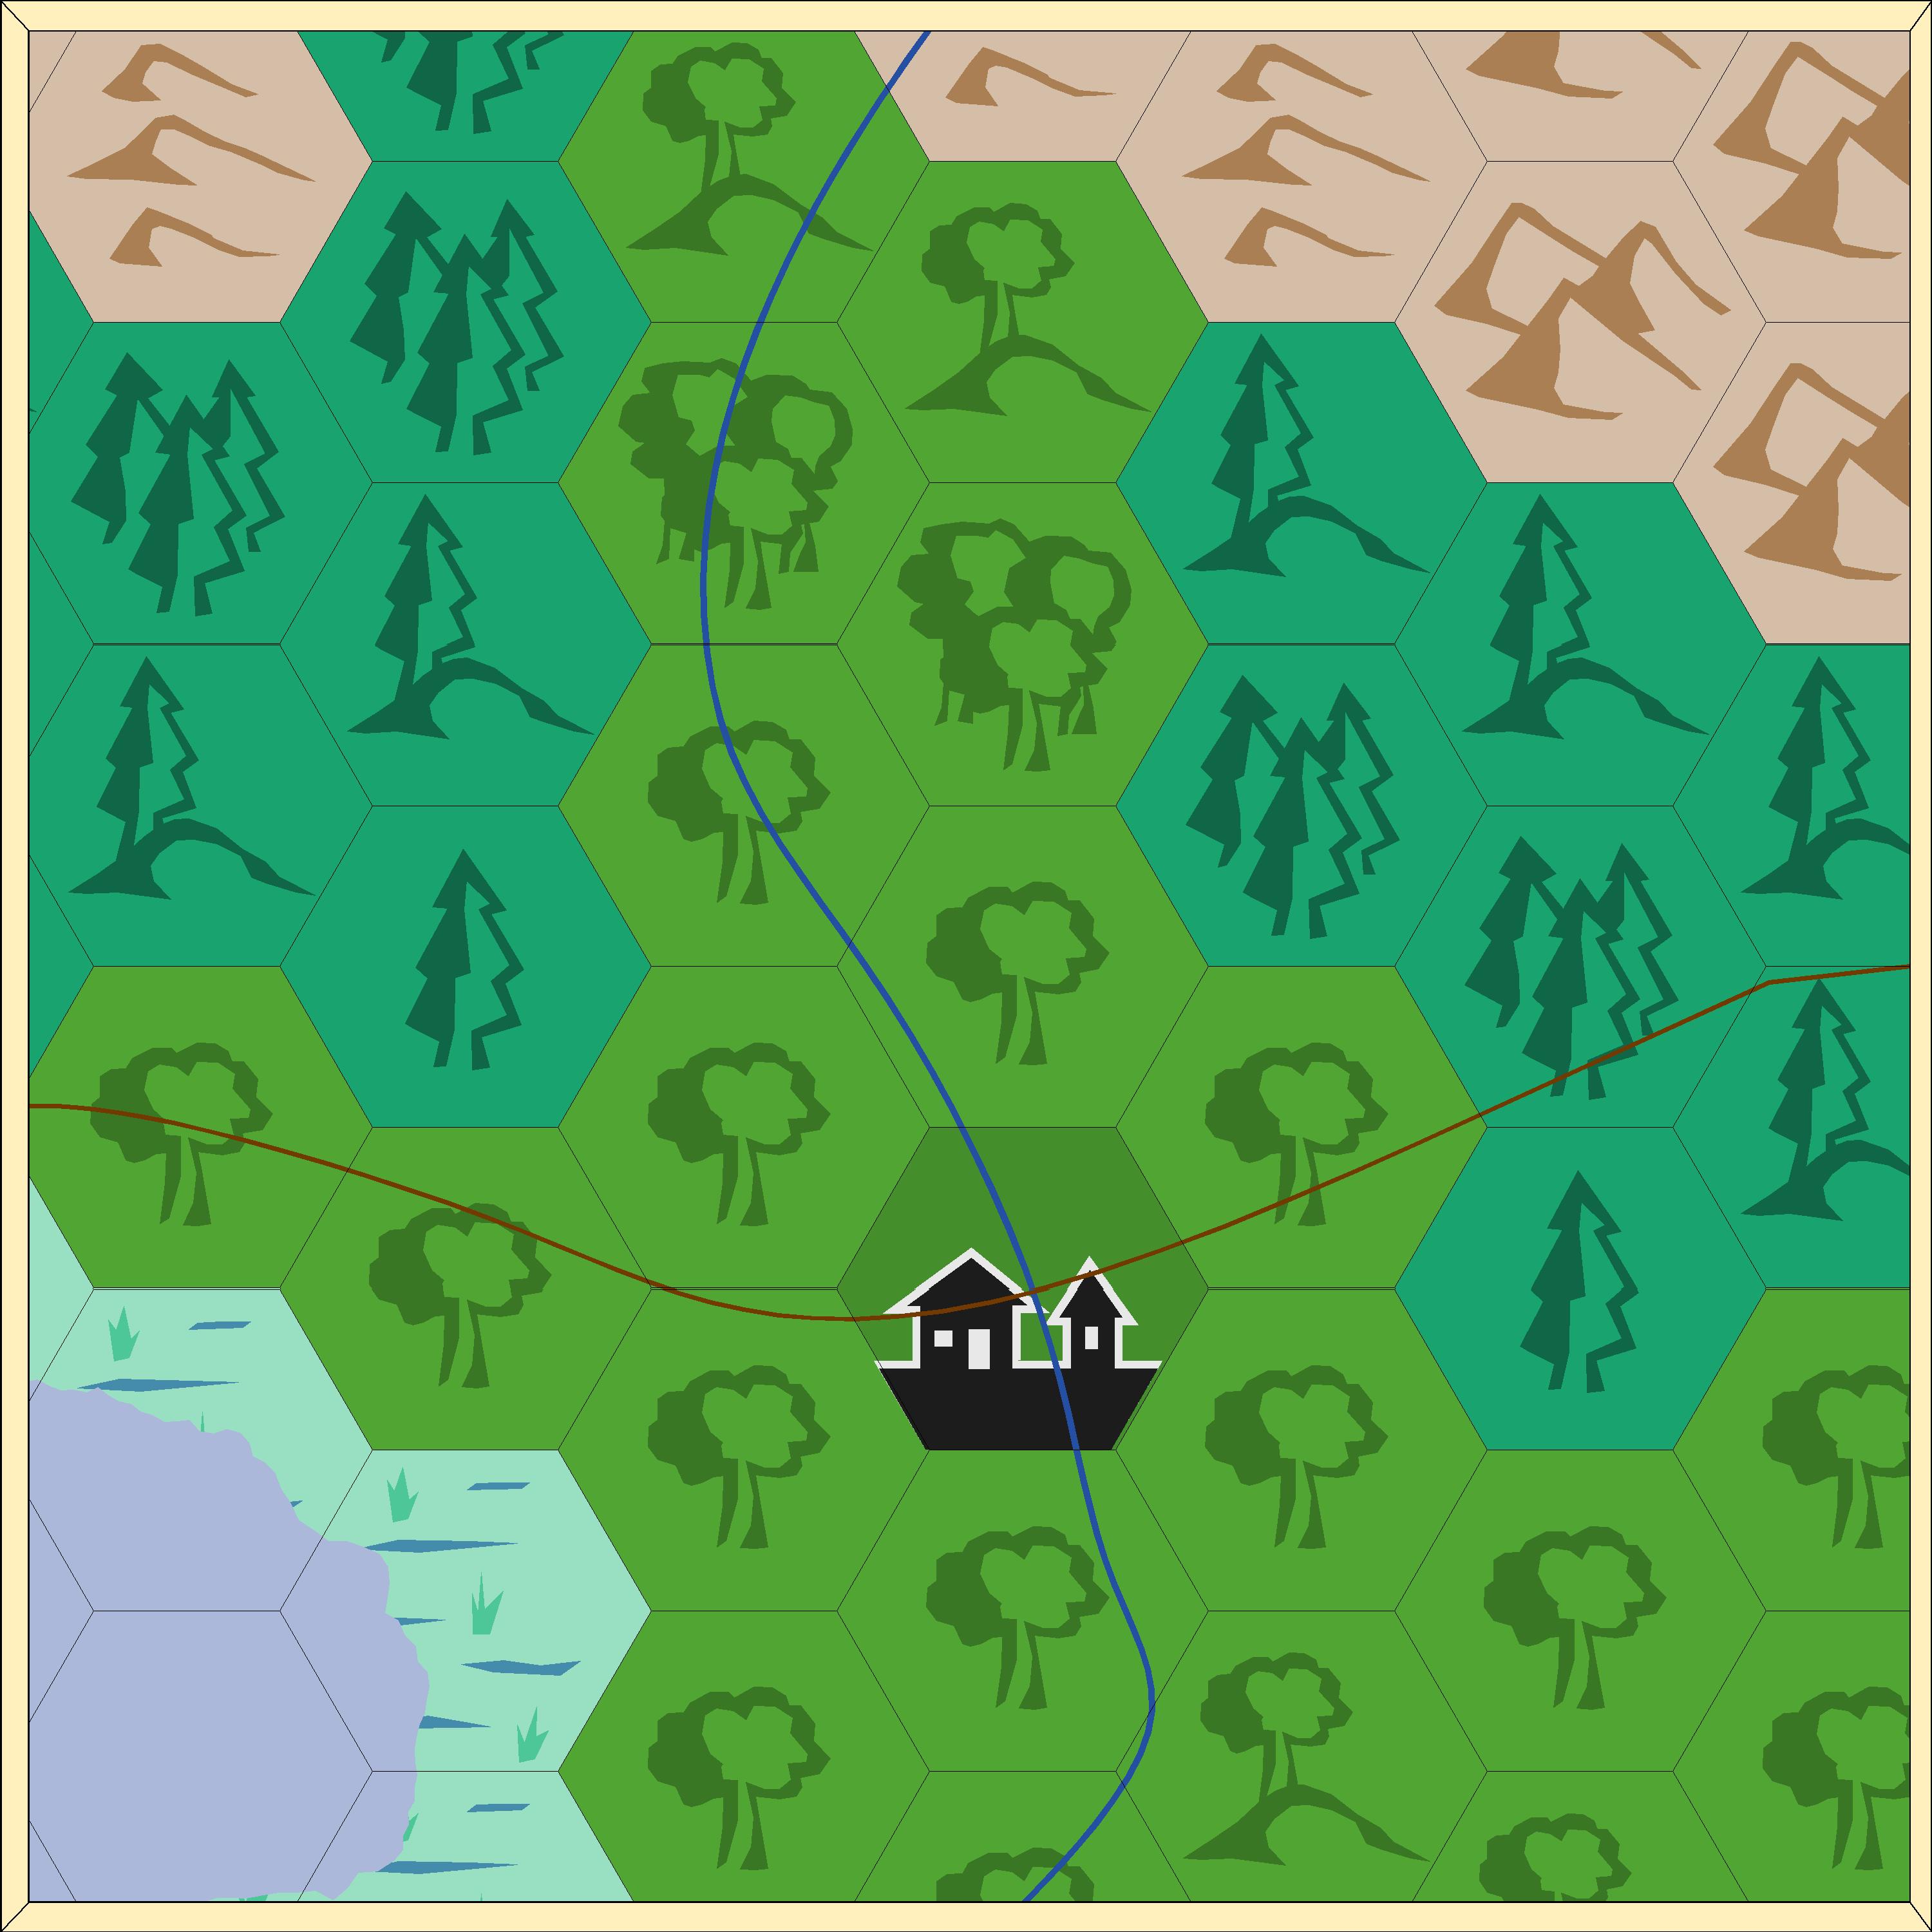
Cross Tree and it’s environs are waiting to be explored. Created with Campaign Cartographer 3+ using the Spectrum Overland symbol set.
My aim when I started this blog was to create bite-sized or modular source material that TTRPG gamemasters could use for inspiration or to help run their games. In pursuit of this, I’ve spent the past couple months creating and populating a starting village named Cross Tree.
Cross Tree is intended to be a simple starting area that can easily be dropped into just about any fantasy setting, while using pretty much any rule set. GMs can use the whole thing as is, or simply pick and choose the elements that work for their game. Others may just lift an NPC or a bit of text that inspires them. I’ve fleshed out several of the most important locations within the village and have turned my eye toward writing some adventures that would use Cross Tree as a home base.
I’ve written previously regarding using a “Who’s Who” as a tool for managing NPCs and places within your campaign. I’ve been doing this for over 40 years and the practice has served me well. I’ve linked the original post above but basically, whenever I create an NPC or location that the players are likely to encounter, I jot down a line or two about them. This not only helps me while we’re at the table but also while I’m putting adventures together.
As I start piecing together my first adventure out of Cross Tree, here’s what I’ve got so far:
Carrowmar Forest – The forest surrounding the Village of Cross Tree, home to various adventures and the location where Karia found an antique suit of armor (see blacksmith).
Cross Tree – An ancient oak located across from the church. This is the tree that the village is named for, due to a cross burned into it. (see the Cross Tree Inn for the story of the tree).
Cross Tree Inn – The inn of the village where many locals and travelers gather. Managed by Killian Merric and his niece Karia.
Fuchs, Astolpho – Owner of the mercantile in Cross Tree. Originally from a large city, he and his wife Gina are in hiding after betraying a thieves’ guild.
Fuchs, Gina – Wife of Astolpho Fuchs, co-owner of the mercantile. They are both in hiding after escaping from a life entangled with a thieves’ guild.
Grenton – A major trade hub to the west of Cross Tree and the original home of Derrick McQuarrie.
Keen, Adam – Father of Taryn Keen, also an adventurer in his youth. Adam vanished around the same time his brother Benjamin did.
Keen, Benjamin – Uncle of Taryn Keen and previous owner of the stables, known for his obsession with the legend of a lost city. He went missing two years ago.
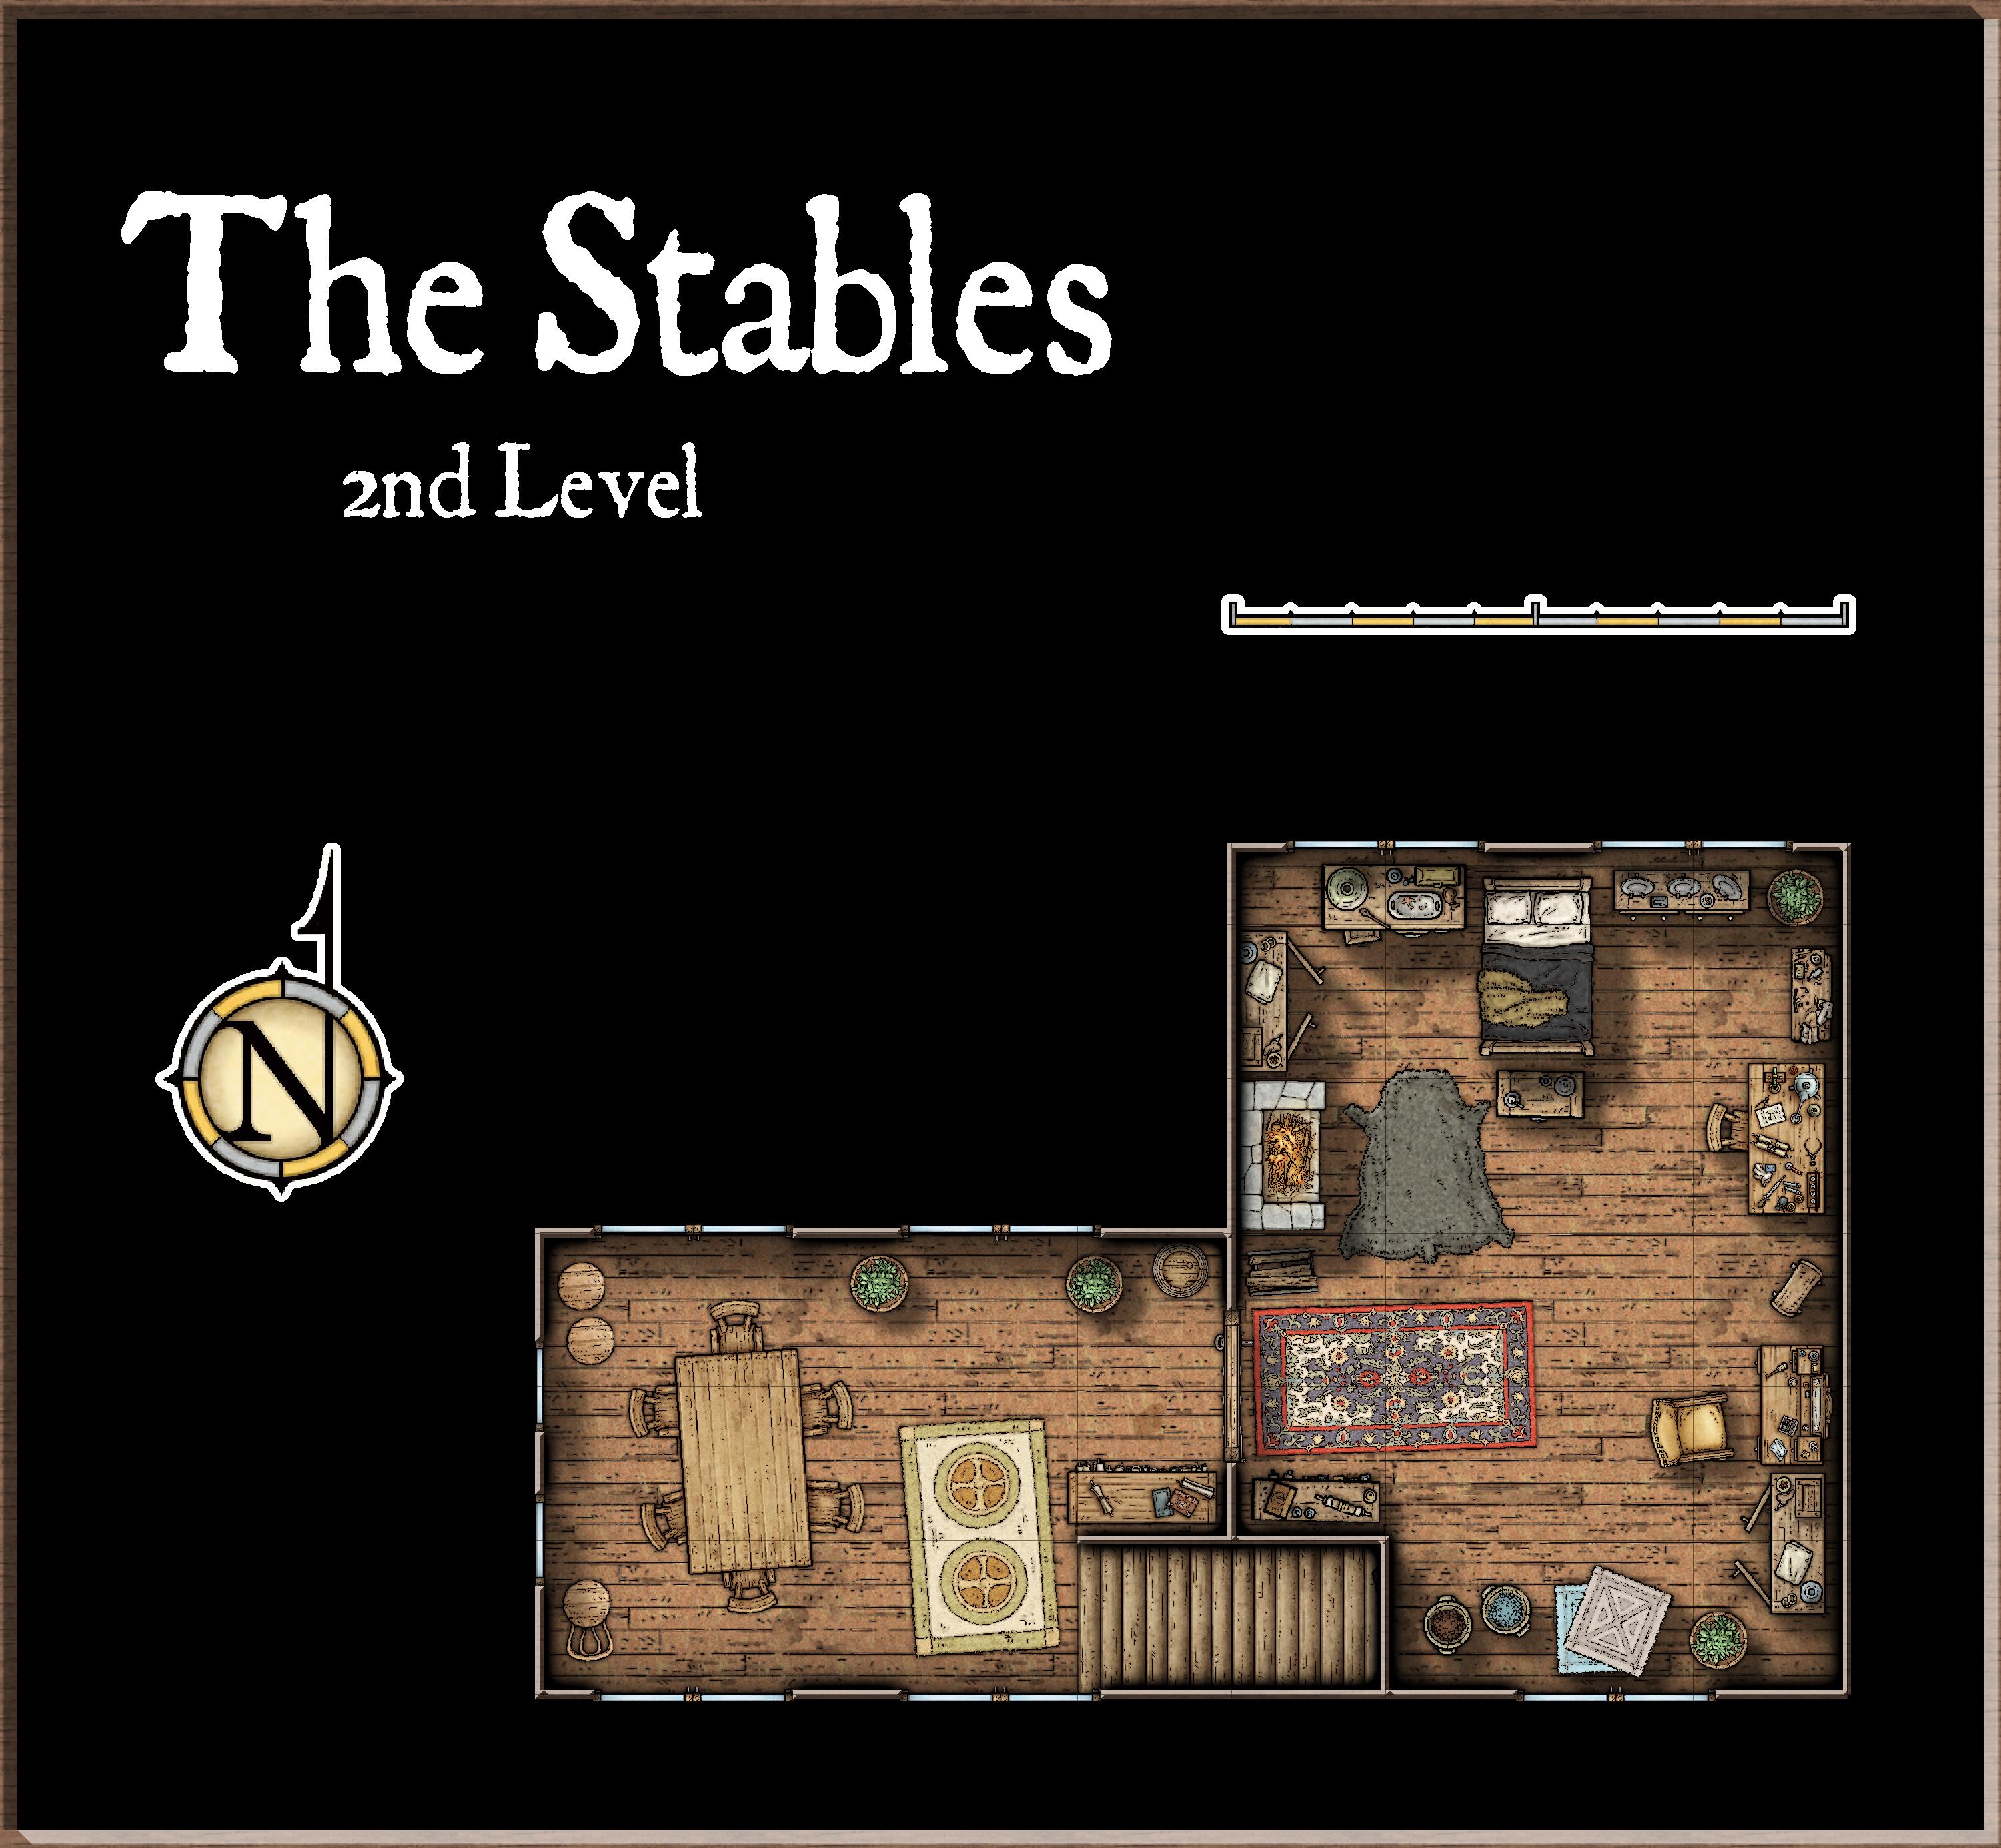
Keen, Taryn – Current owner of the stables, who took over after her uncle Benjamin went missing. She is relatively new to the village and is working to restore the stables.
Kormou, Leagis – The priestess of a nature deity residing in the village church, known for her peaceful demeanor and extensive travels.
McQuarrie, Derrick – The village blacksmith, a skilled craftsman originally from the city of Grenton. He settled in Cross Tree after being hired to work on the village bridge.
Merric, Karia – Niece of Killian Merric, who helps him run the Cross Tree Inn. She is an aspiring herbalist and plays a significant role in the village.
Merric, Killian – The proprietor of the Cross Tree Inn, known for his hospitality and knowledge of the local area.
Nicodemus – A reclusive old man living in the ruined tower. He is mysterious and known to be knowledgeable about many things, possibly magical.
Pine Creek – The small river along which the Village of Cross Tree is settled.
Tinkering around with hexes in true old-school fashion but I’m not quite there yet.
Closing
That will do it for this week. Thank you for taking the time to visit and I hope you have a great week!
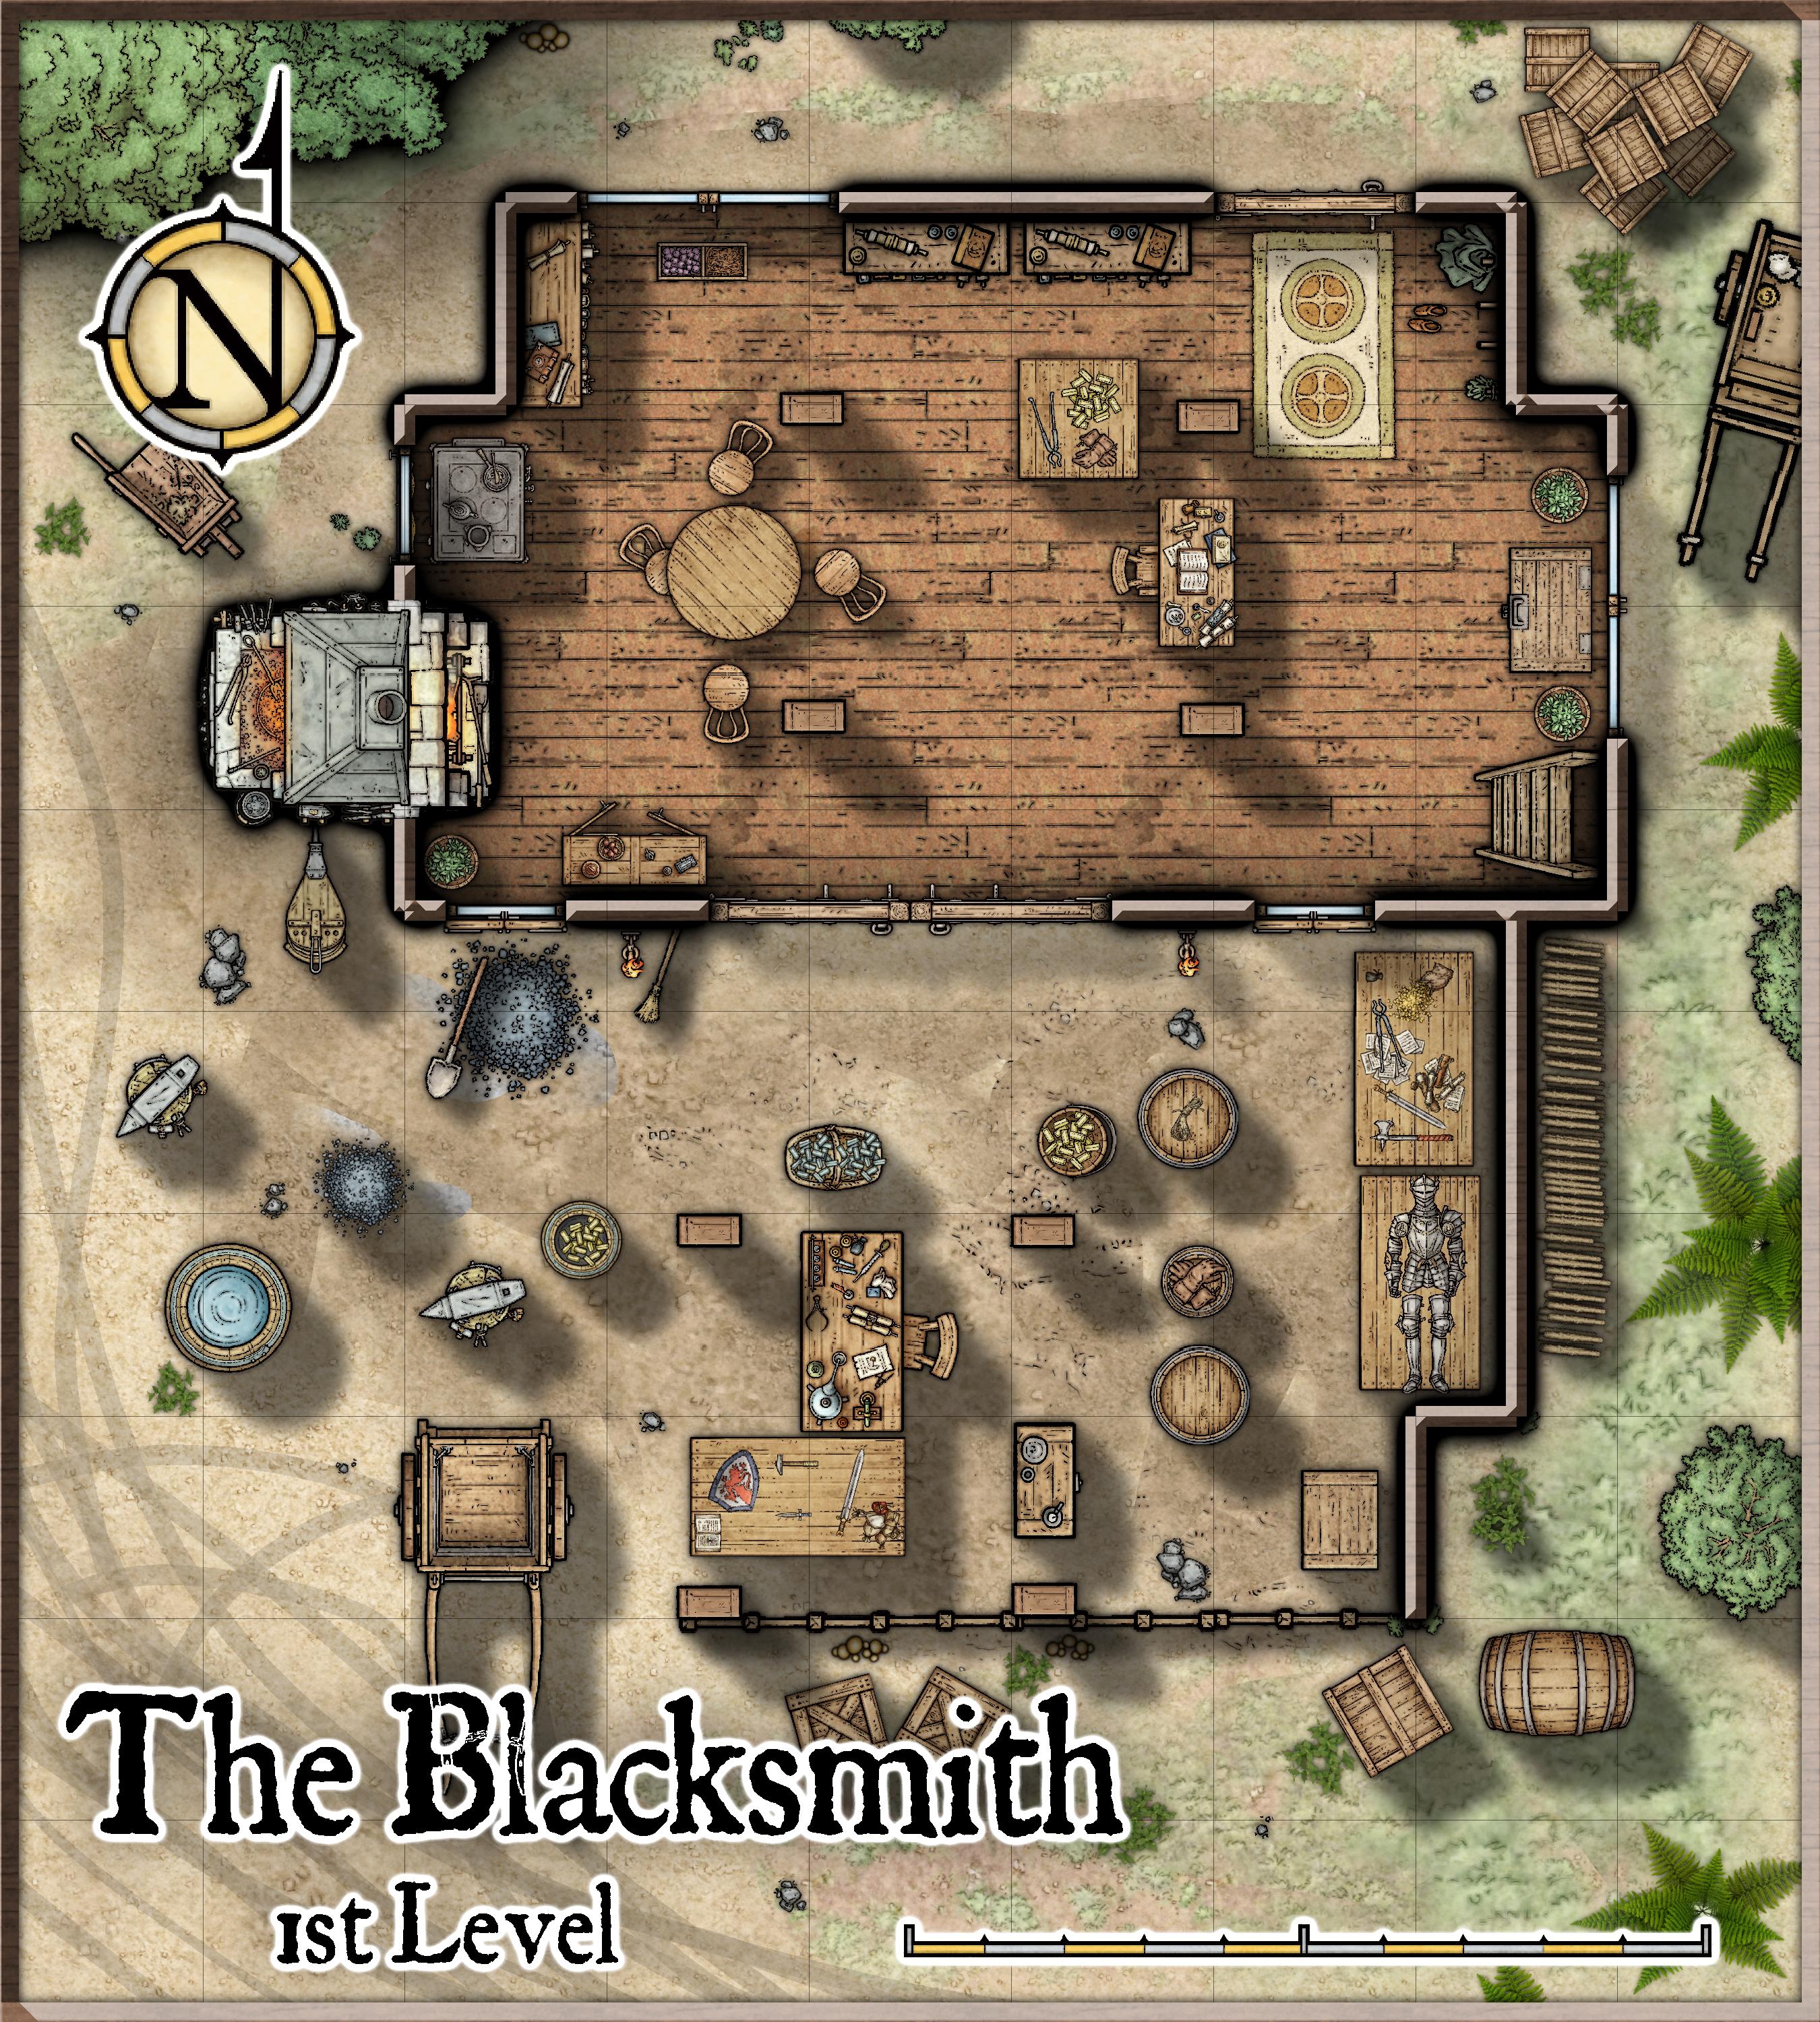
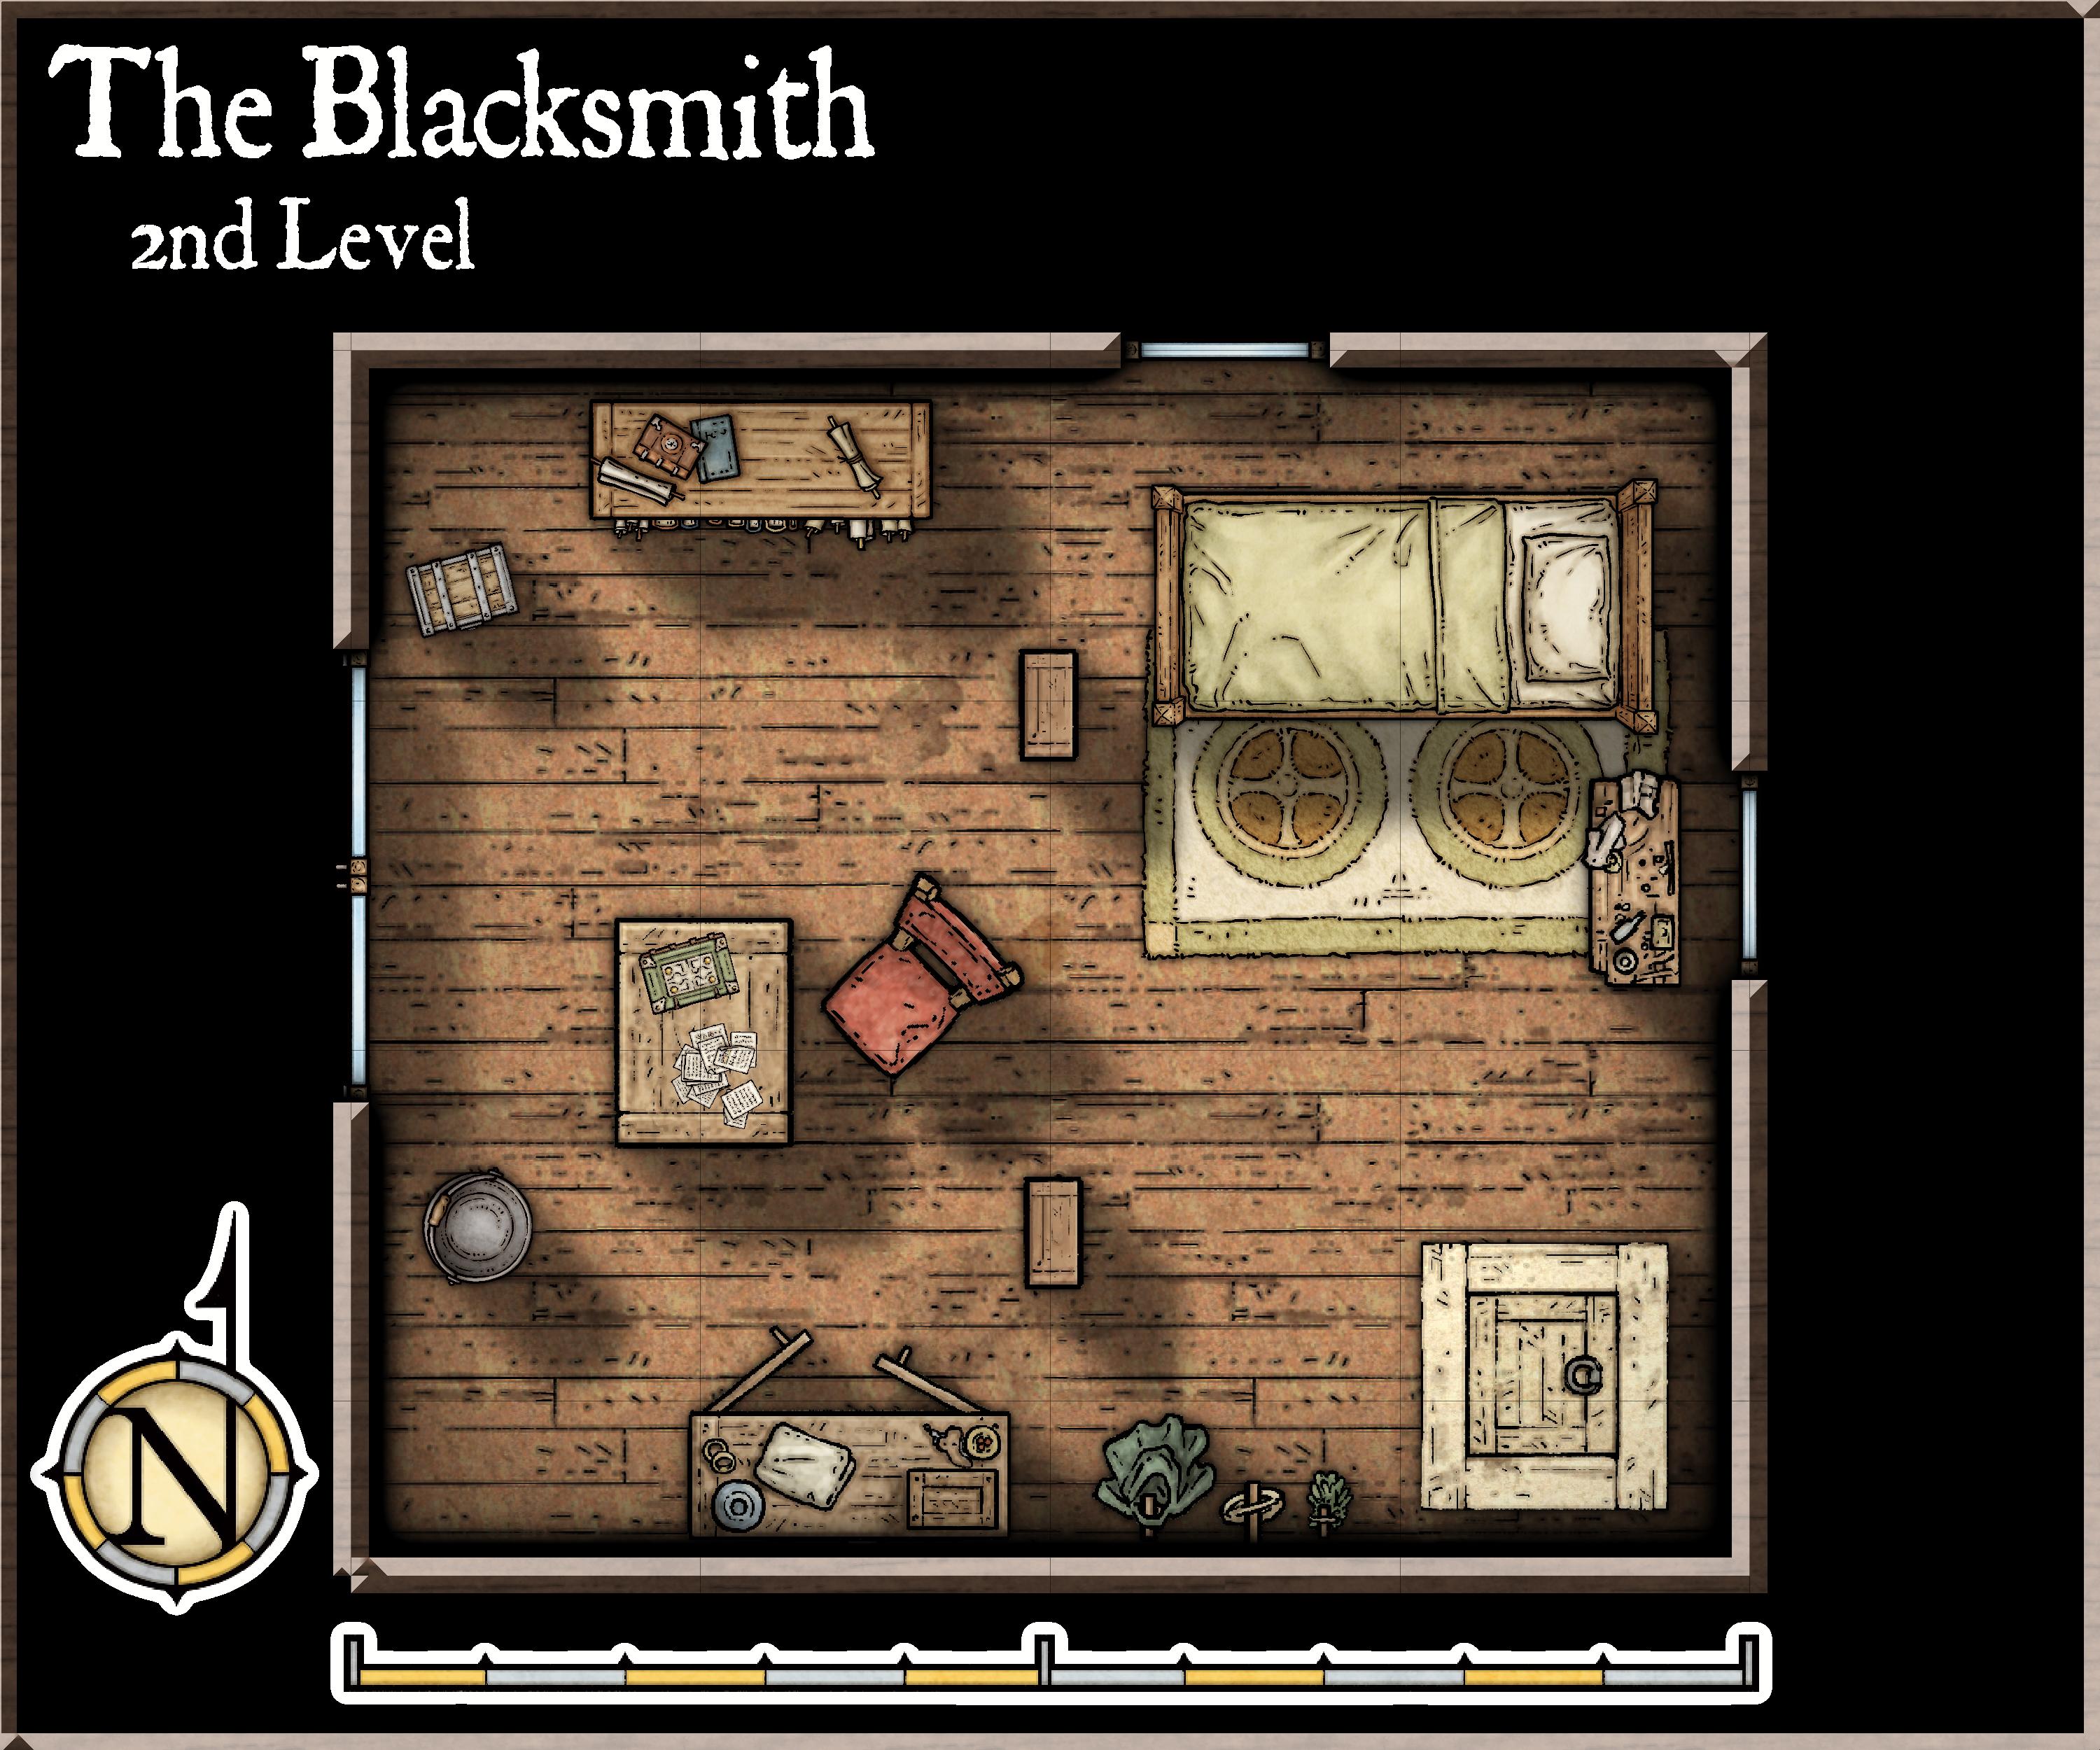
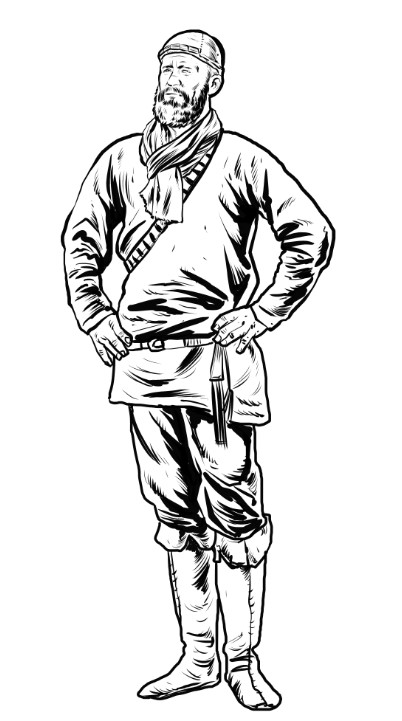
Rhythmic clanging of metal strikes can be heard as one approaches this simple structure, located just south of the great “Cross Tree” that the village is named for. Situated along the western shore of Pine Creek, a simple living quarters stands at the northern part of the property, with a partially enclosed workshop out front.
Created using Campaign Cartographer 3+ with the Dungeons of Schley symbol set.
Derek McQuarrie
Derek McQuarrie. Publisher’s Choice Quality Stock Art @ Rick Hershey / Fat Goblin Games. http://www.fatgoblingames.com
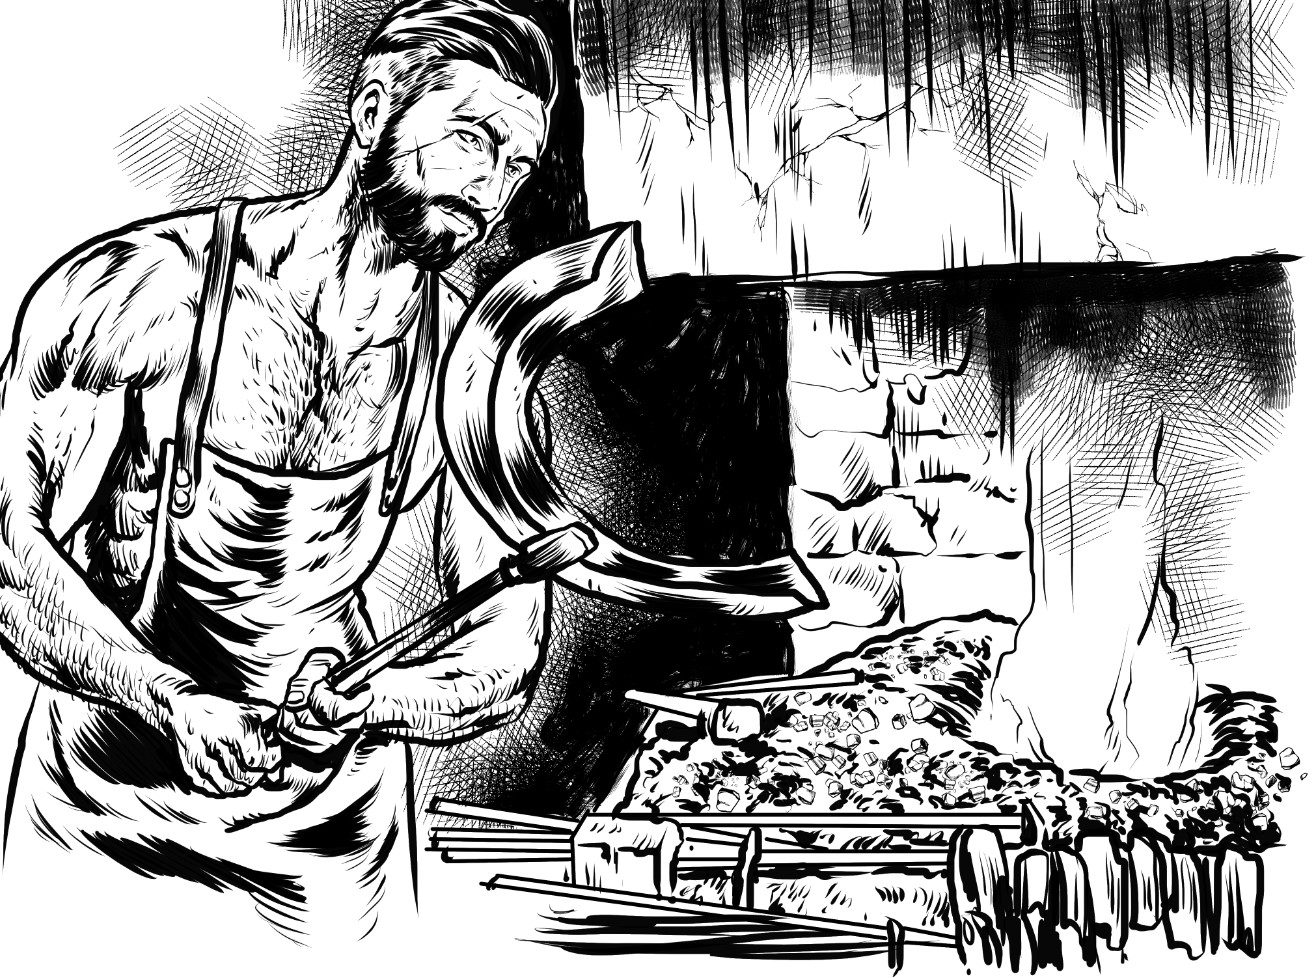
The village blacksmith, Derek McQuarrie, is a man of sturdy build with a rugged beard. He’s a striking fellow of roughly 30 years of age, bearing a long scar down the right side of his face. Well-muscled from years spent plying his trade, initial impressions of the blacksmith would suggest he was quite stern. However, despite his imposing presence, his hands are always extended in welcome to visitors.
Originally contracted by Astolpho Fuchs (see the Mercantile) to produce new supports for the village’s sole bridge, Derek ended up deciding to remain in the village. That was nearly 6 years ago now and the blacksmith has built a comfortable life for himself.
Derek was born in the bustling city of Grenton, a major trade hub situated to the west of Cross Tree. Orphaned at a young age, he took up a role as an apprentice blacksmith. Growing up in the shadow of the forge, Derek learned the trade and mastered the art of shaping metal long before he was fully grown. Cross Tree provided a place where he could establish his own name, free from the competitive pressures of the city.
The village of Cross Tree. Created with Campaign Cartographer 3+ using the Cities of Schley symbol set.
The Blacksmith Shop
A solid oak wall on the eastern side shields the workspace from the wind and provides hanging space for tools and materials. The rest of the shop is open to the elements, supported by sturdy wooden beams that frame the structure. The workshop is cluttered yet organized, with various projects in different stages of completion laid out on worktables.
A stone forge stands along the western wall of the structure and this is where the proprietor can often be found. His actual living quarters are modest but cozy. In the southeast corner, a ladder disappears through a trapdoor to the bedroom above.
Plot Hooks & Encounters
Antique Armor: A few weeks ago, Karia Merric (from the Cross Tree Inn) found a suit of armor while wandering through the Carrowmar forest looking for herbs. Upon her return to the village, she mentioned it to Derek and he set out immediately to retrieve it. The armor is quite ornate and fashioned in a style from another age. The blacksmith is curious about its origins and may hire the party to do some research (or perhaps scour the woods for other pieces).
Supply Chain Disruption: Derek is facing a shortage of high-quality iron due to disturbances at the local mine (perhaps a strike or a natural disaster). He might hire the party to sort out the troubles at the mine, ensuring that his supply of metal isn’t jeopardized.
The Debt: Derek confesses to the party that he’s indebted to a merchant from his past in Grenton due to the initial funding he received to set up his forge in Cross Tree. The merchant has come calling for repayment with interest, and Derek needs help negotiating more favorable terms or finding a way to quickly raise the needed funds.
A Rival’s Challenge: A rival blacksmith from a neighboring town has challenged Derek to a crafting competition. Derek needs assistance to gather rare materials scattered throughout the region. Adventurers can help him win the contest, which would not only uphold his reputation but also attract more business to Cross Tree.
Conclusion
That will close the book on another location in the village of Cross Tree. While there are some other notable individuals within the village, I am feeling a call toward adventure. I think next week it will be time to start delving into some adventures that use Cross Tree as a hub. Thanks for taking the time to stop by and I hope you have a great week. Good gaming!
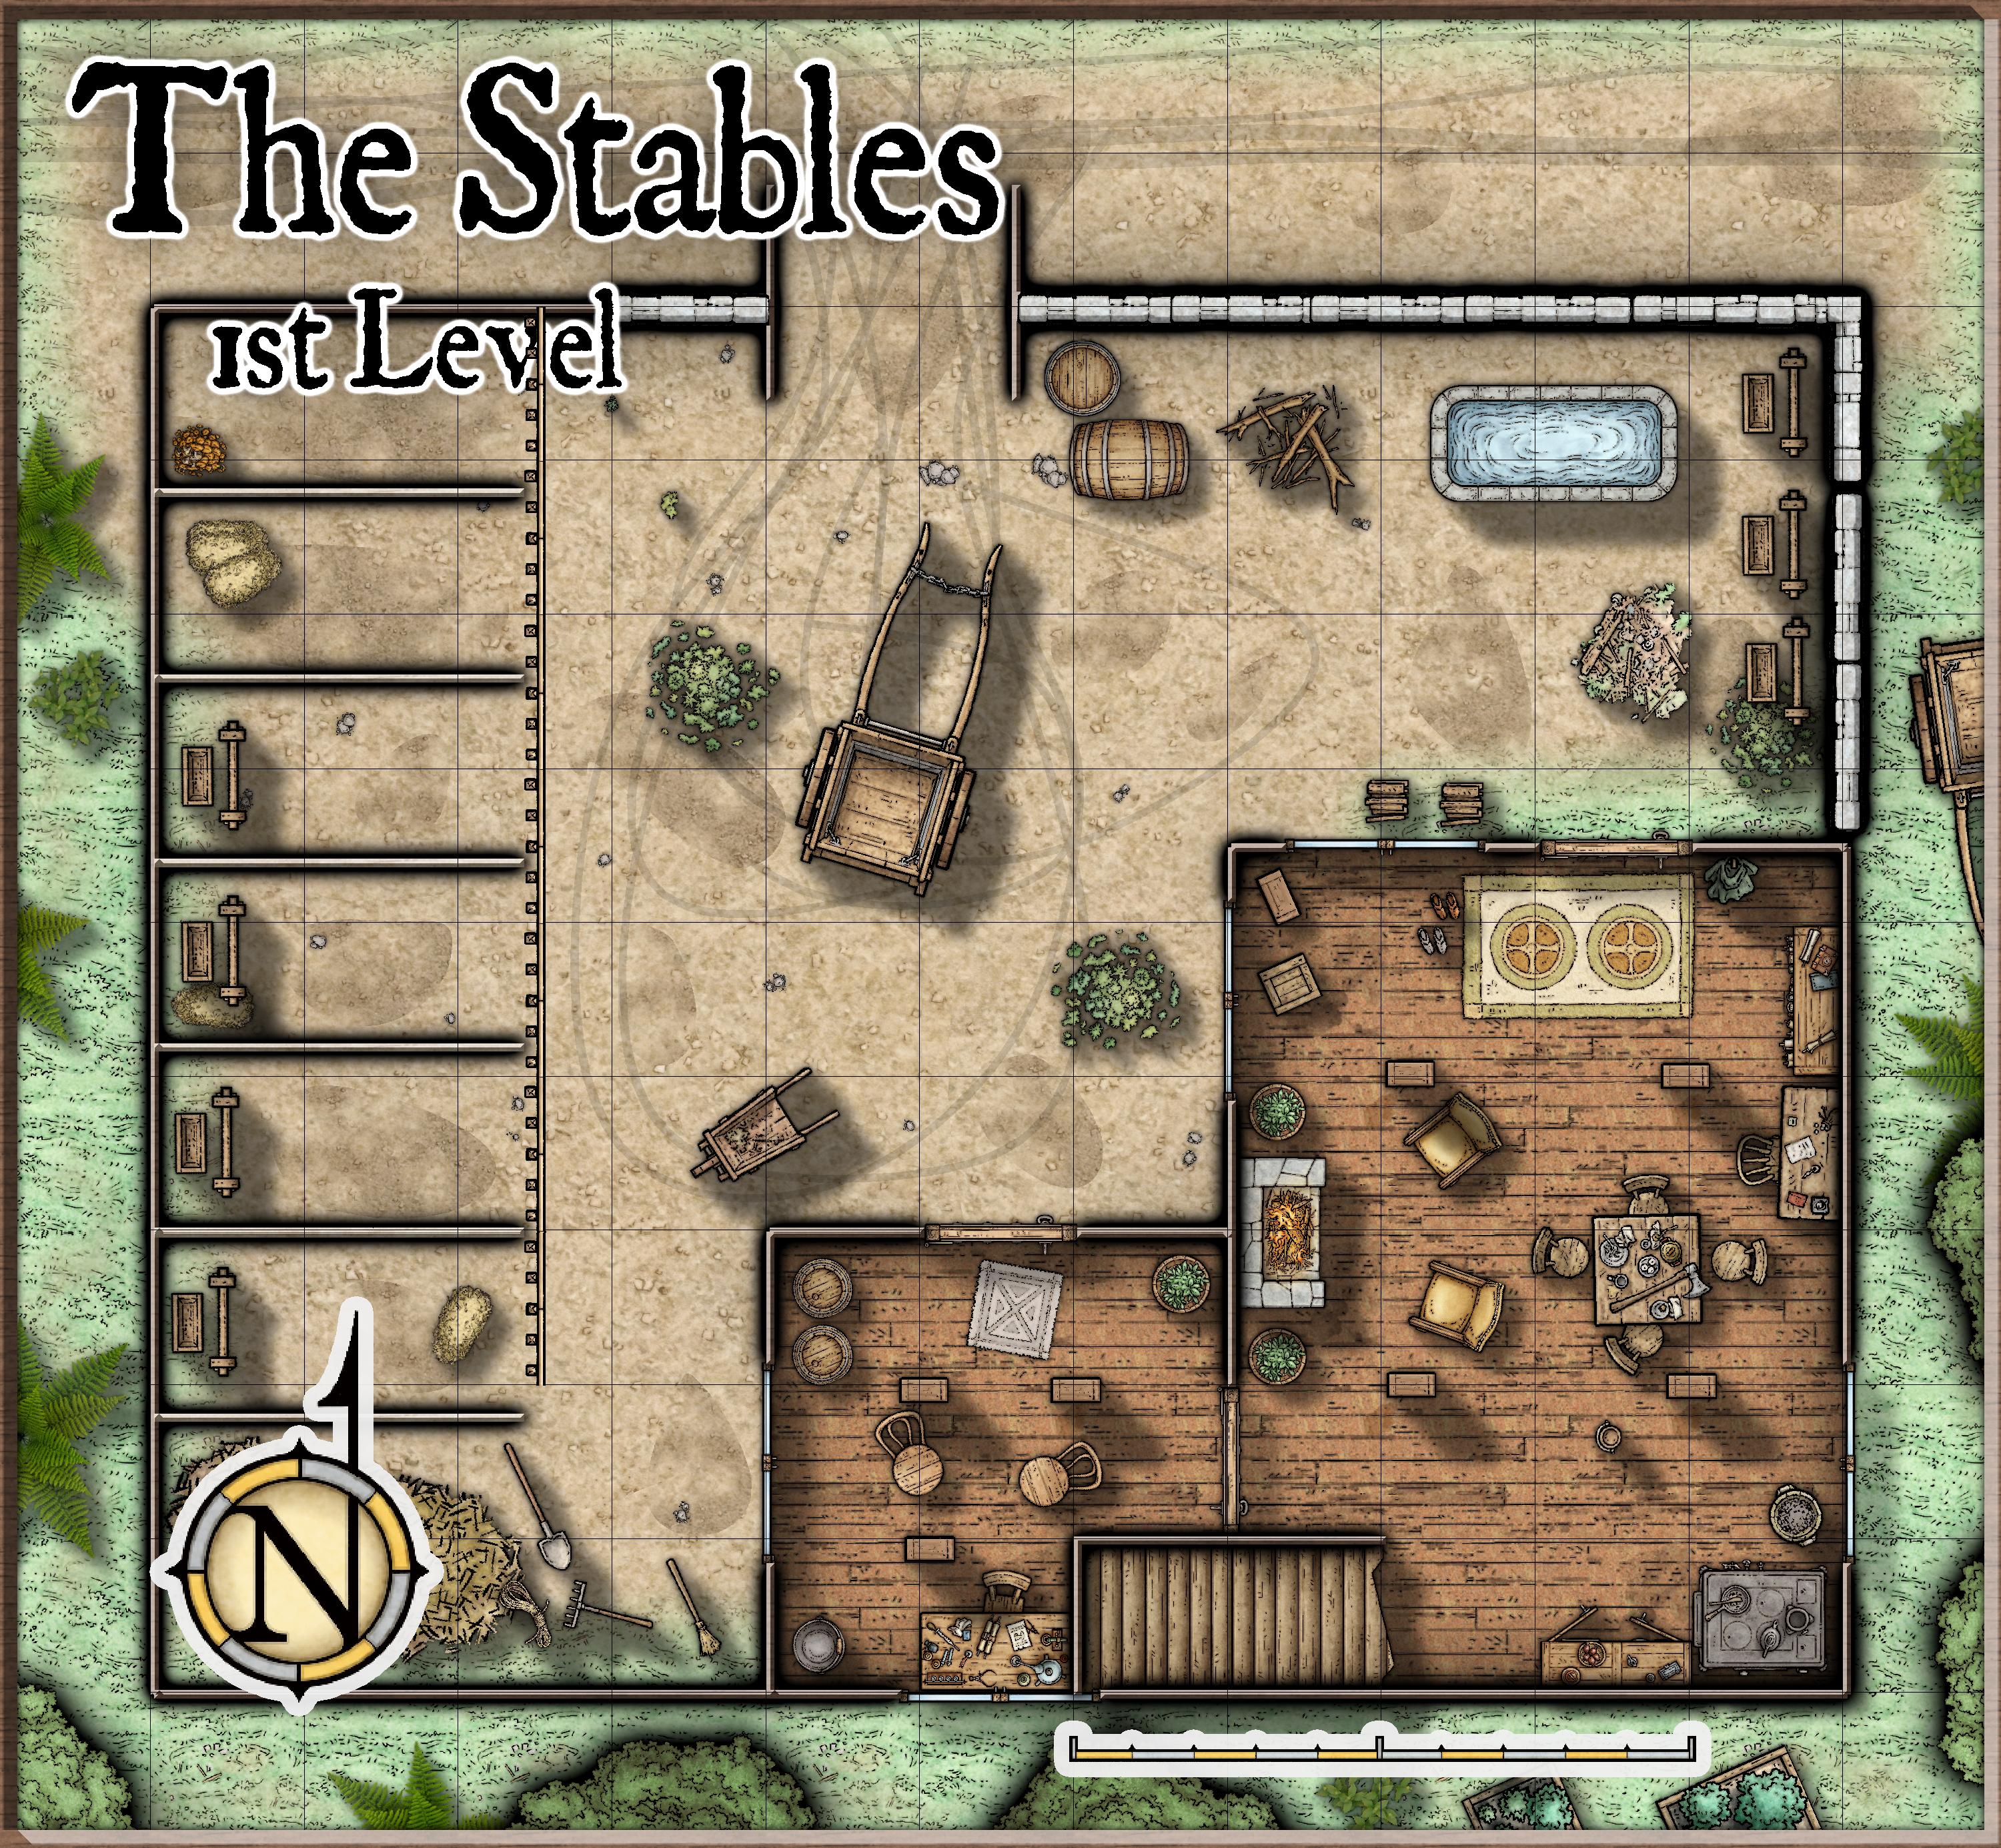
The stables in Cross Tree are located directly across from the Cross Tree Inn. The building itself has seen better days and looks to be in disrepair. A low stone wall surrounds the courtyard, and some chickens can be seen running about. Despite the state of the building, the actual stables appear to be well kept and orderly. It’s clear that the proprietor is taking care of things.
Enough travelers pass through to keep the operation worthwhile for its owner. However, she is new to the town and inherited the property after it had been allowed to go downhill for several years.
The stables. Created with Campaign Cartographer 3+, Dungeons of Schley symbol set.
Taryn Keen is a young human woman who appears to be in her mid-twenties. She has green eyes and auburn hair that falls below her shoulders. Taryn bears a tattoo of a black dragon, just below her collar bone, on her left side. Under normal circumstances, she dresses quite plainly in wool breeches with a linen shirt.
Having inherited the stables from her uncle Benjamin, Taryn has only been in town for a little over a year. She grew up in a large city to the west, where she spent her youth working in her father’s stables.
An adventurer in his younger days, Benjamin Keen had owned the stables in Cross Tree for over 25 years, until he went missing 2 years ago. Townsfolk claim that he had an unhealthy fixation on legends of a lost city somewhere in the vicinity of Cross Tree.
The Village of Cross Tree. Made with Campaign Cartographer 3+, Cities of Schley symbol set.
Rather than operate and take care of his business, Benjamin was known to wander off into the woods for days at time. It is believed that he was obsessed with finding the lost city. On one such expedition, Benjamin failed to return.
When it was clear that the stablemaster was not likely to come back, word was sent to the family and Taryn arrived within the year. Having had a good deal of previous experience, she set about to putting things back in shape. The house itself still needs work but she is getting there.
Besides boarding, Taryn grooms the animals left in her charge and provides medical attention as necessary. She supplements her income by caring for the other beasts of burden and livestock around the town. Her rates would be considered modest compared to whatever is standard in your game. While her operation is too small to carry equestrian equipment, Astolpho & Gina at the mercantile, carry all the basics.
1st Floor
The eastern portion of the ground floor is comprised of Taryn’s living quarters, while the room to the west is what she uses as an office.
2nd Floor
In addition to Taryn’s bedchamber, the 2nd floor consists of a meeting room. While not generally accessible to the public, she may invite the PCs up here for counsel, or to discuss future plans.
Plot Hooks & Encounters
As previously mentioned, Taryn’s uncle Benjamin went missing 2 years ago. What the other residents of Cross Tree are not aware of is that fact that Taryn’s father Adam also vanished around the same time.
• Knowing that both her father and uncle had been adventurers in their youth. Taryn suspects that the legend of a lost city was what lured Benjamin here. It is reasonable to think that she might attempt to hire the party to find out what became of them.
• While out on a ride two weeks ago, Taryn discovered some stone tablets with odd runes on them. She might hire the party to travel to the nearest city and try to decipher them.
• Adam Keen owned a cabin located 3 days west of Cross Tree. Taryn has not been there since she was a young girl. However, she faintly remembers that he kept journals there, detailing his exploits. If she trusts the party, she may give them directions to the cabin and ask them to go retrieve the journals. Obviously, with this and any of the other previous tasks, she would be willing to share any resulting bounty.
• Finally, if the party is simply in need of funds and willing to put in some hard work, there is plenty to be done. Taryn would certainly be willing to hire party members to clean the stables or assist with the process of fixing up her living quarters.
Closing Notes
That will do it for this week’s entry from the town of Cross Tree. I appreciate you taking the time to stop by. If there is anything you would like to see added to the village or you require any tweaks to the maps, let me know in the comments. Until my next post, I hope you have great adventures and a great week!
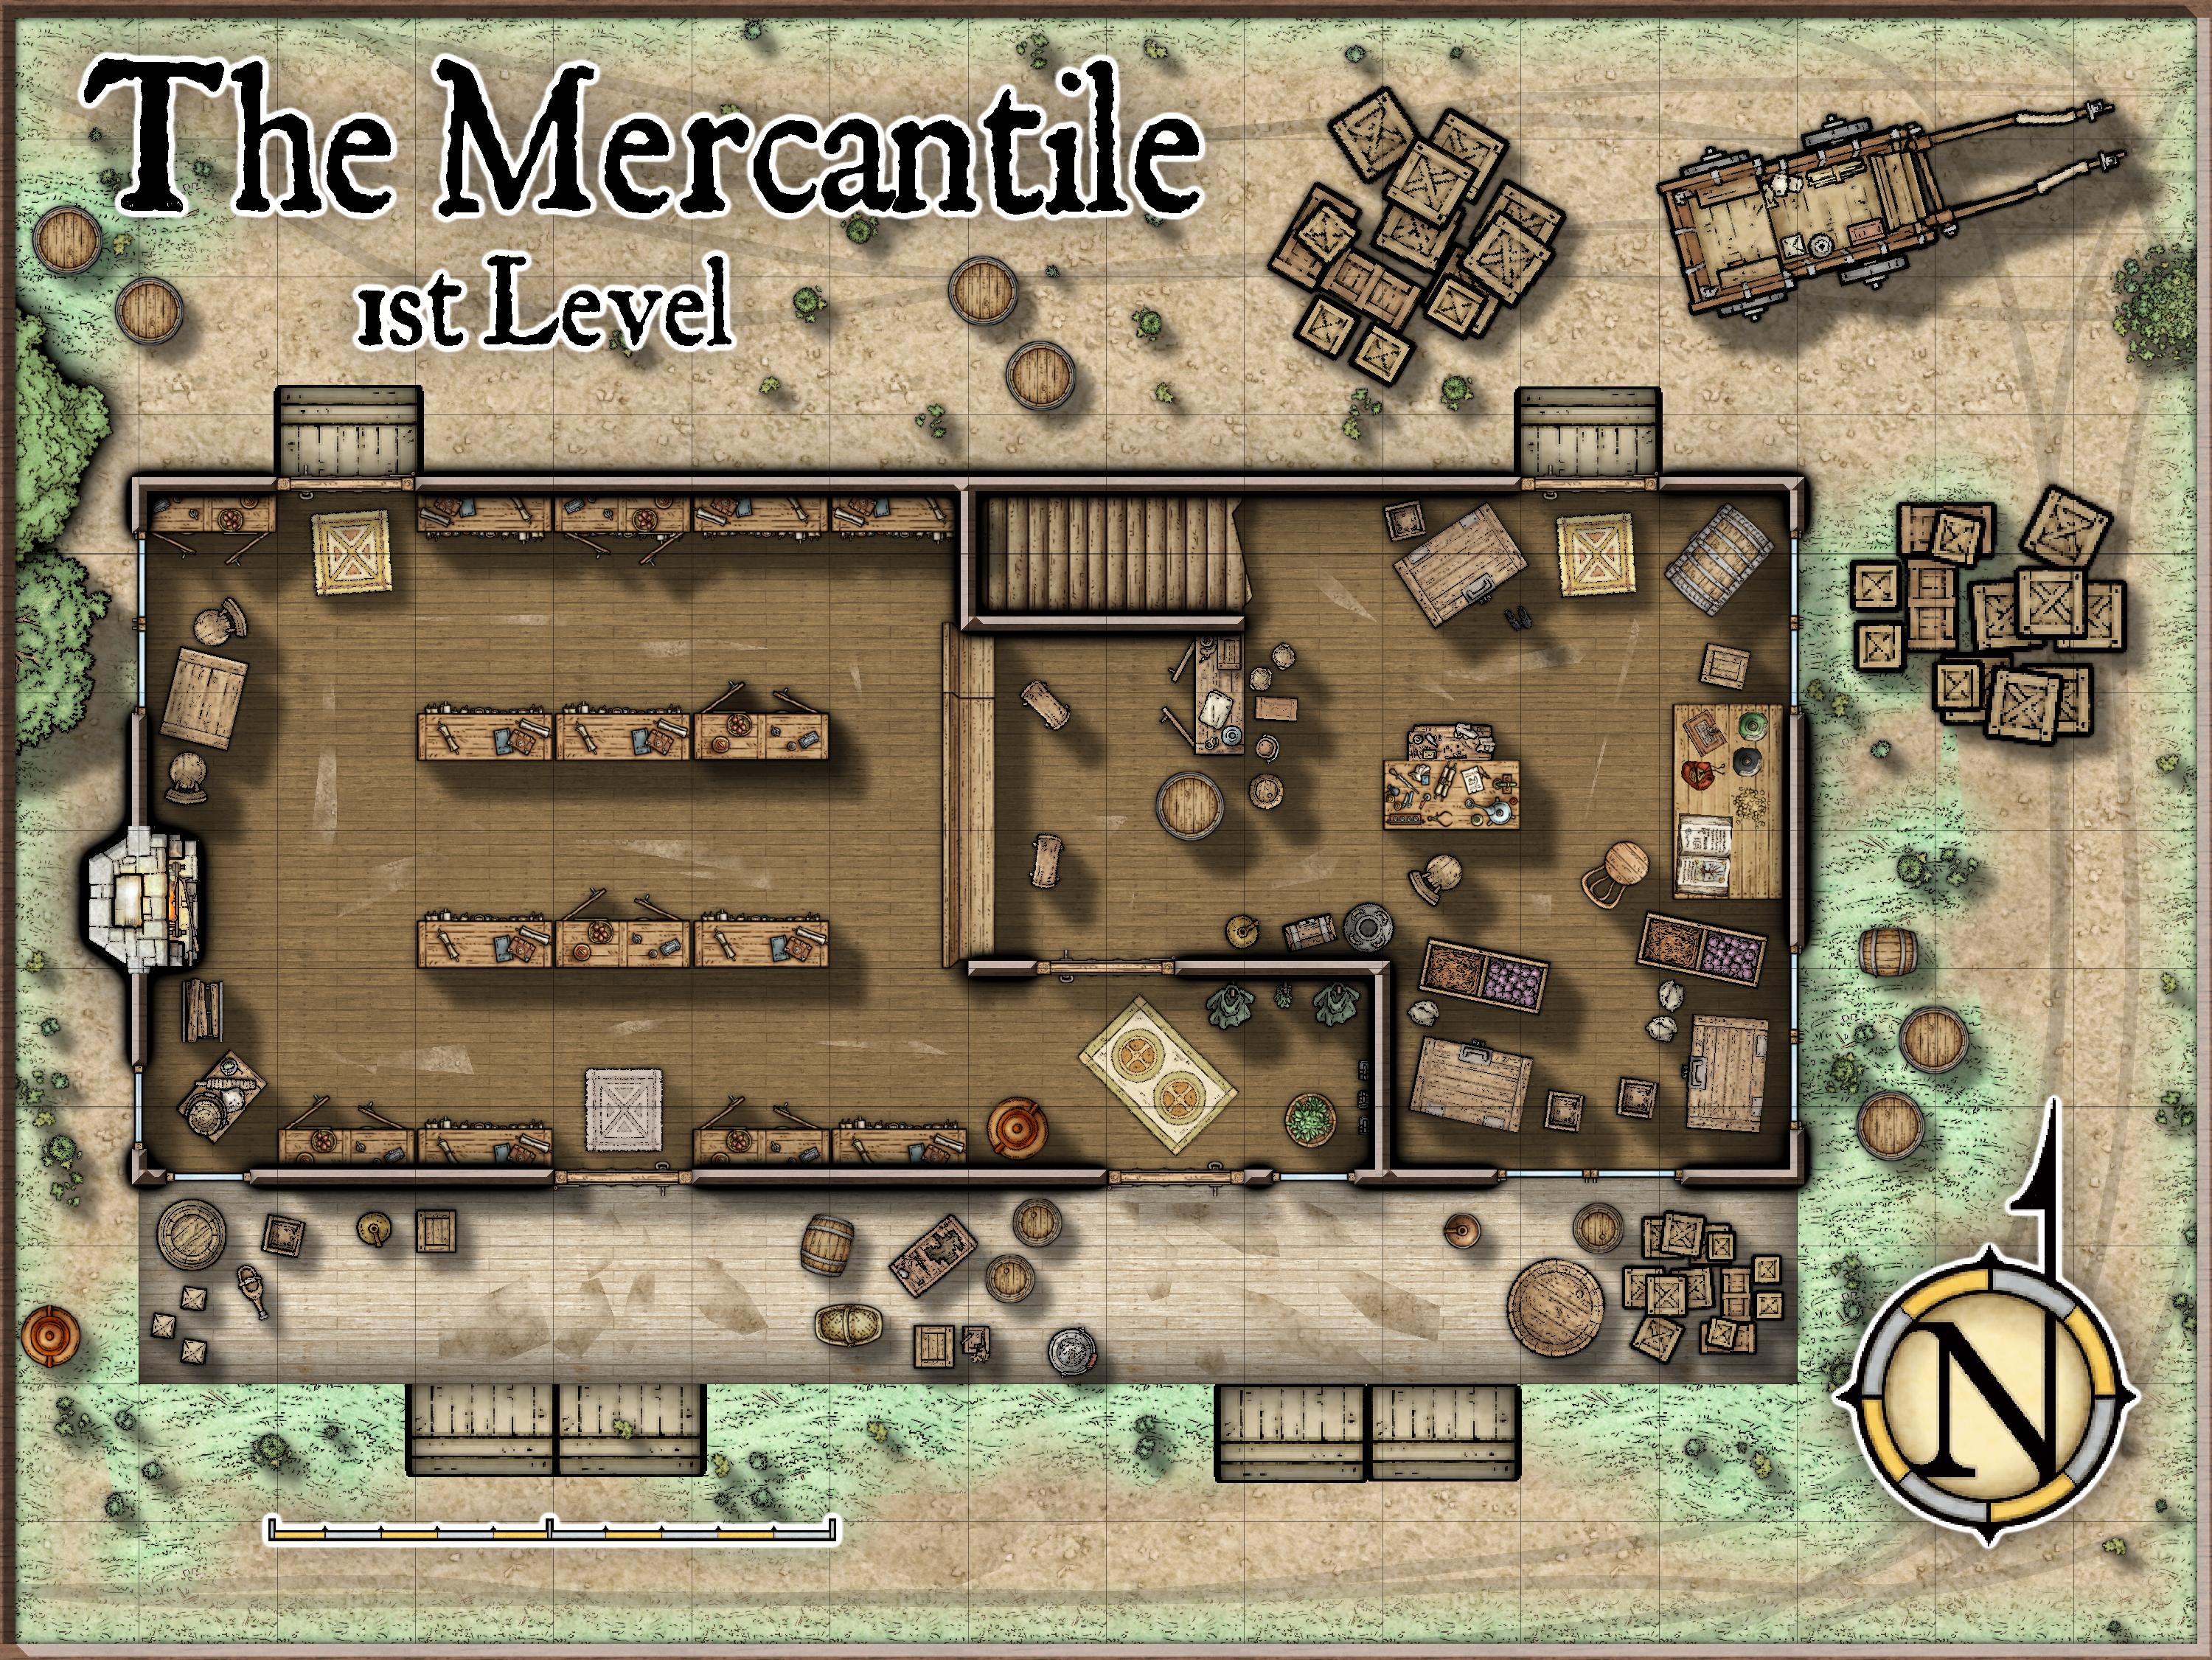
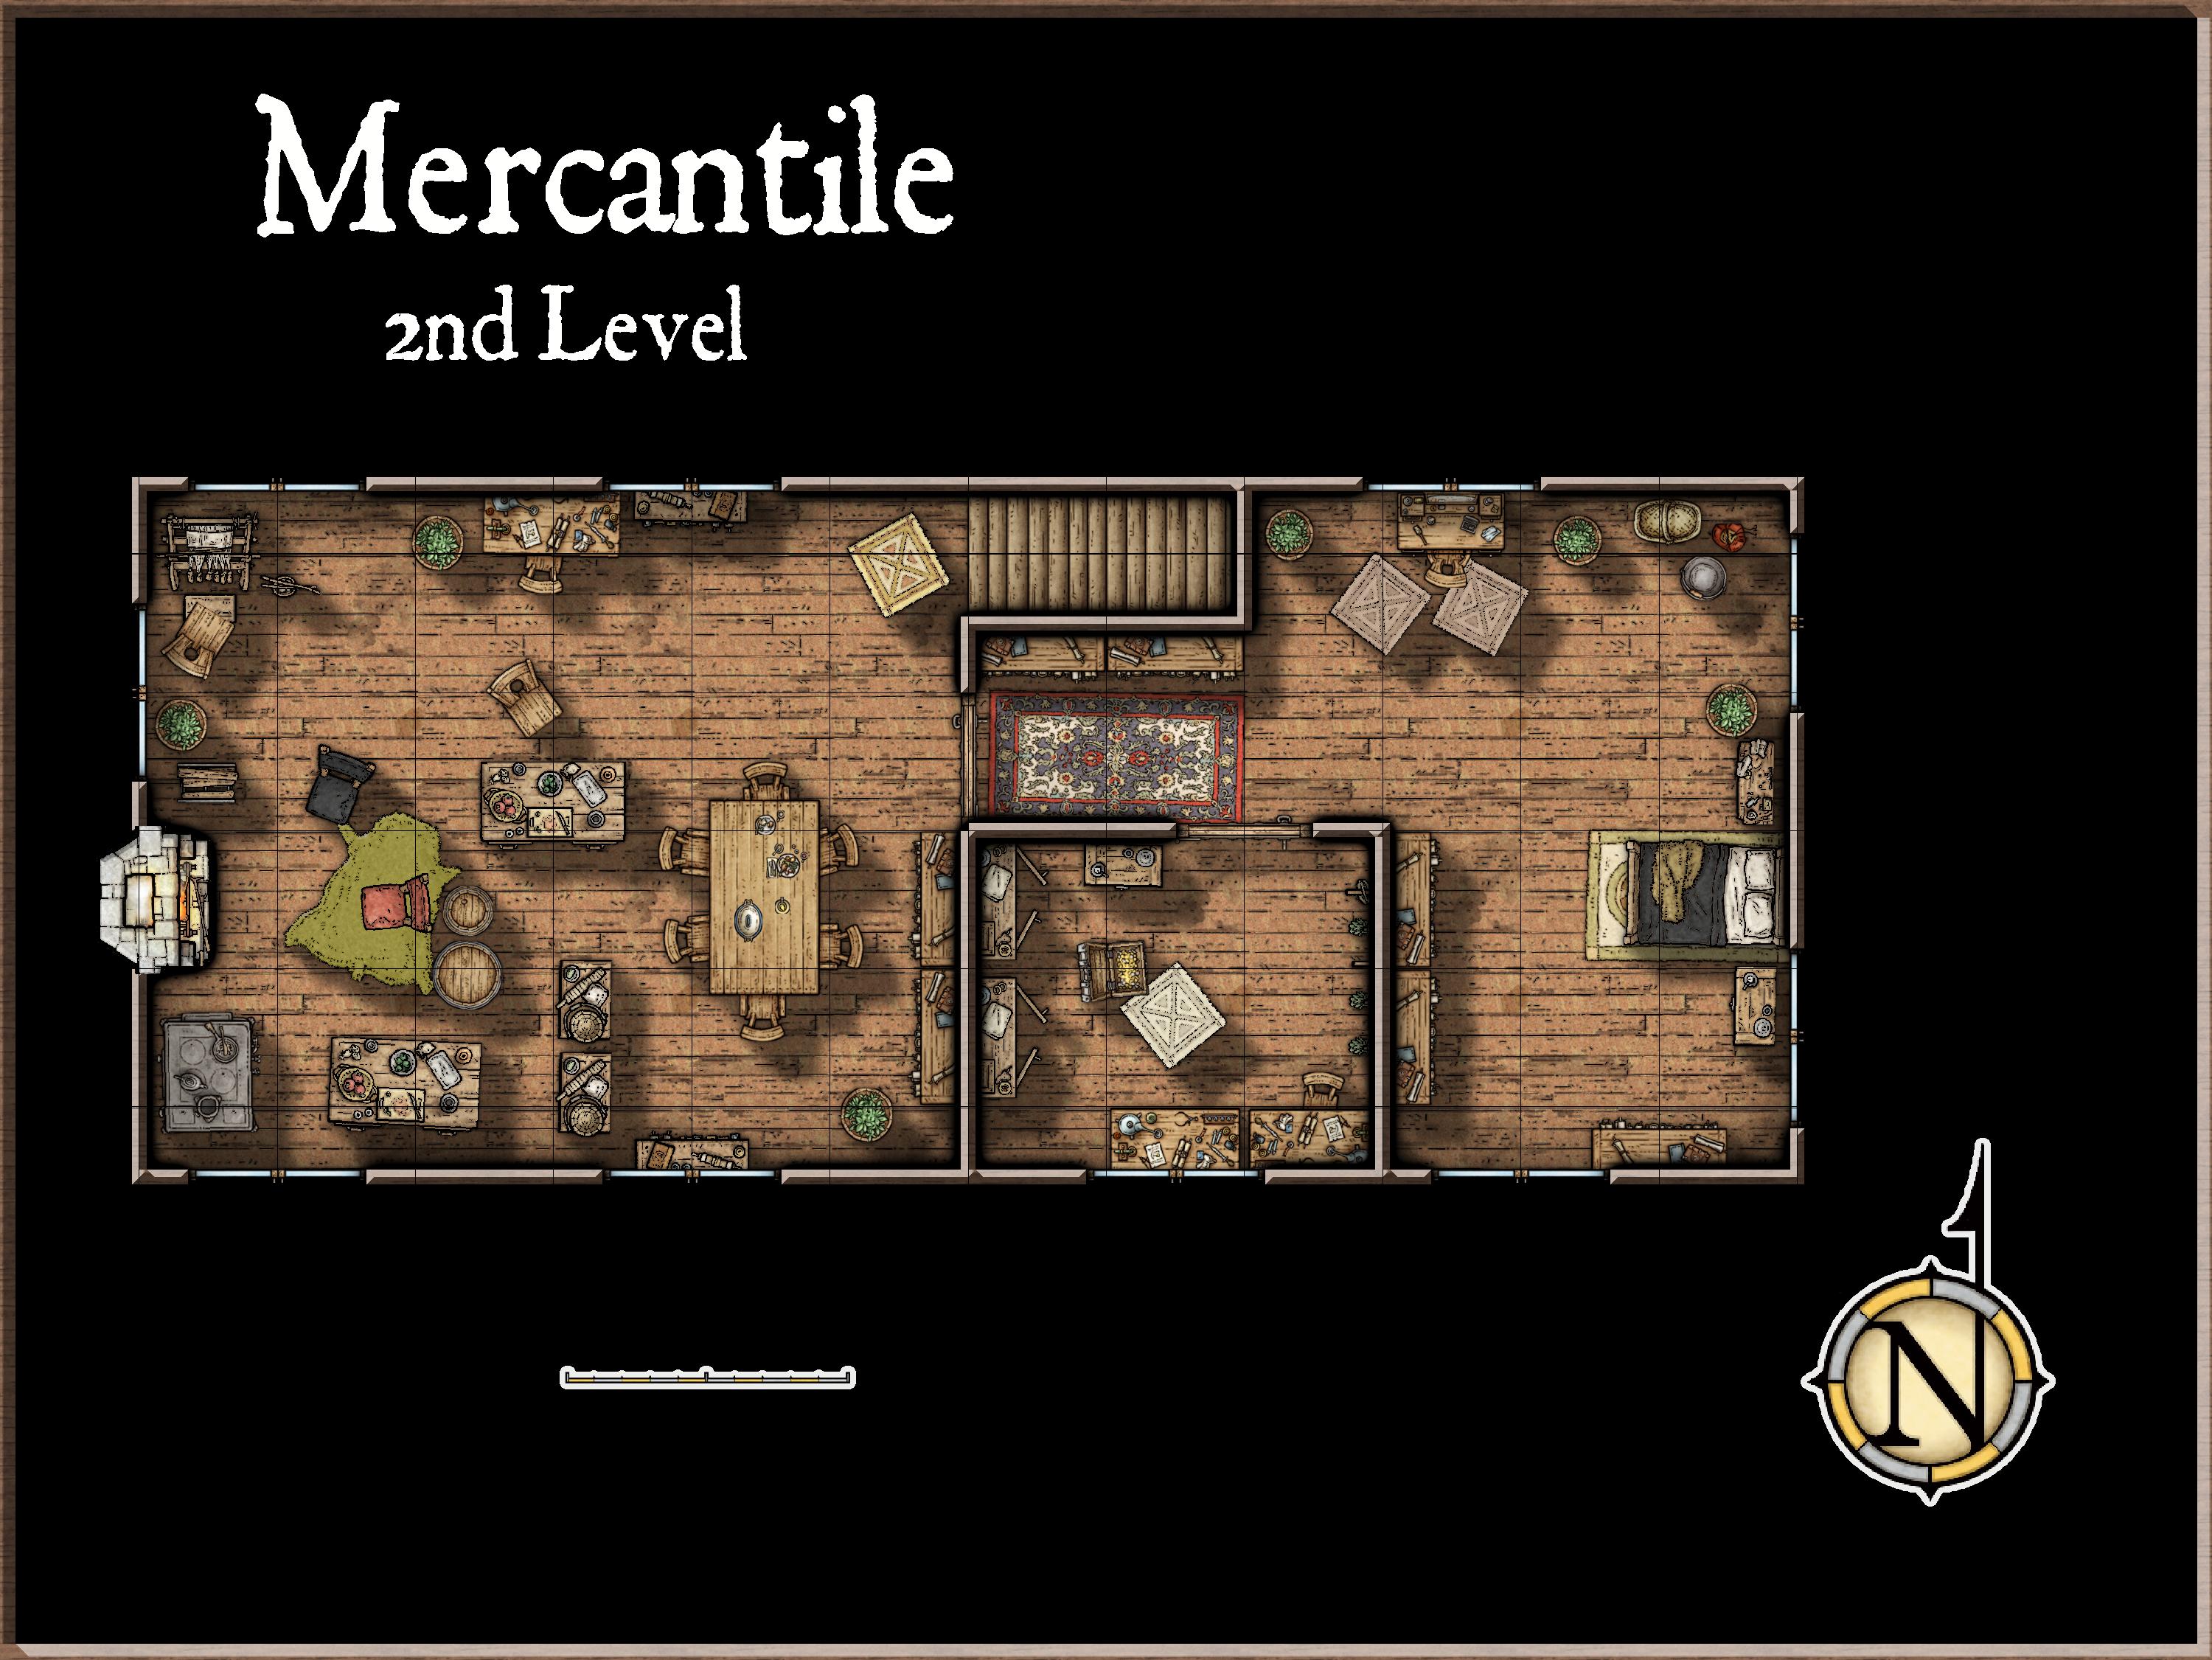
A worn sign above this 2-story oak structure reads “All Manner of Goods”. Easily one of the largest buildings in this settlement, this is clearly a general store. Two short staircases head up to a wooden deck that is home to an assortment of crates & barrels. Just beyond, two doors lead into the establishment.
The mercantile is owned and run by Astolpho Fuchs and his wife Gina. The store is quite large for a settlement the size of Cross Tree. Characters with above average perception will likely surmise that the place must survive due to the extra business brought in by travelers passing through.
The mercantile. Maps created with Campaign Cartographer 3+ using the Dungeons of Schley symbol set.
Astolpho & Gina Fuchs
Astolpho Fuchs. Publisher’s Choice Quality Stock Art @ Rick Hershey / Fat Goblin Games. http://www.fatgoblingames.com
Astolpho is a fit man of roughly 50 years of age. He has black hair, with a neatly trimmed beard & mustache that is starting to show patches of gray. His clothing consists of a simple tunic, woolen breeches, and soft leather boots.
Gina is the same age as her husband, though she appears roughly 5 years younger. She has shoulder length flaxen hair and peaceful green eyes. A sturdy woman, Gina nearly matches Astolpho’s 6’ and she is clearly no stranger to manual labor. A simple linen dress in earthen tones would be her typical attire.
The pair came to Cross Tree 12 years ago. Having been through the area earlier, they came to “get away from it all” and create a new life in this tranquil setting. Unbeknownst to the other inhabitants of the town, the couple are in hiding. Gina was the eldest daughter of a wealthy merchant family in a large city and Astolpho was a member of the thieves’ guild. Already madly in love when the guild decided to target Gina’s family, Astolpho couldn’t stand idly by.
The pair turned the tables on the criminal organization by tipping off the city watch. In the ensuing chaos, they plundered the guild’s coffers and rode off into the night. Knowing that they could never dare return home, the couple eloped and didn’t look back.
They spent years traveling but ultimately settled on Cross Tree as a destination. They have enough wealth to live their lives comfortably, but the store allows them to blend in. As previously mentioned, the store is a bit too large for such a small settlement, but Gina suggested that storing some of their wealth in excess goods rather than gold coins might be prudent.
1st Floor
The village of Cross Tree
The western side of the ground floor is open to the public and contains all the common trade goods, crafting supplies, and tools that might be required by the citizens of Cross Tree. The items would all be priced in a typical manner to what the PCs would expect to find in a large city. This will probably stand out to some characters, since prices in remote areas like this can often be steep.
While arms and armor would not be in great demand in Cross Tree (save for perhaps arrows), the couple do stock quite an array of these items behind the counter. If the PCs inquire about items of this nature, there will be an 80% chance that they stock any common item that might be available based on the game system you are using.
I run a low fantasy game, where magic items are quite rare. That said, if you happen to have the type of campaign where PCs need a place to stock up on potions, scrolls, and the occasional magical armaments, I suppose you could add those to the stock on hand as well.
2nd Floor
The 2nd floor of the mercantile consists of Gina & Astolpho’s residence. While not generally accessible to the public, they may invite the PCs up here for counsel or to discuss future plans.
Plot Hooks & Encounters
As previously mentioned, the couple are on the run. Should anyone from their past find them, it could mean their end. They are rather guarded but if the couple gets to know the party, they may open up to them.
Parties stopping in Cross Tree along the way to somewhere else may be provided information about their destination. Both have traveled extensively and are willing to provide trusted PCs with tips about the workings of nearby larger cities.
Someone from the Thieves’ guild may come looking for the pair and they may need to enlist aid.
Astolpho may receive word that an acquaintance from his underworld days is in trouble. Unable to help himself, he may hire the party to assist.
Gina may approach the party and offer to hire them to transport some valuable merchandise to another settlement.
Possibly Astolpho chose to settle in Cross Tree because he had heard rumors of an ancient lost city hidden away within the depths of the forest. Legends claim that there are fabulous treasures there.
Conclusion
That will close the book on another location in the village of Cross Tree. My laptop bit the dust a couple weeks back and it’s been a comedy of errors shopping for a new device. It’s good to be up and running again. Thanks for taking the time to stop by and I hope you have a great week. Good gaming!
The Ruined Tower. Created with Campaign Cartographer Dungeons of Schley symbol set.
A trail in the northeast corner of the village winds through the woods. Atop a short climb, the remnants of a tower can be seen. Having once stood 50 or 60 feet in height, the upper levels have collapsed over time. The second floor of the structure appears to be somewhat intact, though a large gap can be seen in the wall.
Rubble is strewn about the base of the tower and more can be seen littered out into the forest. Ahead, a wisp of smoke escapes from between two double doors that rest slightly ajar.
The Village of Cross Tree.
The tower itself predates the town of Cross Tree by over 100 years and none of the locals, aside from possible Nicodemus (see below), have any recollection of who built it. Characters with any type of architectural knowledge will easily be able to identify that this structure is from another time.
In my own game, the tower represents one of the last standing traces of a previous civilization. Deep within the outlying forest, there are cave entrances that lead into still accessible areas of this ancient settlement. Swallowed up by the earth itself, a lost city waits to be rediscovered. I will explore some of these locations once the rest of Cross Tree has been covered.
If this doesn’t work for your game, the tower could have an entirely different background. The idea here is to simply give you some interesting locations for your players to visit, without you having to do a lot of work.
PCs exploring the area around the tower will find all manner of debris. Some of this is from the collapse of the upper floors of the tower. The rest consists of odds and ends brought here by the tower’s sole inhabitant.
Unless the party is purposely attempting to be stealthy, the double doors to the tower will swing open enough for a frail figure to emerge.
Nicodemus
With a soft creak, the tower’s doors swing open and a frail old man appears. Fairly tall, though stooped a bit, he walks with the help of an oak staff. His tawny skin appears leathery and wrinkled, as if from years of exposure. Pulling back the hood of his stained maroon robe, his long white hair and beard make for quite a sight.
“Oh heavens! I have visitors it seems” the old fellow mutters, as his eyes dart around and size up the party. “I’ve not seen you people before. Are you lost?”
Nicodemus has lived in the ruined towed for nearly 5 years now. Prior to that he had been a frequent visitor to the area but none of the locals knew too much about him.
The general thinking of the townsfolk is that the tower is not safe for habitation and they are likely right. However, Nicodemus doesn’t interact a great deal with anyone from town. Every so often, Killian from the Cross Tree Inn (location #1) will try to persuade Nicodemus to take up residence at the inn but up to this point these attempts have failed.
Play Nicodemus as a bit mad and a bit mysterious. He exists here as a device for you to feed information or plot hooks to your players. Outside of possibly Leagis (from area #2, the Church) Nicodemus is the only resident who you could really call “worldly”.
He knows a great deal about a great many things but should always be a bit cagey about what he reveals and how he reveals it. Whether Nicodemus actually has any magical abilities is largely up to the GM. Here are some possible angles for Nicodemus, to allow him to fit seamlessly into different styles of games.
Perhaps you make him a great mage, having him be the wise mentor who knew the party was fated to show up on his doorstep.
He could be a part-crazed soothsayer who constantly mutters to himself, while reading tea-leaves and tossing chicken bones to foretell the future. Whether charlatan or gifted fortune teller will be up to the party to decide.
Nicodemus could be an arcane dealer of sorts, prepared to sell different potions, charms, or wards to the party.
Possibly he plumbed the depths of a lost city in his prime, only to be left behind by his comrades. Having spent years as the prisoner of some unnamed horror, he is now quite mad.
Regardless of which route you take Nicodemus is a good-natured sort. He will size up the party and if he believes they have good intentions, he will try to help them. That’s not to say that he will necessarily be forthcoming with his help or information. It’s certainly possible that he may speak in riddles or test the PCs in order to ascertain their intentions.
1st Floor
If the party is friendly from the offset, it is likely that Nicodemus will invite the party inside. The double doors open to a chaotic scene and the heavy scent of smoke and incense.
All manner of junk is piled up within the 1st floor of the tower and the old man has a campfire burning away, near a breach in the wall. Any characters with reasonably high skills of perception are likely to notice a mouse (or other small mammal) skittering for cover as the party enters the room.
Despite the clutter and debris, Nicodemus seems to know his way around the mess and is always able to deftly find what he is looking for amongst the rubble, crates, and boxes.
There are drawings and what appear to be maps scrawled with charcoal on the walls. What they depict and whether Nicodemus will discuss them is largely up to the GM. Two desks are arranged on either side of the room. While they are cluttered, it does appear that they have been painstakingly laid out, allowing Nicodemus to focus on his studies. A spiral staircase leads up to the 2nd floor.
2nd Floor
Every bit as cluttered as the first floor, the walls of this section of the tower has been breached to the northeast and southwest. This allows the weather in, along with the occasional bird or bat.
Arriving from the first floor, it will be immediately evident that the stairway going up to the higher reaches of the tower is completely blocked with rubble. Rubble is strewn about on the creaky wooden floor and PCs who are invited up to this level of the tower should be made to feel that the floor could cave in at any time.
Plot Hooks & Encounters
A lot of what Nicodemus has to offer is going to depend on your game, the level of magic in your world, and what role you need him to play within your campaign.
Other townsfolk might direct the party to Nicodemus in order to identify some item they have found or to seek answers about some quest that they are on.
As with Karia from the Cross Tree Inn, Nicodemus may charge a young party with venturing out into the woods to secure certain components for him.
Perhaps he knows of some impending trouble threatening the area and identifies the party as being just the right group to tackle it.
Seeing a yearning for adventure in the party, Nicodemus might share with the party what he know about a lost city, deep within the forest.
Closing Notes
That will do it for this week’s entry from the town of Cross Tree. I appreciate you taking the time to stop by. If there is anything you would like to see added to the village or you require any tweaks to the maps, let me know in the comments. Until my next post, I hope you have great adventures and a great week!
The Church of Cross Tree. Created with Campaign Cartographer Dungeons of Schley symbol set.
This 2-story oak structure is clearly a church. Modest in size and design, this building appears to have been built more recently than most of the other dwellings in town.
To the left of the building, a waist-high hedge neatly frames a small graveyard. The plots and grave markers seem to be well tended. There is a general feeling of peace about the place and the pleasant scent of incense is in the air.
The church of Cross Tree burned to the ground under mysterious circumstances roughly 15 years ago. At the time, it was a largely unused structure, as it had been quite some time since the settlement had been home to any members of the clergy. The site sat vacant for nearly 5 years, until its current inhabitant came to town.
The Village of Cross Tree. Created with Campaign cartographer Cities of Schley symbol set.
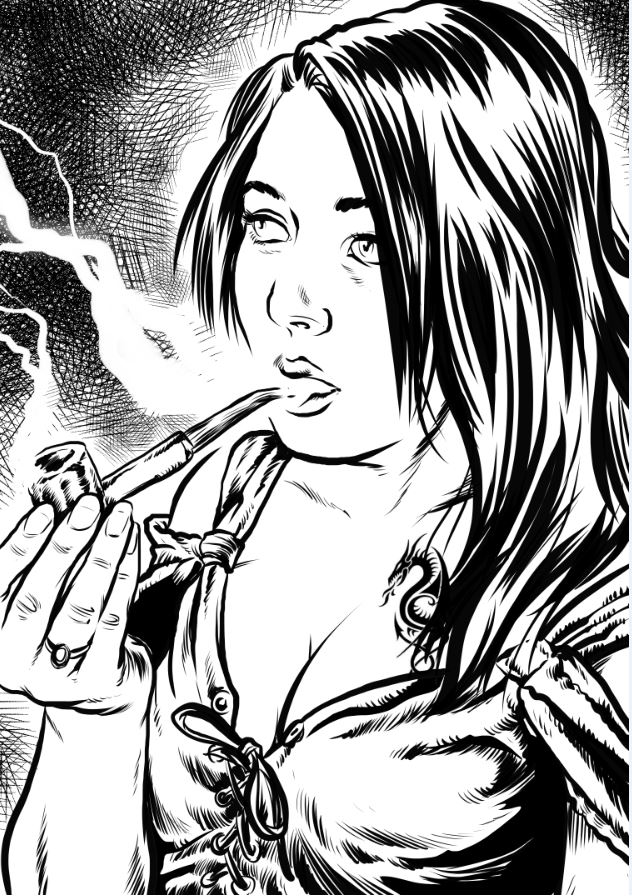
Leagis Kormou
Leagis Kormou is a 42-year-old human woman. She has olive skin and long, white hair that trails down nearly to her waist. While she has a stern brow and piercing green eyes, there is a sense of peace about the woman that is disarming to guests.
Leagis Kormou. Art by: Daniel Comerci – danielcomerci.com.
It will immediately be clear to PCs that Leagis is not originally from this area. In my game she hails from a chain of islands far to the south, though select her place of origin based on what works for your campaign setting. Leagis is a priestess of a nature deity. If your world lacks a divine being who happens to be focused on nature, any good-aligned god or goddess should suffice.
The cleric spent her youth traveling the world, possibly even clocking in some time as an adventurer. As the years passed, she found herself more focused on her religion and wanting to settle down. Cross Tree provided a logical place to put down roots. Nestled deep withing the forest, Leagis can commune with nature while also sharing her faith with her modest flock.
Arriving in town roughly 10 years ago, Leagis began restoring the old burned church structure on her own. As the days passed, other townsfolk would come to lend a hand. Often they would work together by day and then take part in her fellowship and break bread together in the evening. Some of the materials for the new church were brought from the ruined tower to the northeast of town.
Whether Leagis possesses any magical abilities from her deity will be left to the GM’s discretion. It is certainly possible that she may have the ability to casts lower level spells. However, I would suggest drawing the line at allowing her to have the power to raise the dead or even heal very serious afflictions.
The priestess is very welcoming to outsiders and will certainly be curious about their travels. Having travelled extensively herself, Leagis may be able to share information with the party about areas far from Cross Tree.
1st Floor
The nave and sanctuary take up most of the 1st floor of the church. Both are decorated simply, in woodland colors. Both the pews and altar are fashioned from downed oaks found in the forest.
Close to the entrance are two storage closets. Tools are kept here for tending the graveyard, as well as decorations for different festivals throughout the year. Leagis also keeps a small office on the first floor.
2nd Floor
The 2nd floor of the church consists of Leagis’s residence. While not generally accessible to the public, she may invite the PCs up here for counsel or to discuss future plans.
Plot Hooks & Encounters
As previously mentioned, Leagis has travelled extensively. She should provide you a good tool for disseminating information to your PCs. It is also possible that she may have use for their help herself.
Parties stopping in Cross Tree along the way to somewhere else, may be provided information about their destination.
As a priestess of a nature deity, Leagis may enlist the help of the party to investigate some strange goings-on within the forest. Perhaps some strange malady is affecting local wildlife or a queer blight is killing off vegetation.
Leagis recently buried a traveler who died while staying at the Cross Tree Inn. The man’s only personal effects were a strange metallic device and a map to a location that would take two days to travel to from here. The cleric may enlist the party’s help in learning more about the map and the device.
From her traveling days, Leagis may be aware that there is rumored to be an ancient lost city hidden away within the depths of the forest.
Conclusion
That will conclude another post about the town of Cross Tree. Until I write again, I thank you for reading and hope that you may find yourself enjoying a game soon. Cheers