The port town of Hughgrot lies along the southern coast of Archia, on the shore of the Zarhut’lm sea. A forsaken naval outpost, its abandonment became a siren call for pirates, smugglers, and a motley crew of those who preferred life in the shadows.
Made in Campaign Cartographer. I primarily used the Cities of Schley symbol set but added some other touches as necessary.
This coastal haven, colloquially known as “The Underbelly,” bustles with clandestine dealings. An unspoken code, rather than formal laws, governs its narrow, chaotic streets. Leaders of shadowy factions pull strings from behind the scenes, understanding that too much noise could attract the unwanted gaze of Archian authorities.
Nestled along the eastern shore, Hughgrot sprawls around the mouth of the river Alum. Weather-beaten docks stretch into the bay, bearing witness to the constant flow of contraband. A handful of warehouses are located on eastern edge of town, storing the storing various ill-gotten goods. Ramshackle structures and makeshift stalls cling to the shoreline, where dubious transactions play out on a daily basis.
Hughgrot is melting pot of architecture from different eras. Sturdy remnants from the Archian days stand beside hastily assembled buildings of questionable design. Here and there, traces of orcish construction linger-a testament to the time when the orc shaman Grondo-Ri and his warband claimed residence here.
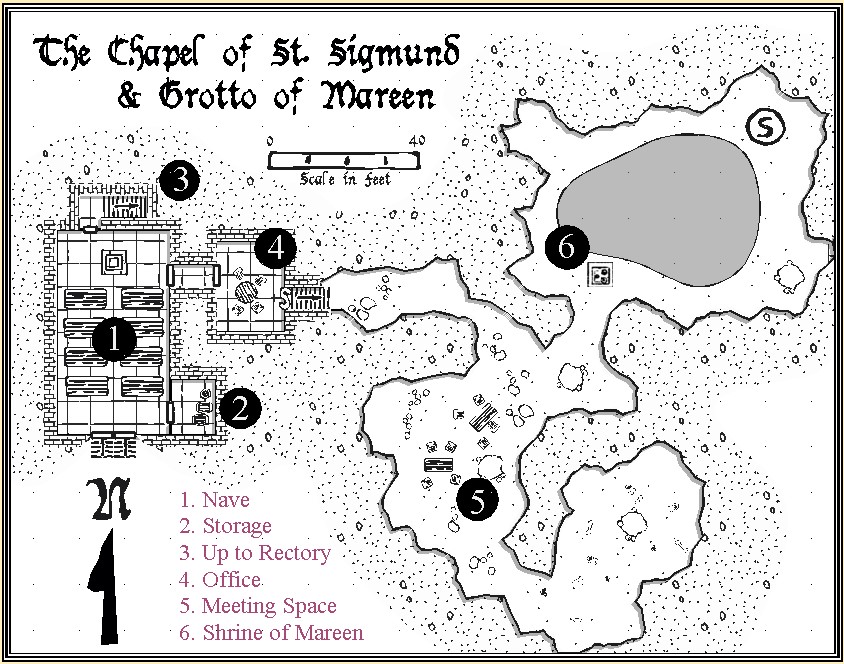
An old church of Mareen crowns the cliffs to the north. Though lacking in followers, it stands unmolested. Superstitious as they are, seafarers offer a wary nod to the goddess of the seas.
Hughgrot’s streets echo with the tongues of many different races and cultures, each telling the tale of trade, and survival. Secrets are currency, and every shadow hides a story. Those who dare to visit are best suited to mind their own business and watch their backs.
Conclusion
This week’s map is another creation that sprang forth from my friend Mike’s Fantasy Hero campaign, back in the 1980s. I have used it regularly in my games ever since. I think a place like this fits into almost any campaign, so I figured it was time to make a proper map of it.
Do you have a seedy town in your campaign? Do your players have a place to go when they need to acquire that rare spell component or elusive bit of information?
I appreciate you taking the time to visit. I hope you’ve enjoyed the holiday season and are getting some much-needed free time to spend with your hobby. Good gaming!
For hundreds of years, the residents of the northern shores of the Sea of Harne have been followers of the cult of Mareen. These simple seafaring people regularly sacrificed a portion of their catch to the brooding queen of the seas, in hopes of fair weather and bountiful waters.
As the Graun Empire’s influence spread over the land, the church of Aunul grew in power. Sailors spread word to the seaside communities that the emperor and his ever-present religious advisors did not view worship of the elder gods as acceptable.
Fearful that inquisitors would arrive one day and brand them as heretics, the residents of Hammondsport acted. A new chapel for the church of Aunul was constructed over the underground grotto that housed their shrine to Mareen. In a comical twist, the chapel was named after a St. Sigmund, a devout follower of Aunul who drowned while trying to spread the faith.
The community goes through the motions of having shifted to the faith of Aunul. However, it is largely a show for outsiders. On all of the old holy days, townsfolk don their robes and meet, well after dark. Slipping through the secret door located in the office, they make their way down into the grotto. There they gather at the altar and make their sacrifices to Mareen as they have for generations.
If you’d like to browse through all of my other maps with plot hooks, you can find them all collected here.
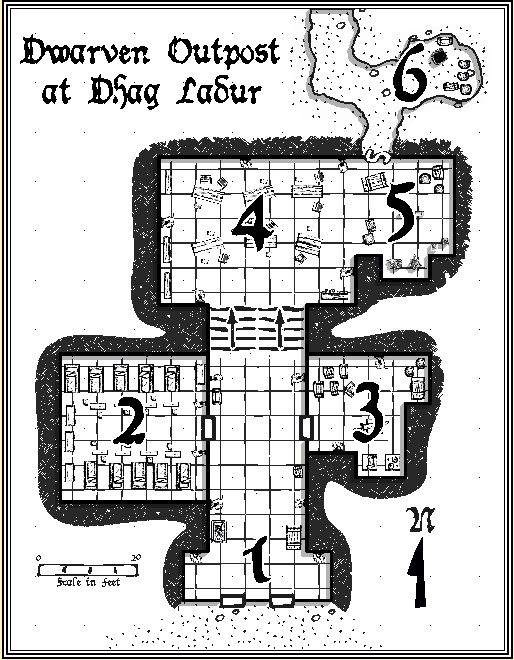
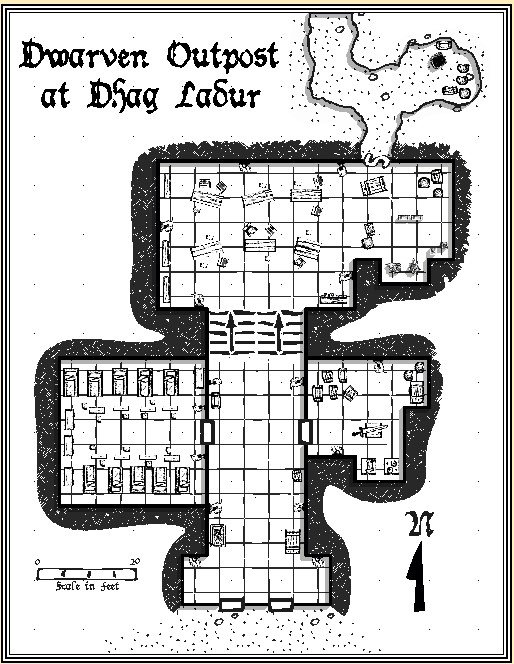
The dwarves of Khared Draz hold the Iron Mountains from Nur Badur in the south, all the way to the frosty Borean border in the north. This simple outpost found at the pass of Dhag Ladur is typical of watch posts found throughout the region.
Entrance: Built into the side of the mountain, double doors reinforced with iron bands mark the entrance to the outpost. 2 sentries are always stationed at the entrance, while 2 others roam further afield.
Dormitory: 10 soldiers are stationed at the outpost during any given time. During each 2-week stint, this room is where they store their belongings and get their sleep. The furnishings are modest but sufficient.
Armory: Weapons are stored and cared for in this small room. A small forge is located on the southern wall and is vented to the outside.
Mess Hall: This spacious room is where you can find most of the dwarves when they are not on duty or asleep. Long benches run the length of the room and a fire is kept burning around the clock.
Kitchen: This isthe command center for the cook. Meals are prepared and ale is provided throughout the day for soldiers who are not on duty.
Tunnels: The tunnels can be accessed through a secret door located in the kitchen. The small cavern to the east house spare supplies and a well. In the event of an attack, the dwarves have the option of barring the entrance and retreating into the tunnels. The tunnel to the north twists around and leads to an alternate exit from the mountain.
Thanks for stopping by. This week’s map was made with Campaign Cartographer, using the “Annual Inked Dungeons” style. Hope you have a great week and manage to fit in some time to roll some dice. Good Gaming!
If you’d like to browse through all of my other maps with plot hooks, you can find them all collected here.
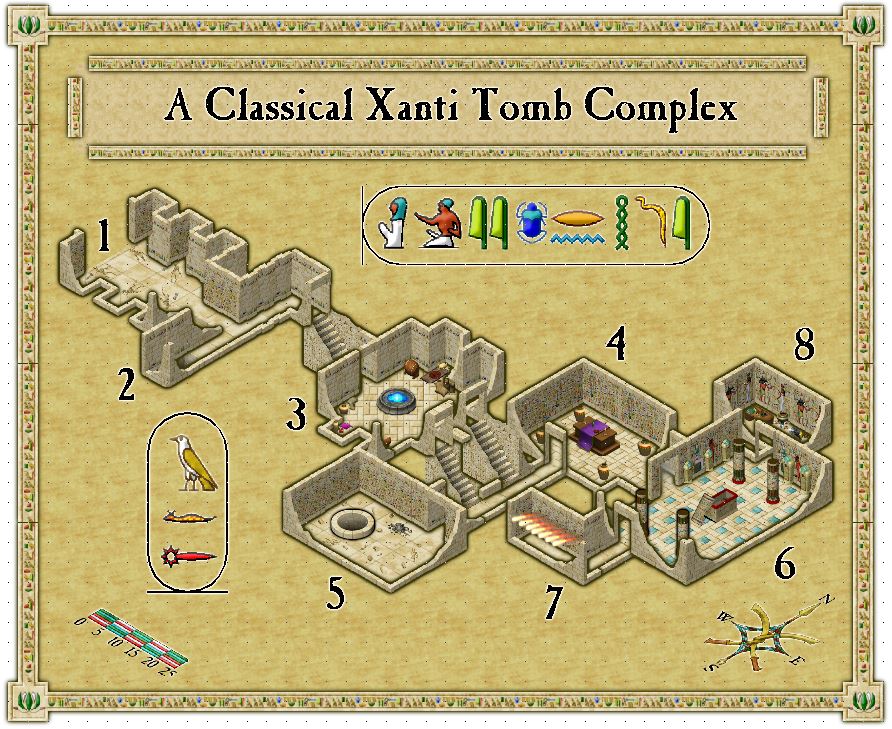
In ancient Xanti, there is a common belief in reincarnation. Among the worshipers of the cult of Kaa, tradition dictates that wealthy nobles be buried along with their belongings, in elaborate tombs.
The tenets of their faith claims they will be reunited with their possessions in their next life. Whether this be truth or folly, only the gods know. However, woe to the dessert thief who tries to claim these riches for herself.
-Bhagiro Hatti, Gowandian Scholar
1. Entrance
The entrances to Xanti tombs are often built into the side of canyon walls. Purposely left open, as a welcome to the gods, they are occasionally sealed off with sand from blowing desert winds. It is believed that when a tomb is sealed off in such a manner that the inhabitants will be forsaken by their deities and lose their opportunity for everlasting life.
While not sealed, Xanti tombs are not without their protections. Necromancers place tomb guardians in the form of skeletal warriors at the entrance of the complex. This particular tomb holds 6 such guardians in niches to the left and right of the entrance.
Each armed with a khopesh, these skeletal figures will remain lifeless unless someone intrudes on the tomb. Once disturbed they will animate and seek to eliminate the threat.
2. Dead End / Pit
This corridor halts at a dead end, with a 10’ deep pit. To the inexperienced, this may at first seem to be a very obvious trap. However, this is actually a very purposeful key to the tomb, placed by the architect.
Any who have studied ancient Xanti burial rights will know what this portends. This signals to any future caretakers that the safe pace through the tomb is to take the leftmost choice at any intersection.
3. Offering Room
This room contains 4 ceremonial offering niches, where well-wishers could visit, prior to the tomb being sanctified. They would fill these niches with all manner of offerings for the departed, in a belief that this would curry favor for them in the next life.
In the center of the room a pool of water gives off an eldritch blue glow. The pool with radiate as magical if any with the ability to check for such things happens to do so. Exactly what its properties are is a secret lost to time. However, legends tell that supplicants leaving offerings would drink from the well to receive a boon from the gods.
The pictured tomb is that of a mid-level noblewoman. Of the present offerings, most are fairly mundane sundry items. There are sacks of old grain, olive oil, bottles of wine that have long since turned to vinegar, and bolts of linen. A close search will turn up a gold scarab pendant and a garnet ring that are both finely crafted.
4. Shrine
This room is the shrine where priests of Kaa would give their final prayers for the departed. During these ceremonies, 4 earthen-ware vessels bearing cobras would be placed within the room as part of the invocation ritual. The reptiles are long since dead and likely nothing remains of them.
This floor of this room is littered with a number of old bones. The opposite end of the room is dominated by a well that is 10’ in diameter. After crossing the threshold to this room, PCs will hear a skittering noise coming from the well. Within 2 rounds of this, 4 giant beetles will emerge from the hole and attack until slain.
If explored, the pit will be found to descend 30’, though there are numerous tunnels branching off in other directions. These other tunnels have been created by the beetles. They are not large enough to stand up in, susceptible to collapse, and parties unwise enough to venture into them should meet more beetles promptly.
6. The Burial Chamber
This ornately decorated room is the burial chamber itself. The noblewoman’s sarcophagus dominates the center of this pillared room, while those of her 8 attendants line the northern, western, and southern walls.
These three walls are adorned with detailed paintings depicting scenes from the life of the departed. The eastern wall is reserved for images of what she hopes for in her new life.
7. Fire Trap
Those foolish enough to cross the threshold from the burial chamber into this L-shaped hall will immediately hear an audible click. However, nothing else will happen at this time.
If anyone walks forward to the right-angle and then follows until the dead end, they will be in for a surprise. As soon more than 5 lbs. of weight is placed on the 5’ section of tile at the dead end, 7 gouts of flame with shoot out from holes on the right side of the wall.
The flames will persist until there is less than 5 lbs. of weight being applied to any of the 3 east-west floor tiles marked with flames on the map. However, after 4 rounds the mechanism will run out of fuel.
If specifically searching, perceptive characters may notice the small holes in the wall.
8. Treasure Room
This room would contain the worldly treasures of the departed. While there would certainly be some coins and gemstones, other items dear to the individual would be here as well. Bolts of fine silk, oils, and incense would be common among such items. In addition, books of arcane knowledge might be stored here for safekeeping until the afterlife.
Final Notes
That wraps up another week. Again, this isn’t intended to be a full-on adventure but I thought perhaps that this might get the creative juices flowing for some of you. Please let me know if any of this sets your mind to wandering. Hopefully, instead of dreading the new work week that is quickly approaching, you’ll be able to let your thoughts drift a bit to future sessions around the gaming table. Good gaming and have a great week!